| 根據Google資料顯示,其資料中心PUE值平均僅為1.21,他們是透過建立冷熱通道、提高電源供應器的使用效率、使用蒸發式的冷卻水塔等,來降低資料中心的耗電量。 | |
| 說到Google,或許你曾使用過Google的Gmail、搜尋引擎等服務,但你一定不知道,當使用Google搜尋時,使用者個人電腦所耗費的電力比起Google系統回應使用者需求所使用的能源還多。 根據Google的資料,Google六座資料中心平均PUE值為1.21,目前臺灣企業資料中心的PUE值平均為2.5,歐美國家的PUE值平均則為 2,PUE值越低,代表著機房空調冷卻所需的電力就會更少,Google幾乎做到最高標準的資料中心節能目標。Google日前發布一個專屬網站,告訴大 家Google如何透過4種方法打造出高能源使用效率的資料中心。 第一步:降低伺服器的用電量 對於Google來說,最大宗的IT設備莫過於伺服器。Google從2000年就開始強化伺服器的節能,目前Google所用的伺服器都是自行設計,將設計好的伺服器委由代工廠製造。Google的目的就是要打造一臺相當節能的伺服器,而重點就是要提升能源轉換的效率。 在挑選伺服器的電源供應器上,Google採用高轉換效率的電源供應器。此外,Google還注意到電力供應從主機板到各零組件的電力浪 費,Google透過有效率的電壓調節模組(efficient voltage regulator modules)來避免電力從主機板至各零組件在轉換的過程中所造成的浪費。不只如此,由於Google的應用屬性,伺服器並不需要繪圖處理器,因此拿掉 不需要的零組件,不但減少電力的浪費,由於零組件數量降低,風扇的使用數目也可減少,提升整體伺服器的用電效率。 第二步:冷卻水塔盡量使用蒸發冷卻 傳統資料中心空調冷卻的費用約占整體電費的30%至70%,Google除了建立冷熱通道來提升空調使用效率,並提高冷通道的溫度設定來減少空調冷卻的支出,比方來說,如果冷通道溫度設定為21度可調高至26度,透過提高冷通道的溫度,減少空調使用。 此外,Google還透過「蒸發冷卻」的方式來降低空調冷卻的費用。 Google目前位在俄勒岡州的資料中心,其冷卻水塔就是採用蒸發冷卻的方式。 先將資料中心所產生的熱透過冷卻水來降溫,所製造的熱水就是透過冷卻水塔,與外界的冷空氣進行熱交換,來達到冷卻的目的,這麼一來就不需要額外負擔電費將熱水降溫,透過「免費的冷卻模式」來降低資料中心空調的電費。 第三步:充分利用水資源 Google不只省電,也想節省用水量,Google計畫在今年底,有兩座資料中心的冷卻水塔將全部採用再生水,並預計在2010年有8成的用水 量是來自再生水。目前在比利時的資料中心就在建置水過濾系統,所使用的水資源主要來自城市的汙水或雨水,雖然淨化後的水質還不足以當作飲用水,但透過過濾 系統淨化雜質,還是可以供給冷卻水塔使用,降低Google的用水量。 第四步:重複利用伺服器 當伺服器走入汰換年限,Google並非丟棄淘汰的伺服器,而是透過回收機制,讓老舊的伺服器還能發揮最大的作用。Google的理想是希望每一臺伺服器的零組件都能重複使用,把回收的零組件繼續用在新伺服器上。 目前Google有6成8的老舊零組件使用在新的伺服器上,至於Google自身無法繼續使用的零組件,Google則是透過出售或捐贈的方式,來延續老舊零組件的壽命。文⊙林文彬 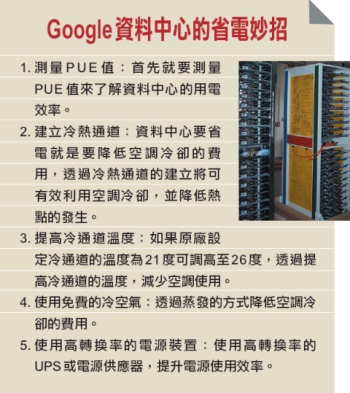 |
Wednesday, October 22, 2008
Google機房的省電妙招
Friday, October 3, 2008
十年磨一劍,開發功力需要實戰累積
| 程式人的養成並非一朝一夕。若以為「熟讀唐詩三百首,不會作詩也會吟」,絕對難成大器。 |
| |
| 一篇名為《Teach Yourself Programming in Ten Years(花十年的時間學習程式設計)》” 文章,作者Peter Norvig點出了許多程式人急於速成程式設計的現象。相信許多人看到這篇文章的標題,都會露出會心的一笑,因為相較於坊間許多標榜在幾天甚至幾小時之 內,可以學成某一程式語言或特定軟體技術的書籍而言,這篇文章標題中的「十年」,無疑突顯出極大的對比。 程式開發可快速上手,是開發工具給的錯覺 已經記不得究竟是那本書籍開此風氣之先,但根據這篇文章的作者,在文章中表示,他在Amazon上搜尋具有此種形式的書名,在搜尋結果的前兩百筆中,高達96%的書是和電腦技術相關。 這實在是一個相當獨特而且有趣的現象。此類書籍大行其道,代表市場接受度高。為什麼唯獨電腦技術,特別是程式語言的學習者,這麼迫切地想要在極短的時間內學習完一樣事物呢?又是什麼樣的原因,使得人們也同樣期待在這麼短的時間內,得以將程式語言學習完成? 許多程式語言具備了易懂難精的本質。程式人或許可以在相對短的時間內了解、學會該語言的主要語法,並且讀懂典型的程式碼,但這不代表已經確切地體會、掌握了該語言的核心及精髓。 有些程式語言本身的設計,即試圖降低入門時的學習曲線及門檻,好讓新手程式人們也能輕易上手。而現代整合開發工具越來越先進,所打造的應用程式框 架及現有元件更是日益完備,使得新手程式人只消撰寫極少量的程式碼,所得的應用程式便可產生極為炫目的效果。在許多開發工具的助陣之下,即使是剛入門的程 式人,只需要拖拉幾個元件並略加設定,便能輕易地完成一個小型的資料庫應用程式,而且資料的新增、修改、刪除、查詢功能一應俱全。 這樣的情況,讓許多程式人以及管理者產生錯覺,誤以為程式語言的學習、程式人的養成,以及軟體的開發,可以如此速成。那麼,這些在若干天之內便教會讀者某種程式語言或技術的書籍,它們的心態及動機,便也就不言可喻了,能夠大行其道也就不那麼難以理解。 教育訓練中心的培訓方式,也使人們以為速成不難 除此之外,「軟體工程師」或「程式設計師」這樣子的職務,在現今的職場中,即使稱不上薪資優沃,卻也是一份需求大過於供給的工作。這吸引了許多原先在校園中並不是修讀資訊相關科系的人們,競向轉職投入這一個領域之中。 於是,許多教育訓練單位及機構,便推出各種滿足此種就職需求的課程,有的甚至是以取得各式證照為目標。而這類的課程,也促使了許多人意外地成為了 程式人,而且對他們來說,能在越短的時間內完成投入職場的準備,越快找到合適的工作,是不可動搖的第一目標。在這樣的前提下,能夠「速成」,何樂而不為? 上述的兩個例子,所呈現的便是社會上對於程式設計的某種觀感,有許多人甚至認為,程式設計是小道,而且速成不難。 用「十年磨一劍」來形容程式人的養成,才是貼切的 程式設計真是一門可以如此速成的技藝嗎?我反倒認為程式設計是一門需要投入時間,才能有所成的領域。而一名優秀程式人的養成,更是需要十分漫長的時間,絕 非許多人所想像的,能夠透過速成的方式達成。唐朝詩人賈島的〈劍客〉裡說「十年磨一劍」,用十年的光陰來磨出一名程式人,似乎也差不多。 不論你是在學校中修讀程式設計及電腦科學課程,或者是憑藉著書籍或課程自修入門,在本質上程式設計是一種全然需要在實戰中累積經驗和技巧的功夫, 閱讀(甚至是少量且走馬看花般的閱讀)以及課程,不過只是踏進這個領域的敲門磚,書本中及課程上所告訴你的,都必須透過一次又一次的實作,才能不斷地從中 有所體會。 許多程式人厭倦煩悶的程式碼撰寫工作,他們期待著早日「晉升」,成為系統設計師、系統分析師、甚至管理職務,以便擺脫工人一般的角色。 然而,這麼一來,對撰寫程式碼容易感到厭倦,就難以成為一名優秀的程式人。二來,系統設計、系統分析之類的角色,都是建立在具有優秀的程式設計基礎之上,而優秀的程式設計能力,除了透過持續、大量的程式撰寫工作之外,大概也沒有其他的方式可以達成。 大量的程式碼撰寫實作,就像是蹲馬步的功夫,有時看起來很單調、枯燥,甚至沒有什麼學問在裡頭。每個人都討厭反覆無聊的動作,但馬步蹲久了,下盤自然穩固了,也會更明白使力出力的法門。而這些都不是單靠老師點撥提示,或自修讀書就能夠輕易體會的。 例如,在書本裡頭、在課堂上,多半是教導你如何達成你想要的功能。對於各種可能會遭遇到的異常情況,該如何處理,以及程式撰寫時可能會意外犯下的錯誤,與這些錯誤可能會有的癥兆,只能透過實戰經驗一一磨練。 從錯誤中學到教訓是程式人最大的資產之一 一名有經驗的程式人,他身上最大的資產之一,在於犯過很多的錯誤,使得他在撰寫程式的同時,知道如何預先避開可能會犯的過失,同時在一模一樣的錯誤再度發生時,能夠很快地透過顯於外的癥兆,明白究竟是發生了什麼樣的失誤,進而得以快速解決。 過去的程式碼,就像一面鏡子一樣映照出自己過去所犯下的錯誤。 程式人透過審視自己舊有的程式碼,更容易察覺曾經產生的缺失。 在實戰中,程式人會親身體驗到自己拙劣不成熟的程式碼所帶來的苦果,並且在反省後,力圖改善。這樣的感受格外深刻,因此也就永誌難忘。 所有書中告訴你的良好寫作形式,都會在親身犯過錯誤之後,有了更深一層的體會。所以越是大量地撰寫程式碼,也就越能印證書中所言,越能自行發掘出書中沒有告訴你的事情。 在長期大量的實作下,程式人才能更深刻地從自己最初的笨拙設計中,體會良好設計的重要性,也才能更明白如何透過好的設計,優雅地解決問題。也只有 在長期大量的實作下,程式人才能培養出洞察重複需求的能力,撰寫出可重複運用的程式碼,藉以提升開發的效率。甚至,只有在長期大量的實作下,才能夠將程式 架構及程式碼的各種可能變化,了然而心,面對可能會有的各種改變,預測出動向,並預先反應。 程式設計素養與能力的訓練,一定需要長期且大量的實戰 十年磨一劍,並非指程式人必須訓練十年之久方能派上用場,而是想強調:程式人的養成並非一朝一夕之功。對於自我的要求及訓練,必須放到更長的時間軸上來看,而不能從速成的眼光限制了自己不斷成長的可能性。 另外一方面,我更想強調:程式設計的訓練,絕對是需要以長期且大量的實戰為基礎的。倘若只是紙上談兵,或者以為「熟讀唐詩三百首,不會作詩也會吟」,只需要大量的閱讀書籍,程式設計功力自然有所提升,那麼絕對難以有所大成。 賈島的〈劍客〉,說的是「十年磨一劍,霜刃未曾試」,磨劍磨了十年,卻未曾真正的於實戰中試過。程式人的十年磨一劍,卻是要天天試劍,才能讓劍的鋒芒越用越利。 |
Turn Your Ubuntu Hardy to Mac OSX Leopard
如何將 Ubuntu Hardy 轉成 Mac OSX Leopard Theme
You can’t really turn a Linux system to a Mac, but you definitely can make your Ubuntu Hardy looks like a Mac OSX Leopard.
You can’t really turn a Linux system to a Mac, but you definitely can make your Ubuntu Hardy looks like a Mac OSX Leopard.
If you want to change this
 into
into
 , follow the steps below.
Before we start…
First, create a folder in your Home and name it Mac_files. Download the following files to the Mac_files folder.
Using Archive manager, extract the three Mac4Lin zip files Modified Mac4Lin theme and Mac4Lin wallpaper to the Mac_files folder.
Apply Mac OSX Leopard Theme
Go to System->Preferences->Appearance.

Select Install and select the Mac4Lin GTK theme (/home/username/Mac_files/Mac4Lin_v0.4/GTK Metacity Theme/Mac4Lin_GTK_v0.4.tar.gz).

Next, click Install again and select the Mac4Lin icon theme. (/home/username/Mac_files/Mac4Lin_Icons_Part2_v0.4.tar.gz /home/username/Mac_files/Mac4Lin_Icons_modified.tar.gz). When prompted, select “Apply new themes“.
Click Install again and select the Mac4Lin mouse cursor theme. (/home/username/Mac_files/Mac4Lin_v0.4/GTK Cursor Theme/Mac4Lin_Cursors_v0.4.tar.gz). Select “Apply new themes” when prompted.

Click ‘customize’ and choose Mac4Lin_GTK_v0.4. Go to the “Window border” tab, choose Mac4Lin_GTK_v0.4. Click Close.

On the top, go to the Background tab. Click Add and select the Leopard wallpaper. (/home/username/Mac_files/Wallpapers/Leopard.jpg). Click Close to terminate the Appearance window

Install the Dock (Avant Window Navigator)
Open a terminal (Applications->Accessories->Terminal) and type
gksu gedit /etc/apt/sources.list
and add the following lines to the end of the file:
deb http://ppa.launchpad.net/awn-testing/ubuntu hardy main
deb-src http://ppa.launchpad.net/awn-testing/ubuntu hardy main
Save and close the file. In your terminal, type
sudo apt-get update
sudo apt-get install avant-window-navigator-trunk awn-manager-trunk awn-extras-applets-trunk
Go to System->Preferences->AWN manager. On the left, click on the Theme. On the right, click Add and navigate to the Mac_files folder. Select the Elegant_glass.tgz file. Check the bullet beside the Elegant glass theme and click Apply.

Next on the left, click on the Applet icon. On the right, scroll down to the stack Applet. Highlight it, then click Activate. This will add the Mac Leopard stack to your dock.

Before you launch the AWN, remove the bottom panel from the desktop first. Right click on the bottom panel and select “delete this panel”. Open AWN via Applications->Accessories->Avant Window Navigator. Once it is activated, you can simply drag and drop the applications into the dock.
Install OSX Fonts
Open a terminal and type the following:
sudo apt-get install msttcorefonts
This will Install the Microsoft core fonts.
Next, copy the OSX fonts to the fonts folder
cd /usr/share/fonts
sudo tar xvzf /home/username/Mac_files/Mac4Lin_v0.4/Fonts/OSX_Fonts.tar.gz
Configure the fonts:
cd/
sudo tar xvjpf /home/username/Mac_files/Mac4Lin_v0.4/Fonts/fontconfig.tbz -C /etc/fonts
Open the Appearance window (System->Preferences->Appearance) and select Fonts tab. Select the following fonts according to the image below. Click Close.

Change the traffic light window control to the left
In the terminal, type
gconf-editor
This will bring up the gconf-editor window. Scroll down to App->Metacity->general. On the right, double click on the button_layout and change the content to ‘close,minimize,maximize:menu’ (without the quote). Click Ok and close the gconf-editor.


Change the menubar
Remove all the icon and applications on the left side of the top panel. Right-click on the icon and select ‘Remove from panel‘. You will left with something like this:
![]()
On the right of the top panel, remove the logout icon. Still on the right hand side of the top panel, right click and select ‘Add to panel‘. Scroll down the list and add ‘Search for files‘. This will add the spotlight icon to the panel.

On the extreme left, right-click and select ‘Add to panel‘. Scroll down the list and add ‘Main Menu‘. This will add the apple icon on the left. You can now log out and shut down from the Apple dropdown menu (same as Mac OSX).

Next, we are going to install globalmenu so as to display the menubar for each application. In your terminal,
cd Mac_files
wget http://gnome2-globalmenu.googlecode.com/files/gnome-globalmenu-0.4-svn964.tar.gz
tar zxvf gnome-globalmenu-0.4-svn964.tar.gz
cd globalmenu
sudo dpkg -i *.deb
If you have any errors when installing the package, try
sudo dpkg -i –force-overwrite *.deb
If you are having some installation problems with the gnome-globalmenu-applet, try
sudo apt-get install -f
Once finished, right click on the top panel and select ‘Add to panel‘. Scroll down the list and add ‘Global Menu Applet‘.

You might not see anything initially. Log out and log in again, you should now see the menubar for each application showing on the panel.
If your globalmenu is of a different shade of grey from the rest of the panel (as shown in the image below), right click on any empty space on the panel and select ‘Properties‘. Go to Background tab and select ‘Background image’. Under the selection, go to /home/username/.themes/Mac4Lin_GTK_v0.4/gtk-2.0/Panel and select panel-bg.png. Click OK. (Updated: If you can’t find the .themes folder, right-click and select ‘show hidden files‘.)
![]()
Drag the globalmenu to the left just beside the Apple icon. Right click on the globalmenu and select ‘Preferences’. Tick the box beside ‘Display the title of the current application‘ and put maximum width 100. Select the font to be Lucida Grande Bold. Click Apply and OK. You should now have a desktop that resemble Mac Leopard.

![]()
Configuring the Login screen
Click on the Apple icon, go to System->Administration->Login Window. On the Local tab, click Add. Navigate to the path /filesystem/home/username/Mac_files/Mac4Lin_v0.4/GDM Theme and select the file Mac4Lin_GDM_v0.4.tar.gz. Check the box beside the newly installed theme to activate it.

Underneath, there is a color selection field, select it and key in the number E5E5E5 into the color code field.

Click Ok. Log out. You should see the login screen as the diagram below.

Configure usplash screen
usplash is the screen that you see when your computer is booting up. We are going to change it to show the white apple screen. In your terminal,
sudo apt-get install startupmanager
Go to System->Administration->Start-Up Manager Go to Appearance tab. Click on the ‘Manage bootloader theme‘. Click Add and navigate to the file /filesystem/home/username/Mac_files/Mac4Lin_v0.4/GRUB Splash/appleblack.xpm.gz. Check the box “Use background image for bootloader menu” and select ‘appleblack”.


Next, click “Manage usplash theme”. Click Add and add the file /filesystem/home/username/Mac_files/Mac4Lin_v0.4/USplash Theme/osx-splash.so. Click OK. Select OSX-splash from the dropdown box.
Now reboot. You should see the following images:


Creating Dashboard effect
We will use a combination of screenlets and Compiz widget plugin to achieve the dashboard effect.
Install Screenlets
sudo apt-get install screenlets compizconfig-settings-manager
Go to System->Preferences->Advanced Desktop Effect Setting. On the Left, click on Desktop. On the right, put a check beside ‘Widget layer’

Go to Accessories->Screenlets. Activate the widgets that you want to display. Right click on the widget and select ‘Properties’. Go to Options tab and select ‘Treat as widget’. Do this for all the widgets that you have activated.

You can now see your dashboard in action by pressing F9.

Done. You have completed the transformation of your Ubuntu desktop to Mac OSX Leopard.
Some screenshots:


Subscribe to:
Posts (Atom)