最近有一位朋友,硬碟及USB 都是病毒,至於是何種毒,我就不便多說,用 Ad-Aware 及 Norton 掃了都沒用,於是就手動解毒
1. 以 "開始" > "執行" > 打入 "regedit" > "確定" ,這時候會彈出 registry 的視窗
2. 到以下兩個位置
[HKEY_CURRENT_USER/Software/Microsoft/Windows/CurrentVersion/Run] 及
[HKEY_LOCAL_MACHINE/Software/Microsoft/Windows/CurrentVersion/Run]
看看裡面是否有 xxxxx.exe 檔但 xxxxx 的命名方式是不規則,不是你唸的出來的
假如有,就殺掉這個 registry,然後重開機
3. 開機完再以 "開始" > "執行" > 打入 "regedit" > "確定",這時候會出現 Dos 的命令列,請用下列方式執行命令
C:\> cd \
C:\>dir *.* /a/p
若此時可以看到 autorun.inf 檔,表示可能已經中毒了。若還有看到 xxxxx.exe 檔,那就真的中毒了。這時候要手動刪除病毒,必須執行下列命令
C:\> attrib -s -h -r autorun.inf
C:\> del autorun.inf
C:\> attrib -s -h -r xxxxx.exe (可能不只一個檔案)
C:\> del xxxxx.exe
若你有 C: D: E: ,必須用相同步驟刪除 D: 與 E: 上的 USB 病毒
4. 若你有 USB 碟,按住 "Shift" 然後插入 USB 碟,等 5 秒後再放開。假設 USB 碟為 F:,用以下命令偵測病毒
C:\> F:
F:\> dir /a/p
要刪除病毒,用以下命令刪除
F:\> attrib -s -h -r autorun.inf
F:\> del autorun.inf
F:\> attrib -s -h -r xxxxx.exe (可能不只一個檔案)
F:\> del xxxxx.exe
5. 刪除完後重開機,再用 step 2,3 去偵測是否有 USB 病毒,若沒有,表示 USB 病毒已刪除。若還有,則需要找專家幫忙了,因為有可能是變種 USB 病毒了
Tuesday, December 30, 2008
Monday, December 22, 2008
Change DHCP IP to static IP in Ubuntu 8.10
若要將 Ubuntu 8.10 中的 DHCP IP 改成 static IP,必須手動用以下步驟改,因為 Ubuntu 8.10 的 NetworkManager 有 bug
$ sudo update-rc.d –f NetworkManager remove
$ sudo reboot
編輯 /etc/network/interfaces
$ sudo nano /etc/network/interfaces
auto lo eth0
iface lo inet loopback
iface eth0 inet static
address xxx.xxx.xxx.xxx(enter your ip here)
netmask xxx.xxx.xxx.xxx
gateway xxx.xxx.xxx.xxx(enter gateway ip here)
編輯 /etc/resolv.conf
$ sudo nano /etc/resolv.conf
# Generated by NetworkManager
nameserver xxx.xxx.xxx.xxx(enter your dns server ip)
nameserver xxx.xxx.xxx.xxx(enter your alt dns server ip)
$ sudo /etc/init.d/networking restart
Wednesday, December 17, 2008
Load balance and clustering with Apache HTTP Server 2.2.x and Tomcat 6.0.x
HA 在網路的世界不可或缺,尤其客戶是屬於 C 端 (customer,個人) 時,更要在 AP 端配置 HA 的架構,讓系統不斷線,客戶可以持續的交易不造成中斷。
HA 涉及的議題包含了軟體端的 Load Balance, Clustering 建置,硬體端的網路連線,磁碟空間配置。就硬體端而言,除了至少要有兩條網路線互相備援外,磁碟空間也必須做 replication 與備援才能有效的支援因外在因素而產生的影響。硬體端的 HA 可以有很多架構,但需要 $$ 去建置,這裡就不多講。
在軟體端方面,因為熟悉 J2EE 的架構,所以就選了非常 light weight 的 Apache HTTP Server 2.2.x 與 Tomcat 6.0.x 作為 load balance and clustering 的 instance.
Load Balance 設定
此部份用 Apache HTTP Server 就可做的到,這裡舉一個範例
Apache HTTP Server (HTTPs)
|
/ \
/ \
/ \
Tomcat 6.0.x(T1) Tomcat 6.0.x(T2)
這是最簡單的架構,透過 Apache HTTP Server ,便可以存取 T1 與 T2,然後可以在 T1 與 T2 的相同 JSP 放入不同的內容,以測試 Load Balance 的正確性
1. 下載 Apache HTTP Server 與 Tomcat 6.0.x (Windows version)
1.1 下載 Apache HTTP Server 2.2.x 並裝至 d:\Program Files。此版本含有 openssl ,用來產生 key 與 certificate for HTTPS 用
1.2 下載 Tomcat 6.0.x 並解壓縮到 d:\java 中。解壓縮時需解到兩個目錄,一個是
d:\java\apache-tomcat-6.0.16-t1,另一個是 d:\java\apache-tomcat-6.0.16-t2
2. 安裝 SSL
這個部份對大部分的人應該都滿陌生的,因為 SSL 有點小 tricky,除非你正式做過需 HTTPS 的案子,不然可能會搞糊塗。 這邊的 SSL 是針對 Apache HTTP Server 上的 SSL,不是 Tomcat 上的 SSL。Tomcat 的作法與 Apche HTTP Server 不同,用的工具也不同,但其 Certificate 是可以共用的,會在後面 Tomcat with SSL 時說明
2.1 去除 D:\Program Files\Apache Software Foundation\Apache2.2\conf\httpd.conf 中有關 SSL 的 #
#LoadModule ssl_module modules/mod_ssl.so
#Include conf/extra/httpd-ssl.conf
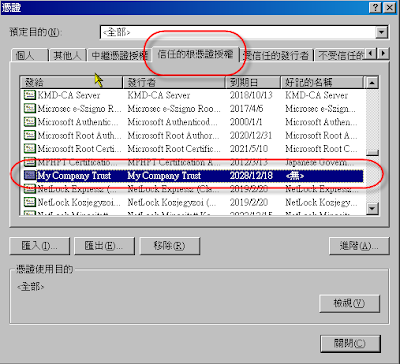
2.2 建立 CA Root Certificate 及 Server Certificate
什麼是 CA Root Certificate ,基本上就是老大發的通行證,若網站是經由此老大認證過,IE 或 Firefox 就會認得此憑證是老大發的,就不用懷疑其效力。這些老大通常都會審核申請憑證的公司的合法性,一般 User 也比較能放心去這些網站使用或消費。
但為何要建立 CA Root Certificate 呢,因為若要公司每台 Server 都需要 Certificate ,則每個 Certificate 都需要跟老大申請認證,這些都需要費用。若這些 Server 只是內部用,則可以自己當老大做一個 CA Root Certificate 然後認證自己發的 Server Certificate,這樣可以減少許多成本,也比較方便。用的時候只需要將老大的 CA Root Certificate 安裝到公司內部的 IE 或 Fixfox 就行了,凡經由 CA Root Certificate 認證過的 Server Certificate 都不會被詢問其 SSL的安全性問題,因為老大說了算 (不知道是否已經有人昏倒了)
建立 CA Root Certificate
d:\>cd D:\Program Files\Apache Software Foundation\Apache2.2\bin
d:>openssl genrsa -des3 -out ..\conf\caroot.key 2048
Loading 'screen' into random state - done Generating RSA private key, 2048 bit long modulus ...........+++ .+++ e is 65537 (0x10001) Enter pass phrase for ..\conf\caroot.key: Verifying - Enter pass phrase for ..\conf\caroot.key:
用 RSA 演算法+Triple Des Encryption (des3) 建立 CA root 的 key,強度為 2048bit。密碼請輸入 暫時輸入 changeit
d:>openssl req -config ..\conf\openssl.cnf -new -key ..\conf\caroot.key -out ..\conf\caroot.csr
Enter pass phrase for ..\conf\caroot.key: Loading 'screen' into random state - done You are about to be asked to enter information that will be incorporated into your certificate request. What you are about to enter is what is called a Distinguished Name or a DN. There are quite a few fields but you can leave some blank For some fields there will be a default value, If you enter '.', the field will be left blank.
----- Country Name (2 letter code) [AU]:TW
State or Province Name (full name) [Some-State]:Taiwan
Locality Name (eg, city) []:Taipei
Organization Name (eg, company) [Internet Widgits Pty Ltd]:My Company Inc.
Organizational Unit Name (eg, section) []:My Company Dept
Service Provider Common Name (eg, YOUR name) []:My Company Trust
Email Address []:
Please enter the following 'extra' attributes to be sent with your certificate request A challenge password []:
An optional company name []:
這裡是產生 CSR (Certificate Service Request),用以讓別的 CA 簽發憑證。因為是自己要用的 Root,所以等一下會自己簽自己。基本上所以有 CA Root 都是自己簽自己。
d:>openssl x509 -req -days 7305 -sha1 -extensions v3_ca -signkey ..\conf\caroot.key -in ..\conf\caroot.csr -out ..\conf\caroot.crt
Loading 'screen' into random state - done Signature ok subject=/C=TW/ST=Taiwan/L=Taipei/O=My Company/OU=My Company Dept/CN=My Company Trust/emailAddress=
Getting Private key
Enter pass phrase for ..\conf\caroot.key:
這裡就是自己簽自己的簽發憑證。若 double click ..\conf\caroot.crt 並安裝此憑證,可以打開 IE > 網際網路選項 > 內容 > 憑證 看到此憑證被放到根憑證的目錄中
PS : caroot.key 一定要保存好並記住密碼,不然掉了,所以憑證全部要重新簽發,很費時間。
建立 Server Certificate
當建立完 CA Root Certificate 後,再來就是要建立 Server Certificate 再用 CA Root Certificate 對 Server Certitificate 做簽發 (Sign)
d:>openssl genrsa -out ..\conf\server.key 2048
建立 Server 用的 key
d:>openssl req -config ..\conf\openssl.cnf -new -key ..\conf\server.key -out ..\conf\server.csr
Loading 'screen' into random state - done You are about to be asked to enter information that will be incorporated into your certificate request. What you are about to enter is what is called a Distinguished Name or a DN. There are quite a few fields but you can leave some blank For some fields there will be a default value, If you enter '.', the field will be left blank. -----
Country Name (2 letter code) [AU]:TW
State or Province Name (full name) [Some-State]:Taiwan
Locality Name (eg, city) []:Taipei
Organization Name (eg, company) [Internet Widgits Pty Ltd]:My Company Ltd
Organizational Unit Name (eg, section) []:RD Dept
Common Name (eg, YOUR name) []:www.mycompnay.com
Email Address []:
Please enter the following 'extra' attributes to be sent with your certificate request A challenge password []:
An optional company name []:
以上會建立申請簽章的檔案 server.csr,這裡需記得 Common Name 必須與 server 的 url domain name 一樣如 www.mycompany.com,這樣才能通過 IE 或 Firefox 的認證,否則會出現 warning。
d:>openssl x509 -req -days 3650 -sha1 -extensions v3_req -CA ..\conf\caroot.crt -CAkey ..\conf\caroot.key -CAcreateserial -in ..\conf\server.csr -out ..\conf\server.crt
Loading 'screen' into random state - done
Signature ok
subject=/C=TW/ST=Taiwan/L=Taipei/O=My Company Ltd/OU=RD Dept/CN=www.mycompnay.co m
Getting CA Private Key
Enter pass phrase for ..\conf\caroot.key:
這裡會用 caroot 簽發 server.csr 並產生 server.crt。double click server.crt 可得畫面如下
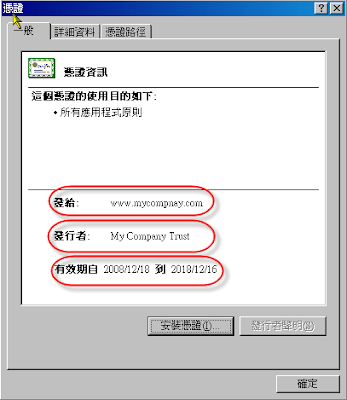
這裡可以發現,沒有 warning, 發行者是 CA Root ,有效是 10 年
2.3 重新啟動 Apache HTTP Server
因為產生 Server 的 certificate 檔名已經同步 conf/extra/httpd-ssl.conf 裡面所定義的命名方式,所以直接啟動 Apache HTTP Server 便可以使用 HTTPS (SSL)
3. 設定 load balance
3.1 下載 mod_jk (Tomcat 6.0.x for win32 版)。
下載完 mod_jk 後 請將檔名改為 mod_jk.so 並放到 D:\Program Files\Apache Software Foundation\Apache2.2\modules 中
3.2 在 D:\Program Files\Apache Software Foundation\Apache2.2\conf\extra 中新增一個檔案 httpd-load-balance.conf
內容如下
================================
#(httpd.conf)
#載入 mod_jk 模組
LoadModule jk_module modules/mod_jk.so
#
# Configure mod_jk
#
JkWorkersFile conf/workers.properties
JkMountFile conf/uriworkermap.properties
JkLogFile logs/mod_jk.log
JkLogLevel info
JkMount jkstatus
Order deny,allow
Deny from all
Allow from 127.0.0.1
===============================
3.3 在 D:\Program Files\Apache Software Foundation\Apache2.2\conf\httpd.conf 的最後新增一行
內容為
Include conf/extra/httpd-load-balance.conf
如此重新啟動 Apache HTTP Server 時才會把 load balance 的 module 放到 kernel 中執行
3.4 在 D:\Program Files\Apache Software Foundation\Apache2.2\conf 中新增一個檔案 workers.properties
內容為
=====================================
# The advanced router LB worker
worker.list=router,jkstatus
# Define a worker using ajp13
worker.worker1.port=8009
worker.worker1.host=localhost
worker.worker1.type=ajp13
worker.worker1.lbfactor=1
# Define prefered failover node for worker1
#worker.worker1.redirect=worker2
# Define another worker using ajp13
worker.worker2.port=9009
worker.worker2.host=localhost
worker.worker2.type=ajp13
worker.worker2.lbfactor=1
# Disable worker2 for all requests except failover
#worker.worker2.activation=disabled
# Define the LB worker
worker.router.type=lb
worker.router.balance_workers=worker1,worker2
# Define a 'jkstatus' worker using status
worker.jkstatus.type=status
====================================
這裡指定 worker1 為 T1, 用的 port 為 8009,worker2 為 T2,用的 port 為 9009
3.5 在 D:\Program Files\Apache Software Foundation\Apache2.2\conf 中新增一個檔案 uriworkermap.properties
內容為
===============================
/*=router
===============================
這裡會將 URI 為 /* 的 mapping 全部轉向 T1 或 T2
3.6 更改 T2 的設定檔
因為 T2 用的 port 還是 8009,需改為 9009 以配合 workers.properties 中的設定
修改 D:\java\apache-tomcat-6.0.16-t2\conf\server.xml 中的
line 22 port="8005" 改為 port="9005"
line 67 port="8080" 改為 port="9090"
line 89 port="8009" 改為 port="9009"
port 改成如此是因為要避免與 T1 衝突。
3.7 重新啟動 Apache HTTP Server 與 T1, T2
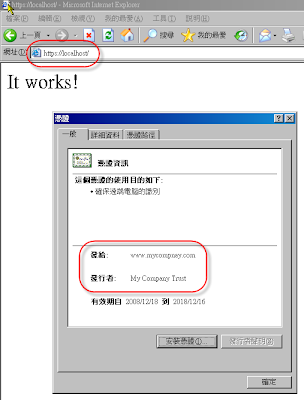
重新啟動 Apache HTTP Server 後再啟動 T1, T2,接下來打開 IE 將 URL 指向 http://localhost 可以得到
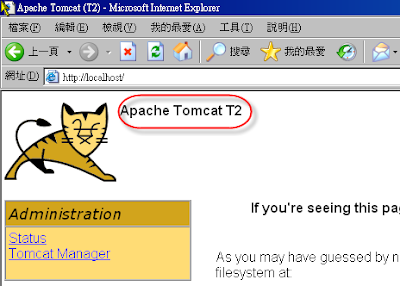
這裡可以看到跑的是 Apache Tomcat T2 (webapps\ROOT\index.html 有修改過),證明 Load Balance 已經開始作用中
3.8 啟動 SSL 的 Load Balance
這時候當 URL 指向 https://localhost 時,Tomcat 的畫面並不會跑出來,需要在
D:\Program Files\Apache Software Foundation\Apache2.2\conf\extra\httpd-ssl.conf
的 VirtualHost 裡面加上這一行
JkMountFile conf/uriworkermap.properties
然後重新啟動 Apache HTTP Server ,SSL 便可以做到 Load Balance 了
以下畫面是把 T2 Shutdown 後,Refresh IE 則會 Forward 到 T1 上
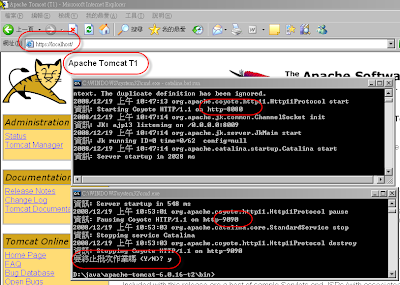
4. 設定 Tomcat 的 Clustering
若有人要OOXX,現在是一個好時機,因為在 Windows XP 上無法做 Clustering。花了幾乎快一個下午的時間試,也無法試出來用 2 個 Tomcat instance 跑在同一台機器,後來用 VMWare 跑 Ubuntu 8.10 然後在上面跑 2 個 Tomcat ,一切搞定。所以,Linux 實在非常適合做 Server。
話不多說,把 Ubuntu 8.10 跑起來後,利用 SSH 將兩個 tomcat 複製到 /opt 下
/$ cd /
/$ sudo mkdir /opt
/$ sudo chmod o+w opt
這樣才能在非 root 的使用者下將 tomcat 複製到 /opt
/opt$ ls -l
apache-tomcat-6.0.16-t1
apache-tomcat-6.0.16-t2
/opt$ chmod +x apache-tomcat-6.0.16-t1/bin/*.sh
/opt$ chmod +x apache-tomcat-6.0.16-t2/bin/*.sh
4.1 設定 Tomcat Cluster in server.xml
更改 /opt/apache-tomcat-6.0.16-t1/conf/server.xml
在 line 100 的 Engine 中加入 jvmRoute="worker1"
在 line 106 將 Cluster 的上下 comment !-- -- 拿掉
更改 /opt/apache-tomcat-6.0.16-t2/conf/server.xml
在 line 100 的 Engine 中加入 jvmRoute="worker2"
在 line 106 將 Cluster 的上下 comment !-- -- 拿掉
4.2 設定 web application
因之前有發表過 appfuse 2.0.2 for JPA ,所以就直接把 war 檔放到 t1 與 t2 的 webapps 下,也修改了 WEB-INF/classes/jdbc.properties 中的 localhost 為原本的 XP 上
4.3 啟動 Tomcat t1, t2
打開一個 xterm (應用程式 > 附屬應用程式 > 終端機 )
$ cd /opt/apache-tomat-6.0.16-t1/bin
/bin$ export JAVA_HOME=/usr/lib/jvm/java-6-sun
/bin$ ./catalina.sh run
打開另一個 xterm (應用程式 > 附屬應用程式 > 終端機 )
$ cd /opt/apache-tomat-6.0.16-t2/bin
/bin$ export JAVA_HOME=/usr/lib/jvm/java-6-sun
/bin$ ./catalina.sh run
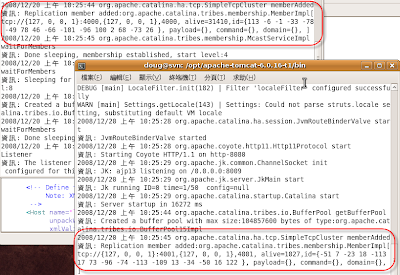
這時候應該可以看到 t1, t2 會互相 talk 如下畫面
4.4 修改 Apache HTTP Server
因之前的 load balance 設定用的 tomcat 是 localhost ,但因 XP 無法支援,所以要將 D:\Program Files\Apache Software Foundation\Apache2.2\conf\workers.properties 中的
worker.worker1.host=localhost
worker.worker2.host=localhost
改為
worker.worker1.host=svn
worker.worker2.host=svn
PS : 此 svn 是 Ubuntu VM 上的 hostname
然後重新啟動 Apache HTTP Server
4.5 測試 Cluster
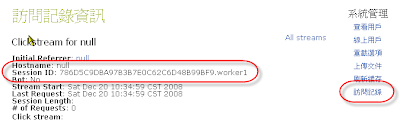
打開一個 IE 網址為 https://localhost/myprojectjpa-1.0-SNAPSHOT/然後用 admin/admin login,再進入 系統管理 > 訪問紀錄 可以看到用的是 worker1 的 tomat t1
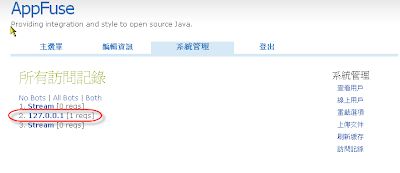
再打開另一個 IE 網址為 https://localhost/myprojectjpa-1.0-SNAPSHOT/ 然後用 admin/admin login,再進入 系統管理 > 訪問紀錄 可以看到有兩個 Stream ,點進去看可以看到分別是 worker1 與 worker2

經由此測試可以發現 Cluster 試驗成功,因為 worker1 上或 worker2 上的 tomcat 都有兩個 session 在
接下來將 t1 shutdown ,然後在按 worker1 上的 IE 的訪問紀錄,可發現 session 已轉到 worker2 了。因為此 session 是由 worker1 複製過來的,所以 Name 被改為 127.0.0.1 了
後記 :
1. 經由此測試發現在 Windows XP 上無法模擬 Cluster (也許要改設定),有興趣的人可以試試在 Windows 2003 server 上試,但建議用 VMware 跑 Ubuntu,因為省錢又方便
2. Tomcat 6 的設定比 Tomcat 5 簡單多了,因為預設值都被 Tomcat container 處理掉了
3. Load Balance 除了用 mod_jk 外,好像也可以用 ProxyPass 的方式,改天再來試試看
HA 涉及的議題包含了軟體端的 Load Balance, Clustering 建置,硬體端的網路連線,磁碟空間配置。就硬體端而言,除了至少要有兩條網路線互相備援外,磁碟空間也必須做 replication 與備援才能有效的支援因外在因素而產生的影響。硬體端的 HA 可以有很多架構,但需要 $$ 去建置,這裡就不多講。
在軟體端方面,因為熟悉 J2EE 的架構,所以就選了非常 light weight 的 Apache HTTP Server 2.2.x 與 Tomcat 6.0.x 作為 load balance and clustering 的 instance.
Load Balance 設定
此部份用 Apache HTTP Server 就可做的到,這裡舉一個範例
Apache HTTP Server (HTTPs)
|
/ \
/ \
/ \
Tomcat 6.0.x(T1) Tomcat 6.0.x(T2)
這是最簡單的架構,透過 Apache HTTP Server ,便可以存取 T1 與 T2,然後可以在 T1 與 T2 的相同 JSP 放入不同的內容,以測試 Load Balance 的正確性
1. 下載 Apache HTTP Server 與 Tomcat 6.0.x (Windows version)
1.1 下載 Apache HTTP Server 2.2.x 並裝至 d:\Program Files。此版本含有 openssl ,用來產生 key 與 certificate for HTTPS 用
1.2 下載 Tomcat 6.0.x 並解壓縮到 d:\java 中。解壓縮時需解到兩個目錄,一個是
d:\java\apache-tomcat-6.0.16-t1,另一個是 d:\java\apache-tomcat-6.0.16-t2
2. 安裝 SSL
這個部份對大部分的人應該都滿陌生的,因為 SSL 有點小 tricky,除非你正式做過需 HTTPS 的案子,不然可能會搞糊塗。 這邊的 SSL 是針對 Apache HTTP Server 上的 SSL,不是 Tomcat 上的 SSL。Tomcat 的作法與 Apche HTTP Server 不同,用的工具也不同,但其 Certificate 是可以共用的,會在後面 Tomcat with SSL 時說明
2.1 去除 D:\Program Files\Apache Software Foundation\Apache2.2\conf\httpd.conf 中有關 SSL 的 #
#LoadModule ssl_module modules/mod_ssl.so
#Include conf/extra/httpd-ssl.conf
2.2 建立 CA Root Certificate 及 Server Certificate
什麼是 CA Root Certificate ,基本上就是老大發的通行證,若網站是經由此老大認證過,IE 或 Firefox 就會認得此憑證是老大發的,就不用懷疑其效力。這些老大通常都會審核申請憑證的公司的合法性,一般 User 也比較能放心去這些網站使用或消費。
但為何要建立 CA Root Certificate 呢,因為若要公司每台 Server 都需要 Certificate ,則每個 Certificate 都需要跟老大申請認證,這些都需要費用。若這些 Server 只是內部用,則可以自己當老大做一個 CA Root Certificate 然後認證自己發的 Server Certificate,這樣可以減少許多成本,也比較方便。用的時候只需要將老大的 CA Root Certificate 安裝到公司內部的 IE 或 Fixfox 就行了,凡經由 CA Root Certificate 認證過的 Server Certificate 都不會被詢問其 SSL的安全性問題,因為老大說了算 (不知道是否已經有人昏倒了)
建立 CA Root Certificate
d:\>cd D:\Program Files\Apache Software Foundation\Apache2.2\bin
d:>openssl genrsa -des3 -out ..\conf\caroot.key 2048
Loading 'screen' into random state - done Generating RSA private key, 2048 bit long modulus ...........+++ .+++ e is 65537 (0x10001) Enter pass phrase for ..\conf\caroot.key: Verifying - Enter pass phrase for ..\conf\caroot.key:
用 RSA 演算法+Triple Des Encryption (des3) 建立 CA root 的 key,強度為 2048bit。密碼請輸入 暫時輸入 changeit
d:>openssl req -config ..\conf\openssl.cnf -new -key ..\conf\caroot.key -out ..\conf\caroot.csr
Enter pass phrase for ..\conf\caroot.key: Loading 'screen' into random state - done You are about to be asked to enter information that will be incorporated into your certificate request. What you are about to enter is what is called a Distinguished Name or a DN. There are quite a few fields but you can leave some blank For some fields there will be a default value, If you enter '.', the field will be left blank.
----- Country Name (2 letter code) [AU]:TW
State or Province Name (full name) [Some-State]:Taiwan
Locality Name (eg, city) []:Taipei
Organization Name (eg, company) [Internet Widgits Pty Ltd]:My Company Inc.
Organizational Unit Name (eg, section) []:My Company Dept
Service Provider Common Name (eg, YOUR name) []:My Company Trust
Email Address []:
Please enter the following 'extra' attributes to be sent with your certificate request A challenge password []:
An optional company name []:
這裡是產生 CSR (Certificate Service Request),用以讓別的 CA 簽發憑證。因為是自己要用的 Root,所以等一下會自己簽自己。基本上所以有 CA Root 都是自己簽自己。
d:>openssl x509 -req -days 7305 -sha1 -extensions v3_ca -signkey ..\conf\caroot.key -in ..\conf\caroot.csr -out ..\conf\caroot.crt
Loading 'screen' into random state - done Signature ok subject=/C=TW/ST=Taiwan/L=Taipei/O=My Company/OU=My Company Dept/CN=My Company Trust/emailAddress=
Getting Private key
Enter pass phrase for ..\conf\caroot.key:
這裡就是自己簽自己的簽發憑證。若 double click ..\conf\caroot.crt 並安裝此憑證,可以打開 IE > 網際網路選項 > 內容 > 憑證 看到此憑證被放到根憑證的目錄中

PS : caroot.key 一定要保存好並記住密碼,不然掉了,所以憑證全部要重新簽發,很費時間。
建立 Server Certificate
當建立完 CA Root Certificate 後,再來就是要建立 Server Certificate 再用 CA Root Certificate 對 Server Certitificate 做簽發 (Sign)
d:>openssl genrsa -out ..\conf\server.key 2048
建立 Server 用的 key
d:>openssl req -config ..\conf\openssl.cnf -new -key ..\conf\server.key -out ..\conf\server.csr
Loading 'screen' into random state - done You are about to be asked to enter information that will be incorporated into your certificate request. What you are about to enter is what is called a Distinguished Name or a DN. There are quite a few fields but you can leave some blank For some fields there will be a default value, If you enter '.', the field will be left blank. -----
Country Name (2 letter code) [AU]:TW
State or Province Name (full name) [Some-State]:Taiwan
Locality Name (eg, city) []:Taipei
Organization Name (eg, company) [Internet Widgits Pty Ltd]:My Company Ltd
Organizational Unit Name (eg, section) []:RD Dept
Common Name (eg, YOUR name) []:www.mycompnay.com
Email Address []:
Please enter the following 'extra' attributes to be sent with your certificate request A challenge password []:
An optional company name []:
以上會建立申請簽章的檔案 server.csr,這裡需記得 Common Name 必須與 server 的 url domain name 一樣如 www.mycompany.com,這樣才能通過 IE 或 Firefox 的認證,否則會出現 warning。
d:>openssl x509 -req -days 3650 -sha1 -extensions v3_req -CA ..\conf\caroot.crt -CAkey ..\conf\caroot.key -CAcreateserial -in ..\conf\server.csr -out ..\conf\server.crt
Loading 'screen' into random state - done
Signature ok
subject=/C=TW/ST=Taiwan/L=Taipei/O=My Company Ltd/OU=RD Dept/CN=www.mycompnay.co m
Getting CA Private Key
Enter pass phrase for ..\conf\caroot.key:
這裡會用 caroot 簽發 server.csr 並產生 server.crt。double click server.crt 可得畫面如下

這裡可以發現,沒有 warning, 發行者是 CA Root ,有效是 10 年
2.3 重新啟動 Apache HTTP Server
因為產生 Server 的 certificate 檔名已經同步 conf/extra/httpd-ssl.conf 裡面所定義的命名方式,所以直接啟動 Apache HTTP Server 便可以使用 HTTPS (SSL)

3. 設定 load balance
3.1 下載 mod_jk (Tomcat 6.0.x for win32 版)。
下載完 mod_jk 後 請將檔名改為 mod_jk.so 並放到 D:\Program Files\Apache Software Foundation\Apache2.2\modules 中
3.2 在 D:\Program Files\Apache Software Foundation\Apache2.2\conf\extra 中新增一個檔案 httpd-load-balance.conf
內容如下
================================
#(httpd.conf)
#載入 mod_jk 模組
LoadModule jk_module modules/mod_jk.so
#
# Configure mod_jk
#
JkWorkersFile conf/workers.properties
JkMountFile conf/uriworkermap.properties
JkLogFile logs/mod_jk.log
JkLogLevel info
JkMount jkstatus
Order deny,allow
Deny from all
Allow from 127.0.0.1
===============================
3.3 在 D:\Program Files\Apache Software Foundation\Apache2.2\conf\httpd.conf 的最後新增一行
內容為
Include conf/extra/httpd-load-balance.conf
如此重新啟動 Apache HTTP Server 時才會把 load balance 的 module 放到 kernel 中執行
3.4 在 D:\Program Files\Apache Software Foundation\Apache2.2\conf 中新增一個檔案 workers.properties
內容為
=====================================
# The advanced router LB worker
worker.list=router,jkstatus
# Define a worker using ajp13
worker.worker1.port=8009
worker.worker1.host=localhost
worker.worker1.type=ajp13
worker.worker1.lbfactor=1
# Define prefered failover node for worker1
#worker.worker1.redirect=worker2
# Define another worker using ajp13
worker.worker2.port=9009
worker.worker2.host=localhost
worker.worker2.type=ajp13
worker.worker2.lbfactor=1
# Disable worker2 for all requests except failover
#worker.worker2.activation=disabled
# Define the LB worker
worker.router.type=lb
worker.router.balance_workers=worker1,worker2
# Define a 'jkstatus' worker using status
worker.jkstatus.type=status
====================================
這裡指定 worker1 為 T1, 用的 port 為 8009,worker2 為 T2,用的 port 為 9009
3.5 在 D:\Program Files\Apache Software Foundation\Apache2.2\conf 中新增一個檔案 uriworkermap.properties
內容為
===============================
/*=router
===============================
這裡會將 URI 為 /* 的 mapping 全部轉向 T1 或 T2
3.6 更改 T2 的設定檔
因為 T2 用的 port 還是 8009,需改為 9009 以配合 workers.properties 中的設定
修改 D:\java\apache-tomcat-6.0.16-t2\conf\server.xml 中的
line 22 port="8005" 改為 port="9005"
line 67 port="8080" 改為 port="9090"
line 89 port="8009" 改為 port="9009"
port 改成如此是因為要避免與 T1 衝突。
3.7 重新啟動 Apache HTTP Server 與 T1, T2
重新啟動 Apache HTTP Server 後再啟動 T1, T2,接下來打開 IE 將 URL 指向 http://localhost 可以得到

這裡可以看到跑的是 Apache Tomcat T2 (webapps\ROOT\index.html 有修改過),證明 Load Balance 已經開始作用中
3.8 啟動 SSL 的 Load Balance
這時候當 URL 指向 https://localhost 時,Tomcat 的畫面並不會跑出來,需要在
D:\Program Files\Apache Software Foundation\Apache2.2\conf\extra\httpd-ssl.conf
的 VirtualHost 裡面加上這一行
JkMountFile conf/uriworkermap.properties
然後重新啟動 Apache HTTP Server ,SSL 便可以做到 Load Balance 了
以下畫面是把 T2 Shutdown 後,Refresh IE 則會 Forward 到 T1 上

4. 設定 Tomcat 的 Clustering
若有人要OOXX,現在是一個好時機,因為在 Windows XP 上無法做 Clustering。花了幾乎快一個下午的時間試,也無法試出來用 2 個 Tomcat instance 跑在同一台機器,後來用 VMWare 跑 Ubuntu 8.10 然後在上面跑 2 個 Tomcat ,一切搞定。所以,Linux 實在非常適合做 Server。
話不多說,把 Ubuntu 8.10 跑起來後,利用 SSH 將兩個 tomcat 複製到 /opt 下
/$ cd /
/$ sudo mkdir /opt
/$ sudo chmod o+w opt
這樣才能在非 root 的使用者下將 tomcat 複製到 /opt
/opt$ ls -l
apache-tomcat-6.0.16-t1
apache-tomcat-6.0.16-t2
/opt$ chmod +x apache-tomcat-6.0.16-t1/bin/*.sh
/opt$ chmod +x apache-tomcat-6.0.16-t2/bin/*.sh
4.1 設定 Tomcat Cluster in server.xml
更改 /opt/apache-tomcat-6.0.16-t1/conf/server.xml
在 line 100 的 Engine 中加入 jvmRoute="worker1"
在 line 106 將 Cluster 的上下 comment !-- -- 拿掉
更改 /opt/apache-tomcat-6.0.16-t2/conf/server.xml
在 line 100 的 Engine 中加入 jvmRoute="worker2"
在 line 106 將 Cluster 的上下 comment !-- -- 拿掉
4.2 設定 web application
因之前有發表過 appfuse 2.0.2 for JPA ,所以就直接把 war 檔放到 t1 與 t2 的 webapps 下,也修改了 WEB-INF/classes/jdbc.properties 中的 localhost 為原本的 XP 上
4.3 啟動 Tomcat t1, t2
打開一個 xterm (應用程式 > 附屬應用程式 > 終端機 )
$ cd /opt/apache-tomat-6.0.16-t1/bin
/bin$ export JAVA_HOME=/usr/lib/jvm/java-6-sun
/bin$ ./catalina.sh run
打開另一個 xterm (應用程式 > 附屬應用程式 > 終端機 )
$ cd /opt/apache-tomat-6.0.16-t2/bin
/bin$ export JAVA_HOME=/usr/lib/jvm/java-6-sun
/bin$ ./catalina.sh run
這時候應該可以看到 t1, t2 會互相 talk 如下畫面

4.4 修改 Apache HTTP Server
因之前的 load balance 設定用的 tomcat 是 localhost ,但因 XP 無法支援,所以要將 D:\Program Files\Apache Software Foundation\Apache2.2\conf\workers.properties 中的
worker.worker1.host=localhost
worker.worker2.host=localhost
改為
worker.worker1.host=svn
worker.worker2.host=svn
PS : 此 svn 是 Ubuntu VM 上的 hostname
然後重新啟動 Apache HTTP Server
4.5 測試 Cluster
打開一個 IE 網址為 https://localhost/myprojectjpa-1.0-SNAPSHOT/然後用 admin/admin login,再進入 系統管理 > 訪問紀錄 可以看到用的是 worker1 的 tomat t1

再打開另一個 IE 網址為 https://localhost/myprojectjpa-1.0-SNAPSHOT/ 然後用 admin/admin login,再進入 系統管理 > 訪問紀錄 可以看到有兩個 Stream ,點進去看可以看到分別是 worker1 與 worker2

經由此測試可以發現 Cluster 試驗成功,因為 worker1 上或 worker2 上的 tomcat 都有兩個 session 在
接下來將 t1 shutdown ,然後在按 worker1 上的 IE 的訪問紀錄,可發現 session 已轉到 worker2 了。因為此 session 是由 worker1 複製過來的,所以 Name 被改為 127.0.0.1 了

後記 :
1. 經由此測試發現在 Windows XP 上無法模擬 Cluster (也許要改設定),有興趣的人可以試試在 Windows 2003 server 上試,但建議用 VMware 跑 Ubuntu,因為省錢又方便
2. Tomcat 6 的設定比 Tomcat 5 簡單多了,因為預設值都被 Tomcat container 處理掉了
3. Load Balance 除了用 mod_jk 外,好像也可以用 ProxyPass 的方式,改天再來試試看
Saturday, December 13, 2008
讓 HP CQ20 的聲音重現在 Ubuntu 8.10 上
裝了 Ubuntu 8.10 後, CQ20 上得喇叭聲音就不見了, 但經過以下步驟, 終於讓聲音恢復
看來 linux driver 總是會比 Windows 慢半拍
1. 先用 sudo apt-get install build-essential 將 kernel 模組下載到本機
2. 到 http://www.alsa-project.org/main/index.php/Main_Page 下載最新的驅動程式. 我下載的是 alsa-driver-1.0.18a
3. ./configure --with-cards=hda-intel
4. make
5. sudo make install
6. sudo gedit /etc/modprobe.d/alsa-base,最後一行加入:options snd-hda-intel model=laptop
7. reboot看來 linux driver 總是會比 Windows 慢半拍
Tuesday, December 9, 2008
Bug in appfuse 2.0.2 DaoTest
今天試著照著 appfuse 的 tutorial 上走一次,以了解 2.0 與 1.9 版的差異,當用 JPA 做完 PersonDaoTest 後,發現了兩個 bug
1. 若測試 PersonDaoTest 時假資料是用
person = (Person) populate(person);
的方式且是用 PersonDaoTest.properties 做假資料,因 test-compile 會漏掉將 PersonDaoTest.properties 複製到 classpath 中,以致於測試 PersonDaoTest 會失敗,因為無法取得假資料。
解法 : 在 pom.xml 上補上複製 properties 的敘述
line 293
<testResources>
<!-- copy test property file in test class path -->
<testResource>
<directory>src/test/java</directory>
<filtering>true</filtering>
<includes>
<include>**/*.properties</include>
</includes>
</testResource>
這樣就可以將 PersonDaoTest.properties 複製到 test-classes 中了
2. 這個 bug 較嚴重
在 BaseDaoTestCase 中,line 74
BeanUtils.copyProperties(map, obj);
跑測試的時候發現假資料無法複製到 obj (person instance) 中,後來查 API 才發現應該是
BeanUtils.copyProperties(obj, map);
才對,因為 API 為
Copy property values from the origin bean to the destination bean for all cases where the property names are the same.
這個 bug 對於使用 populate 的人而言算滿嚴重的,可能會讓試用 appfuse 的人卻步,所以在此提供大家做參考
1. 若測試 PersonDaoTest 時假資料是用
person = (Person) populate(person);
的方式且是用 PersonDaoTest.properties 做假資料,因 test-compile 會漏掉將 PersonDaoTest.properties 複製到 classpath 中,以致於測試 PersonDaoTest 會失敗,因為無法取得假資料。
解法 : 在 pom.xml 上補上複製 properties 的敘述
line 293
<testResources>
<!-- copy test property file in test class path -->
<testResource>
<directory>src/test/java</directory>
<filtering>true</filtering>
<includes>
<include>**/*.properties</include>
</includes>
</testResource>
這樣就可以將 PersonDaoTest.properties 複製到 test-classes 中了
2. 這個 bug 較嚴重
在 BaseDaoTestCase 中,line 74
BeanUtils.copyProperties(map, obj);
跑測試的時候發現假資料無法複製到 obj (person instance) 中,後來查 API 才發現應該是
BeanUtils.copyProperties(obj, map);
才對,因為 API 為
copyProperties(Object dest, Object orig) Copy property values from the origin bean to the destination bean for all cases where the property names are the same.
這個 bug 對於使用 populate 的人而言算滿嚴重的,可能會讓試用 appfuse 的人卻步,所以在此提供大家做參考
Appfuse 2.0.2 的 displaytag 繁體中文檔
最近在試 Appfuse 2.0.2 發現沒有 displaytag 繁體中文檔,於是把簡體檔轉成繁體中文再改語意,可以從 這邊 下載,記得放到 src/main/resources 下就可以了
Run appfuse 2.0.2 with JPA
最近發現一件事,似乎越來越多的軟體公司,若是用 J2EE + MVC 架構,以 JPA 取代 Hibernate 的情況越來越多。說實在的,看了一下 JPA 的 spec,跟以往 EJB 一樣,他是一個空殼子,真正的 implementation 可以是任何 framework。
目前看到的 JPA implementation 有 Hibernate 、TopLink 及 OpenJPA,在 appfuse 2.0.2 中用的是 Hibernate 最新版 3.3.0 GA 版,但在試 appfuse 2.0.2 with JPA 中發現一些問題,讓我摸索好久才試出來,提供那些卡住的人一些解法。試之前請先參考
Appfuse 2.0.2 安裝步驟(steps for appfuse 2.0.2 installation) 中的
1. 安裝 maven-2.0.9 及設定環境變數
1. 建立 appfuse 2.0.2 的 archetype 到 d:\projects 中
d:\projects> mvn archetype:create -DarchetypeGroupId=org.appfuse.archetypes -DarchetypeArtifactId=appfuse-basic-struts -DremoteRepositories=http://static.appfuse.org/releases -DarchetypeVersion=2.0.2 -DgroupId=com.mycompany.app -DartifactId=myprojectjpa
PS : 有別於之前的範例,這裡用 struts 2.0 作為 MVC 的 framework,artifactId 也改為 myprojectjpa,避免與之前的範例衝到
2. 安裝 mysql (若尚未安裝)
到 mysql 的網站下載 mysql for Windows 並安裝 (此時裝的是 v5.0.x )。root 的密碼暫定為 root
3. 修改 root 的密碼及更改 dao framework 為 jpa
3.1 因 預設在 myproject 中的 pom.xml 的 mysql 密碼為 "空白",所以必須將此部份的空白填入真正的 root 密碼,在做 install 時才能將 table 及 測試資料放到 mysql 的資料庫中。編輯 pom.xml 並在 line 975 修改
<jdbc.password> </jdbc.password> 為
<jdbc.password>root</jdbc.password> (假設 mysql root 的密碼為 root)
3.2 修改 line 938 將 hibernate 改成 jpa
3.3 修改 line 142 將 annotationconfiguration 改成 jpaconfiguration
3.4 這時候別急著跑 mvn jetty:run-war ,因為你一跑,會出現
javax.persistence.PersistenceException: No name provided and several persistence
units found
我因為這個 error 卡了 2,3 個小時,後來 google 後才知道要
3.4.1 remove D:\projects\myprojectjpa\src\main\resources\hibernate.cfg.xml
3.4.2 remove D:\projects\myprojectjpa\src\test\resources\hibernate.cfg.xml
3.4.3 remove D:\projects\myprojectjpa\src\main\resources\META-INF\persistence.xml
4. 取得 appfuse 的 source code 以便日後 debug 用
d:\projects> cd myproject
d:\projects\myproject> mvn appfuse:full-source
5. 利用 command line 啟動 appfuse
d:\projects\myproject> mvn clean jetty:run-war
執行 clean 的目的是要把 war 中的 hibernate.cfg.xml 清除掉,不然會造成 error
org.hibernate.DuplicateMappingException: Duplicate collection role mapping com.m
ycompany.app.model.User.roles
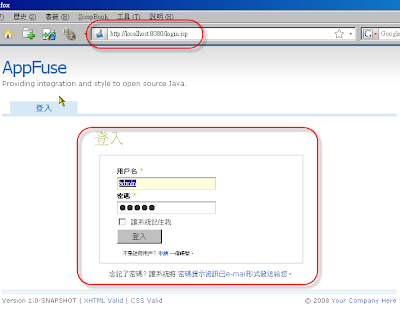
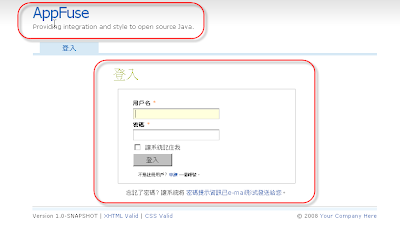
一旦執行此 mvn jetty:run-war,appfuse 就會直接啟動在 port 8080。此時可以用 firefox 檢測 appfuse 是否啟動成功。將 url 指向 http://localhost:8080 可以得到此畫面
目前看到的 JPA implementation 有 Hibernate 、TopLink 及 OpenJPA,在 appfuse 2.0.2 中用的是 Hibernate 最新版 3.3.0 GA 版,但在試 appfuse 2.0.2 with JPA 中發現一些問題,讓我摸索好久才試出來,提供那些卡住的人一些解法。試之前請先參考
Appfuse 2.0.2 安裝步驟(steps for appfuse 2.0.2 installation) 中的
1. 安裝 maven-2.0.9 及設定環境變數
1. 建立 appfuse 2.0.2 的 archetype 到 d:\projects 中
d:\projects> mvn archetype:create -DarchetypeGroupId=org.appfuse.archetypes -DarchetypeArtifactId=appfuse-basic-struts -DremoteRepositories=http://static.appfuse.org/releases -DarchetypeVersion=2.0.2 -DgroupId=com.mycompany.app -DartifactId=myprojectjpa
PS : 有別於之前的範例,這裡用 struts 2.0 作為 MVC 的 framework,artifactId 也改為 myprojectjpa,避免與之前的範例衝到
到 mysql 的網站下載 mysql for Windows 並安裝 (此時裝的是 v5.0.x )。root 的密碼暫定為 root
3. 修改 root 的密碼及更改 dao framework 為 jpa
3.1 因 預設在 myproject 中的 pom.xml 的 mysql 密碼為 "空白",所以必須將此部份的空白填入真正的 root 密碼,在做 install 時才能將 table 及 測試資料放到 mysql 的資料庫中。編輯 pom.xml 並在 line 975 修改
<jdbc.password>
<jdbc.password>root</jdbc.password> (假設 mysql root 的密碼為 root)
3.2 修改 line 938 將 hibernate 改成 jpa
3.3 修改 line 142 將 annotationconfiguration 改成 jpaconfiguration
3.4 這時候別急著跑 mvn jetty:run-war ,因為你一跑,會出現
javax.persistence.PersistenceException: No name provided and several persistence
units found
我因為這個 error 卡了 2,3 個小時,後來 google 後才知道要
3.4.1 remove D:\projects\myprojectjpa\src\main\resources\hibernate.cfg.xml
3.4.2 remove D:\projects\myprojectjpa\src\test\resources\hibernate.cfg.xml
3.4.3 remove D:\projects\myprojectjpa\src\main\resources\META-INF\persistence.xml
4. 取得 appfuse 的 source code 以便日後 debug 用
d:\projects> cd myproject
d:\projects\myproject> mvn appfuse:full-source
執行 clean 的目的是要把 war 中的 hibernate.cfg.xml 清除掉,不然會造成 error
org.hibernate.DuplicateMappingException: Duplicate collection role mapping com.m
ycompany.app.model.User.roles
一旦執行此 mvn jetty:run-war,appfuse 就會直接啟動在 port 8080。此時可以用 firefox 檢測 appfuse 是否啟動成功。將 url 指向 http://localhost:8080 可以得到此畫面

Saturday, December 6, 2008
Run appfuse 2.0.2 in NetBeans 6.5
在 NetBeans 6.1 跑 appfuse 2.0.2 幾乎是不可能,試了半天總是碰壁,但到了 NetBeans 6.5,就像變魔術一般,跑的特別順,尤其是改 jsp 時,不用像 eclipse 需要改 snapshot 裡面的 jsp。在 NetBeans 6.5 可以直接修改 jsp 後在 firefox 中按 F5 就會立即反應改過的結果,對於開發者而言,實在助益不少。以下就 NetBeans 6.5 跑 appfuse 2.0.2 的步驟做一說明
使用 NetBeans 6.5 前,必須先把 appfuse 2.0.2 先安裝好。安裝的步驟可參考
Appfuse 2.0.2 安裝步驟(steps for appfuse 2.0.2 installation)
1. 安裝 NetBeans 6.5
下載 NetBeans 6.5 後安裝到 d:\Java\NetBeans 6.5 下。安裝時須確認裝的元件含 Java Web and EE,及 Run time server Tomcat 6.0.x ,如此跑 appfuse 2.0.2 時才能指定 Tomcat server 為其 Rune time server。
PS : 若你是用 JDK 6.0 Update 10 以上的版本,可以更改 d:\Java\NetBeans 6.5\etc\netbeans.conf 中的 netbeans_default_options (line 6) 在最後加上
--laf com.sun.java.swing.plaf.nimbus.NimbusLookAndFeel
可以將 NetBeans 的外觀換成新的介面如下
此介面比舊的 Windows 好看多了
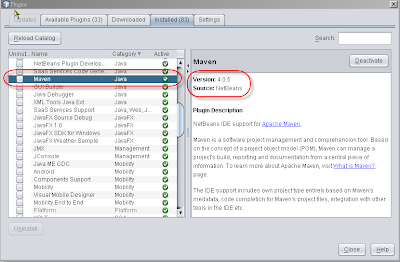
2. 安裝 maven plugin
安裝完 NetBeans 6.5 後,可透過 Tools > Plugins > Available Plugins 安裝 maven plugin。安裝完可得以下畫面
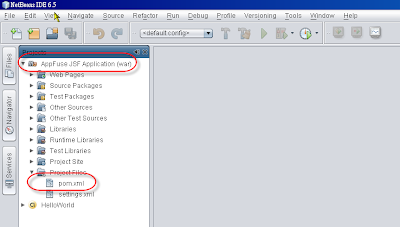
3. 匯入 myproject 到 NetBeans 6.5 中
基本上這也不是匯入,因為已經裝了 maven plugin 的關係,可以透過 File > Open Project 的方式就可以直接打開 myproject 了
4. 設定 Rumtime Server
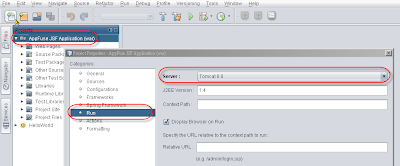
把 myproject 匯入到 NetBeans 後,預設並不會指定 Runtime Server ,這時候需透過 右鍵按Appfuse JSF Application > Properties > Run 去指定 Server。這邊請先設定為 Tomcat 6.0
5. 啟動 Appfuse web application
當 1-4 設定完成後,可以按 F6 ,Appfuse 就會立即 compile 並 deploy 到 Tomcat 6.0 上且直接帶出 Firefox (或 IE) 顯示 Appfuse 的完整功能
Tips
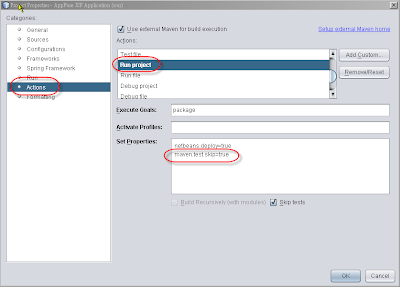
1. 每次按 F6 時,maven 都會先跑 testcase 後再 deploy 到 tomcat 上,若要跳過 testcase ,可以透過 右鍵按Appfuse JSF Application > Properties > Action > Run project > Set Properties 加入 maven.test.skip=true 即可以跳過 testcase
2. 當修改 java code 後按 F6 重新 deploy appfuse 到 tomcat ,會發現 2 次後便會發生
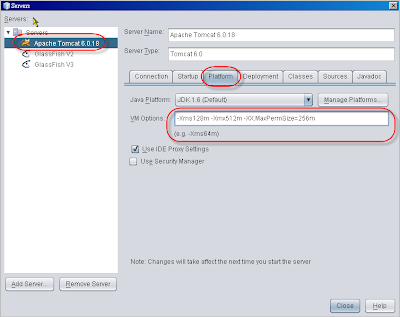
java.lang.OutOfMemoryError: PermGen space
的錯誤訊息,此時便無法重新 deploy appfuse ,必須透過 Task Manager 將手動 Tomcat 除掉後再重新 deploy 一次,造成很大的不便。這個問題可以透過 Tools > Servers > Apache Tomcat 6.0.18 > Platform(tab) > VM options 加入 -XX:MaxPermSize=256m 便可以至少 redeploy appfuse 至少 10 次以上,減少除掉 Tomcat 所需花費的時間。
運用這兩個 Tips ,應該可以減少一下開發時的麻煩,把時間花在功能的開發上。
使用 NetBeans 6.5 前,必須先把 appfuse 2.0.2 先安裝好。安裝的步驟可參考
Appfuse 2.0.2 安裝步驟(steps for appfuse 2.0.2 installation)
1. 安裝 NetBeans 6.5
下載 NetBeans 6.5 後安裝到 d:\Java\NetBeans 6.5 下。安裝時須確認裝的元件含 Java Web and EE,及 Run time server Tomcat 6.0.x ,如此跑 appfuse 2.0.2 時才能指定 Tomcat server 為其 Rune time server。
PS : 若你是用 JDK 6.0 Update 10 以上的版本,可以更改 d:\Java\NetBeans 6.5\etc\netbeans.conf 中的 netbeans_default_options (line 6) 在最後加上
--laf com.sun.java.swing.plaf.nimbus.NimbusLookAndFeel
可以將 NetBeans 的外觀換成新的介面如下

此介面比舊的 Windows 好看多了
2. 安裝 maven plugin
安裝完 NetBeans 6.5 後,可透過 Tools > Plugins > Available Plugins 安裝 maven plugin。安裝完可得以下畫面

3. 匯入 myproject 到 NetBeans 6.5 中
基本上這也不是匯入,因為已經裝了 maven plugin 的關係,可以透過 File > Open Project 的方式就可以直接打開 myproject 了

4. 設定 Rumtime Server
把 myproject 匯入到 NetBeans 後,預設並不會指定 Runtime Server ,這時候需透過 右鍵按Appfuse JSF Application > Properties > Run 去指定 Server。這邊請先設定為 Tomcat 6.0

5. 啟動 Appfuse web application
當 1-4 設定完成後,可以按 F6 ,Appfuse 就會立即 compile 並 deploy 到 Tomcat 6.0 上且直接帶出 Firefox (或 IE) 顯示 Appfuse 的完整功能

Tips
1. 每次按 F6 時,maven 都會先跑 testcase 後再 deploy 到 tomcat 上,若要跳過 testcase ,可以透過 右鍵按Appfuse JSF Application > Properties > Action > Run project > Set Properties 加入 maven.test.skip=true 即可以跳過 testcase

2. 當修改 java code 後按 F6 重新 deploy appfuse 到 tomcat ,會發現 2 次後便會發生
java.lang.OutOfMemoryError: PermGen space
的錯誤訊息,此時便無法重新 deploy appfuse ,必須透過 Task Manager 將手動 Tomcat 除掉後再重新 deploy 一次,造成很大的不便。這個問題可以透過 Tools > Servers > Apache Tomcat 6.0.18 > Platform(tab) > VM options 加入 -XX:MaxPermSize=256m 便可以至少 redeploy appfuse 至少 10 次以上,減少除掉 Tomcat 所需花費的時間。

運用這兩個 Tips ,應該可以減少一下開發時的麻煩,把時間花在功能的開發上。
Appfuse 2.0.2 安裝步驟(steps for appfuse 2.0.2 installation)
Appfuse 2.0.2 理論上不是一個 framework,而是一個已經 ready to go 的 project prototype。它集合了最穩定與先進的 framework 再加上最基本的 ACL,Menu ,讓 developer 不用從頭開始建構一個 project 的基礎架構。它的 build tool 用的是 Maven,所以無論在做 demo、test、ContinuousIntegration 都不用在額外撰寫新的,直接使用或就現有的架構再做擴充便可以上手。
以下為安裝 appfuse 2.0.2 的簡單步驟,不用十分鐘(除了喝 coffee 的時間),你就有一個可以 login 、manage user 、 upload file 基本功能的 web application 出現在你的電腦上。
1. 安裝 maven-2.0.9 及設定環境變數
下載 maven-2.0.9 到 d:\Java (目錄為 d:\Java\apache-maven-2.0.9)
set M2=D:\Java\apache-maven-2.0.9\bin
set M2_HOME=D:\Java\apache-maven-2.0.9
set MAVEN_OPTS=-Xms256m -Xmx512m
set PATH=%M2%;%PATH%
編輯 d:\Java\apache-maven-2.0.9\conf\settting.xml
line 49 將 localrepository 的內容改成 D:\Java\apache-maven-2.0.9\repository
PS:因 maven 預設值會將 repository 放到 c:\Document2 and Settings\.m2 中,這樣用不同的人 login ,其 repository 就需要跟著異動。放到 d:\Java\apache2-maven-2.0.9\repository 的好處在於將來 team 可以用同樣的設定作業,避免因環境的不同而需要花額外的時間做環境設定
2. 建立 appfuse 2.0.2 的 archetype 到 d:\projects 中
d:\projects> mvn archetype:create -DarchetypeGroupId=org.appfuse.archetypes -DarchetypeArtifactId=appfuse-basic-jsf -DremoteRepositories=http://static.appfuse.org/releases -DarchetypeVersion=2.0.2 -DgroupId=com.mycompany.app -DartifactId=myproject
PS : 此時可以去喝一杯咖啡了,因為要很久。若要節省時間,可以下載 dependency 並解壓縮到 d:\Java\apache-maven-2.0.9\repository
3. 取得 appfuse 的 source code 以便日後 debug 用
d:\projects> cd myproject
d:\projects\myproject> mvn appfuse:full-source
4. 安裝 mysql
到 mysql 的網站下載 mysql for Windows 並安裝 (此時裝的是 v5.0.x )。root 的密碼暫定為 root
5. 修改 root 的密碼
因 預設在 myproject 中的 pom.xml 的 mysql 密碼為 "空白",所以必須將此部份的空白填入真正的 root 密碼,在做 install 時才能將 table 及 測試資料放到 mysql 的資料庫中。編輯 pom.xml 並在 line 982 修改 <jdbc.password> </jdbc.password> 為 <jdbc.password>root</jdbc.password> (假設 mysql root 的密碼為 root)
6. 利用 command line 啟動 appfuse
一旦執行此 mvn jetty:run-war,appfuse 就會直接啟動在 port 8080。此時可以用 firefox 檢測 appfuse 是否啟動成功。將 url 指向 http://localhost:8080 可以得到此畫面
簡單的 6 個步驟,你就有一個功能陽春的 prototype 可以使用,但是若要真的用在 project 上,建議需要有至少 1 年以上的 web 開發功力再使用這一套,因為裡面用的是 MVC + ACEGI + AJAX ,光摸熟這一套就需要花約 2 星期的工夫,但一旦摸熟,則無往不利,因為要加新的功能,除了 domain 的 knowledge 以外,用套的就可以了。
以下為安裝 appfuse 2.0.2 的簡單步驟,不用十分鐘(除了喝 coffee 的時間),你就有一個可以 login 、manage user 、 upload file 基本功能的 web application 出現在你的電腦上。
1. 安裝 maven-2.0.9 及設定環境變數
下載 maven-2.0.9 到 d:\Java (目錄為 d:\Java\apache-maven-2.0.9)
set M2=D:\Java\apache-maven-2.0.9\bin
set M2_HOME=D:\Java\apache-maven-2.0.9
set MAVEN_OPTS=-Xms256m -Xmx512m
set PATH=%M2%;%PATH%
編輯 d:\Java\apache-maven-2.0.9\conf\settting.xml
line 49 將 localrepository 的內容改成 D:\Java\apache-maven-2.0.9\repository
PS:因 maven 預設值會將 repository 放到 c:\Document2 and Settings\
2. 建立 appfuse 2.0.2 的 archetype 到 d:\projects 中
d:\projects> mvn archetype:create -DarchetypeGroupId=org.appfuse.archetypes -DarchetypeArtifactId=appfuse-basic-jsf -DremoteRepositories=http://static.appfuse.org/releases -DarchetypeVersion=2.0.2 -DgroupId=com.mycompany.app -DartifactId=myproject
PS : 此時可以去喝一杯咖啡了,因為要很久。若要節省時間,可以下載 dependency 並解壓縮到 d:\Java\apache-maven-2.0.9\repository
3. 取得 appfuse 的 source code 以便日後 debug 用
d:\projects\myproject> mvn appfuse:full-source
4. 安裝 mysql
到 mysql 的網站下載 mysql for Windows 並安裝 (此時裝的是 v5.0.x )。root 的密碼暫定為 root
5. 修改 root 的密碼
因 預設在 myproject 中的 pom.xml 的 mysql 密碼為 "空白",所以必須將此部份的空白填入真正的 root 密碼,在做 install 時才能將 table 及 測試資料放到 mysql 的資料庫中。編輯 pom.xml 並在 line 982 修改 <jdbc.password>
6. 利用 command line 啟動 appfuse
一旦執行此 mvn jetty:run-war,appfuse 就會直接啟動在 port 8080。此時可以用 firefox 檢測 appfuse 是否啟動成功。將 url 指向 http://localhost:8080 可以得到此畫面
簡單的 6 個步驟,你就有一個功能陽春的 prototype 可以使用,但是若要真的用在 project 上,建議需要有至少 1 年以上的 web 開發功力再使用這一套,因為裡面用的是 MVC + ACEGI + AJAX ,光摸熟這一套就需要花約 2 星期的工夫,但一旦摸熟,則無往不利,因為要加新的功能,除了 domain 的 knowledge 以外,用套的就可以了。
Tuesday, December 2, 2008
如何在 eclipse 3.4 下跑 appfuse 2.0.2
因為工作性質的關係(一堆同時進行的專案),在系統的開發上需要有效率的執行,不能每次都從頭來,但已做過的專案又會因其特性的不同而造成 reuse 的機會降低,所以當時找了一個不是 framework 的 framework 當作開發的 initial startup ,裡面含有當下最新的技術,不用在自行組裝要用的 package,以降低開發時所需的時間與精力
Appfuse 目前最新版的是 2.0.2 ,用的整合工具是 maven 2.0.x ,但只能用 command line 做 build 及 run ,無法直接用在 IDE 的環境上。說實在的,借由 IDE 的輔助,可以省掉一些 coding 的時間,尤其是在 gen getxx 與 setxx 的 java code 時,助益不少
經我測試過,Appfuse 2.0.2 在 Netbeans 6.5 下完全沒有問題,可見 Netbeans 越來越成熟了,但在 eclipse 3.4 下則必須還要做些微修正才能符合 eclipse 的環境,做到 hot deployment 及減少修改 code 後還要重新 deployment 所浪費的時間
以下為修改步驟以便讓 appfuse 2.0.2 適用於 eclipse 3.4
PS : 請先安裝 JDK1.6, eclipse 3.4 JEE, maven 2.0.9, m2eclipse, mysql
1. 安裝 eclipse 3.4
下載 eclipse 3.4 並解壓縮到 d:\Java (目錄為 d:\Java\eclipse)
利用 eclipse 的 Help > Software Update > Available Software > Add site 安裝 m2eclipse plugin。
此 plugin 的 url 為 http://m2eclipse.sonatype.org/update/
2. 安裝 maven-2.0.9 及設定環境變數
下載 maven-2.0.9 到 d:\Java (目錄為 d:\Java\apache-maven-2.0.9)
set M2=D:\Java\apache-maven-2.0.9\bin
set M2_HOME=D:\Java\apache-maven-2.0.9
set MAVEN_OPTS=-Xms256m -Xmx512m
set PATH=%M2%;%PATH%
編輯 d:\Java\apache-maven-2.0.9\conf\settting.xml
line 49 將 localrepository 的內容改成 D:\Java\apache-maven-2.0.9\repository
PS:因 maven 預設值會將 repository 放到 c:\Document2 and Settings\.m2 中,這樣用不同的人 login ,其 repository 就需要跟著異動。放到 d:\Java\apache2-maven-2.0.9\repository 的好處在於將來 team 可以用同樣的設定作業,避免因環境的不同而需要花額外的時間做環境設定
3. 建立 appfuse 2.0.2 的 archetype
d:\projects> mvn archetype:create -DarchetypeGroupId=org.appfuse.archetypes -DarchetypeArtifactId=appfuse-basic-jsf -DremoteRepositories=http://static.appfuse.org/releases -DarchetypeVersion=2.0.2 -DgroupId=com.mycompany.app -DartifactId=myproject
PS : 此時可以去喝一杯咖啡了,因為要很久。若要節省時間,可以下載 dependency 並解壓縮到 d:\Java\apache-maven-2.0.9\repository
4. 取得 appfuse 的 source code 以便日後 debug 用
d:\projects> cd myproject
d:\projects\myproject> mvn appfuse:full-source
5. 修改 root 的密碼
因 預設在 myproject 中的 pom.xml 的 mysql 密碼為 "空白",所以必須將此部份的空白填入真正的 root 密碼,在做 install 時才能將 table 及 測試資料放到 mysql 的資料庫中。編輯 pom.xml 並在 line 982 修改 <jdbc.password> </jdbc.password> 為 <jdbc.password>root</jdbc.password> (假設 mysql root 的密碼為 root)
6. 利用 command line 啟動 appfuse
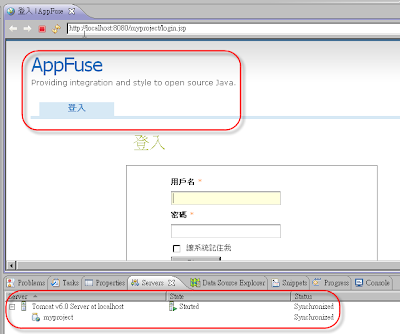
一旦執行此 mvn jetty:run,appfuse 就會直接啟動在 port 8080。此時可以用 firefox 檢測 appfuse 是否啟動成功。將 url 指向 http://localhost:8080 可以得到此畫面
7. 匯入 myproject 到 eclipse 中
確認 appfuse 執行無誤後, 請執行
d:\projects\myproject> mvn eclipse:eclipse
這時候會在 d:\projects\myproject 目錄下產生 .settings 目錄及 .project, .classpath 檔
然後打開 eclipse ,利用 File > Import > General > Maven Projects 再將 Root Directory 指到 d:\projects\myproject 再按 Finish
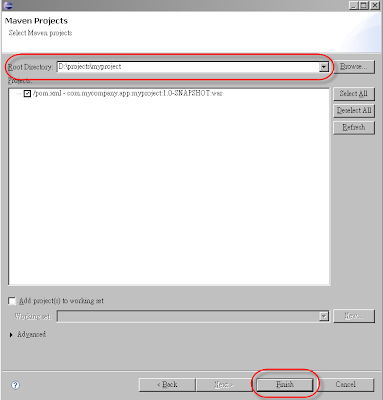
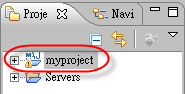
這裡可看到 myproject 已經被匯入到 eclipse 中了
8. 修改 eclipse WTP 專用的設定檔
若要讓 appfuse 可以在 eclipse WTP 上執行,必須做稍微的修正,才能直接在 eclipse 上啟動 tomcat 並 deploy appfuse
修改 .setting\org.eclipse.wst.common.component
刪除 <wb-resource deploy-path="/" source-path="src/main/webapp"/>
刪除 <wb-resource deploy-path="/" source-path="src/main/resource"/>
增加
修改 .classpath
刪 除 <classpathentry kind="src" path="src/main/resources" excluding="ApplicationResources_de.properties|ApplicationResources_fr.properties|ApplicationResources_ko.properties|ApplicationResources_nl.properties|ApplicationResources_no.properties|ApplicationResources_pt*.properties|ApplicationResources_tr.properties|ApplicationResources_zh*.properties|applicationContext- resources.xml|**/*.java"/>
增 加 <classpathentry kind="con" path="org.eclipse.jst.server.core.container/org.eclipse.jst.server.tomcat.runtimeTarget/Apache Tomcat v6.0"/>
增加 <classpathentry kind="con" path="org.eclipse.jst.j2ee.internal.web.container"/>
9. 注意事項
9.1 若要改 jsp ,必須改 target/myproject-1.0-SNAPSHOT 下面的 jsp 檔,測試完後再 copy 回 src\main\webapp 下,因為修改後的 WTP 只吃 target/myproject-1.0-SNAPSHOT 下的 jsp。
9.2 若改 jsp 後 refresh browser 無法立即呈現修改後的狀態,需要 close myproject 在 open myrpoejct。這是因為手動改 wtp 設定檔,需 reopen myproject 才行
Appfuse 目前最新版的是 2.0.2 ,用的整合工具是 maven 2.0.x ,但只能用 command line 做 build 及 run ,無法直接用在 IDE 的環境上。說實在的,借由 IDE 的輔助,可以省掉一些 coding 的時間,尤其是在 gen getxx 與 setxx 的 java code 時,助益不少
經我測試過,Appfuse 2.0.2 在 Netbeans 6.5 下完全沒有問題,可見 Netbeans 越來越成熟了,但在 eclipse 3.4 下則必須還要做些微修正才能符合 eclipse 的環境,做到 hot deployment 及減少修改 code 後還要重新 deployment 所浪費的時間
以下為修改步驟以便讓 appfuse 2.0.2 適用於 eclipse 3.4
PS : 請先安裝 JDK1.6, eclipse 3.4 JEE, maven 2.0.9, m2eclipse, mysql
1. 安裝 eclipse 3.4
下載 eclipse 3.4 並解壓縮到 d:\Java (目錄為 d:\Java\eclipse)
利用 eclipse 的 Help > Software Update > Available Software > Add site 安裝 m2eclipse plugin。
此 plugin 的 url 為 http://m2eclipse.sonatype.org/update/
2. 安裝 maven-2.0.9 及設定環境變數
下載 maven-2.0.9 到 d:\Java (目錄為 d:\Java\apache-maven-2.0.9)
set M2=D:\Java\apache-maven-2.0.9\bin
set M2_HOME=D:\Java\apache-maven-2.0.9
set MAVEN_OPTS=-Xms256m -Xmx512m
set PATH=%M2%;%PATH%
編輯 d:\Java\apache-maven-2.0.9\conf\settting.xml
line 49 將 localrepository 的內容改成 D:\Java\apache-maven-2.0.9\repository
PS:因 maven 預設值會將 repository 放到 c:\Document2 and Settings\
3. 建立 appfuse 2.0.2 的 archetype
d:\projects> mvn archetype:create -DarchetypeGroupId=org.appfuse.archetypes -DarchetypeArtifactId=appfuse-basic-jsf -DremoteRepositories=http://static.appfuse.org/releases -DarchetypeVersion=2.0.2 -DgroupId=com.mycompany.app -DartifactId=myproject
PS : 此時可以去喝一杯咖啡了,因為要很久。若要節省時間,可以下載 dependency 並解壓縮到 d:\Java\apache-maven-2.0.9\repository
4. 取得 appfuse 的 source code 以便日後 debug 用
d:\projects\myproject> mvn appfuse:full-source
5. 修改 root 的密碼
因 預設在 myproject 中的 pom.xml 的 mysql 密碼為 "空白",所以必須將此部份的空白填入真正的 root 密碼,在做 install 時才能將 table 及 測試資料放到 mysql 的資料庫中。編輯 pom.xml 並在 line 982 修改 <jdbc.password>
6. 利用 command line 啟動 appfuse
一旦執行此 mvn jetty:run,appfuse 就會直接啟動在 port 8080。此時可以用 firefox 檢測 appfuse 是否啟動成功。將 url 指向 http://localhost:8080 可以得到此畫面
7. 匯入 myproject 到 eclipse 中
確認 appfuse 執行無誤後, 請執行
d:\projects\myproject> mvn eclipse:eclipse
這時候會在 d:\projects\myproject 目錄下產生 .settings 目錄及 .project, .classpath 檔
然後打開 eclipse ,利用 File > Import > General > Maven Projects 再將 Root Directory 指到 d:\projects\myproject 再按 Finish


這裡可看到 myproject 已經被匯入到 eclipse 中了
8. 修改 eclipse WTP 專用的設定檔
若要讓 appfuse 可以在 eclipse WTP 上執行,必須做稍微的修正,才能直接在 eclipse 上啟動 tomcat 並 deploy appfuse
修改 .setting\org.eclipse.wst.common.component
刪除 <wb-resource deploy-path="/" source-path="src/main/webapp"/>
刪除 <wb-resource deploy-path="/" source-path="src/main/resource"/>
增加
刪 除 <classpathentry kind="src" path="src/main/resources" excluding="ApplicationResources_de.properties|ApplicationResources_fr.properties|ApplicationResources_ko.properties|ApplicationResources_nl.properties|ApplicationResources_no.properties|ApplicationResources_pt*.properties|ApplicationResources_tr.properties|ApplicationResources_zh*.properties|applicationContext- resources.xml|**/*.java"/>

9. 注意事項
9.1 若要改 jsp ,必須改 target/myproject-1.0-SNAPSHOT 下面的 jsp 檔,測試完後再 copy 回 src\main\webapp 下,因為修改後的 WTP 只吃 target/myproject-1.0-SNAPSHOT 下的 jsp。
9.2 若改 jsp 後 refresh browser 無法立即呈現修改後的狀態,需要 close myproject 在 open myrpoejct。這是因為手動改 wtp 設定檔,需 reopen myproject 才行
Thursday, November 27, 2008
Android Plugin in Netbeans 6.5
Android for Netbeans 的 plugin 終於出現了,雖然 Android 官方網站只推出支援 eclipse 的 plugin ,但畢竟 Netbeans 也越來越多人使用,Google 應該也推出 Netbeans 的 plugin 才對,可能是 resource 不夠吧。
目前的 release 版本只能算是 beta 版,因為在 Linux 此 plugin 運作沒有問題,但在 Windows 上還要做些微的修改才能順利的使用此 plugin。以下為使用此 plugin 的步驟
1. 安裝 IDE 與 Android SDK 軟體
下載 NetBeans 6.5 並安裝到 d:\Java\NetBeans 6.5
下載 Android Windows SDK 並安裝到 d:\Java\android-sdk-windows-1.0_r1
2. 安裝 Android plugin
啟動 NetBeans 6.5,點選 Tools > Plugins > Settings > Add
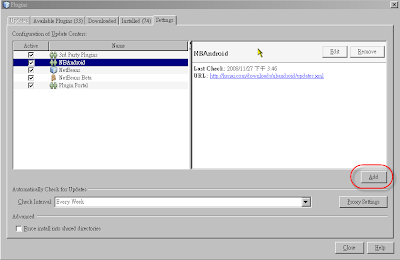
然後在 dialog 加入 nbandroid 的 URL http://kenai.com/downloads/nbandroid/updates.xml
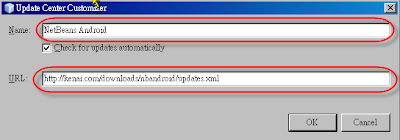
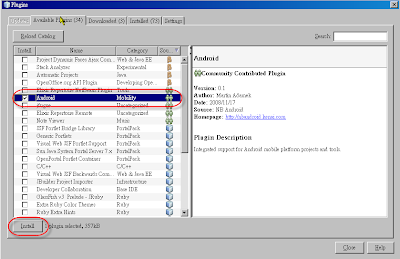
這時候可以在 Available-plugin 中找到 Android 的 plugin 並按 Install 安裝
3. Hello Word, Android
既然 plugin 裝好了,就順便寫一個初學者最常用的程式 Hello World。在 NetBeans 中按
File > New Project > Android > Android Application
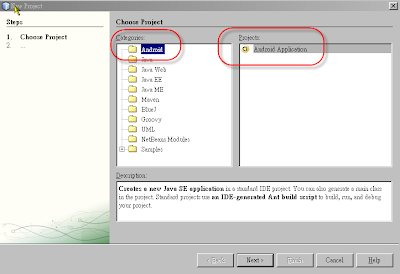
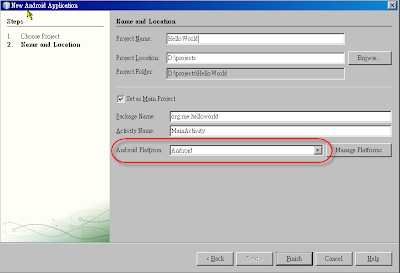
按 Next 會出現 New Android Application 的畫面,在此畫面,請填入如下畫面
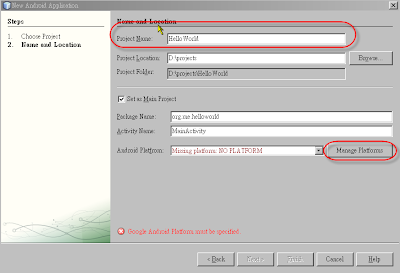
在畫面下面可以看見紅字部份,此部份是因為尚未設定 Android Platform 的關係,此時可以按 Manage Platforms > Add Platform... 來新增 Android Platform
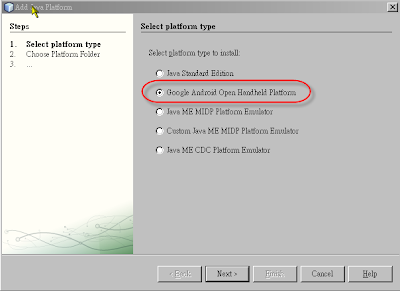
點選 Google Android Open Handheld Platform 按 Next,
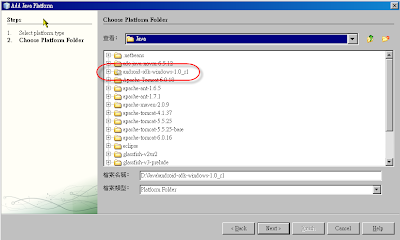
在 Platform folder 選擇 d:\Java\android-sdk-windows-1.0_r1 後按 Next
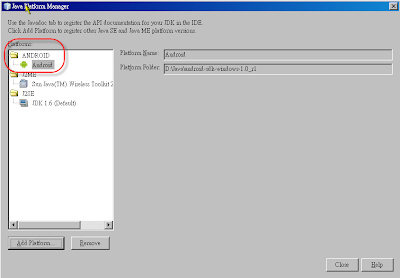
按 Next 後,出現 Platform 的命名,在 Name 上用預設值按 Finish,Android Platform 便可新增完成
按 Close 後,返回 New Android Application 後,Android Platform 會自動選擇
按 Finish 後,就可以開始寫 Android 的 Hello World 程式了
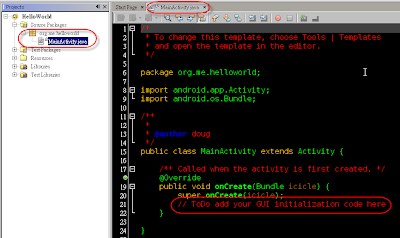
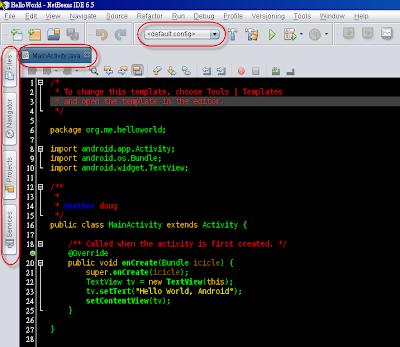
將 Todo 那一行換成以下三行
TextView tv = new TextView(this);
tv.setText("Hello World, Android");
setContentView(tv);
PS : 請記得 import android.widget.TextView;
此時按 Run 會發現模擬器雖然跑出來了,但並不會將 Hello World deploy 到模擬器中
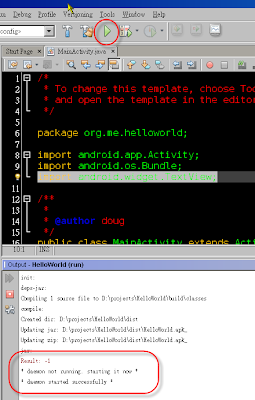
這是因為此 plug in 有一個 bug,要修正此 bug ,可以手動修改 D:\projects\HelloAndroid\nbproject\build-impl.xml 檔將 line 466~468 換成以下內容

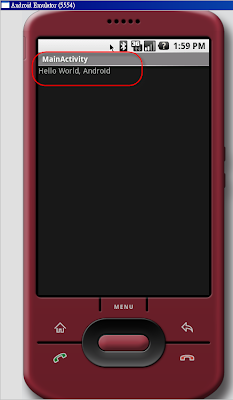
然後再按 Run ,便可以出現剛剛寫的 Hellow World, Android 畫面
4. 更改 skin
若想試試不同的 Android skin ,可以在 D:\projects\HelloAndroid\build.xml 中增加一個 property 去設定要用的 screen.skin 為何,在此我用的 skin 為
則模擬器會出現 QVGA-L 型號的畫面

PS : 寫此 blog 時,此 plug in 的修正尚未 publish
目前的 release 版本只能算是 beta 版,因為在 Linux 此 plugin 運作沒有問題,但在 Windows 上還要做些微的修改才能順利的使用此 plugin。以下為使用此 plugin 的步驟
1. 安裝 IDE 與 Android SDK 軟體
下載 NetBeans 6.5 並安裝到 d:\Java\NetBeans 6.5
下載 Android Windows SDK 並安裝到 d:\Java\android-sdk-windows-1.0_r1
2. 安裝 Android plugin
啟動 NetBeans 6.5,點選 Tools > Plugins > Settings > Add

然後在 dialog 加入 nbandroid 的 URL http://kenai.com/downloads/nbandroid/updates.xml

這時候可以在 Available-plugin 中找到 Android 的 plugin 並按 Install 安裝

3. Hello Word, Android
既然 plugin 裝好了,就順便寫一個初學者最常用的程式 Hello World。在 NetBeans 中按
File > New Project > Android > Android Application

按 Next 會出現 New Android Application 的畫面,在此畫面,請填入如下畫面

在畫面下面可以看見紅字部份,此部份是因為尚未設定 Android Platform 的關係,此時可以按 Manage Platforms > Add Platform... 來新增 Android Platform

點選 Google Android Open Handheld Platform 按 Next,
在 Platform folder 選擇 d:\Java\android-sdk-windows-1.0_r1 後按 Next

按 Next 後,出現 Platform 的命名,在 Name 上用預設值按 Finish,Android Platform 便可新增完成

按 Close 後,返回 New Android Application 後,Android Platform 會自動選擇

按 Finish 後,就可以開始寫 Android 的 Hello World 程式了

將 Todo 那一行換成以下三行
TextView tv = new TextView(this);
tv.setText("Hello World, Android");
setContentView(tv);
PS : 請記得 import android.widget.TextView;
此時按 Run 會發現模擬器雖然跑出來了,但並不會將 Hello World deploy 到模擬器中

這是因為此 plug in 有一個 bug,要修正此 bug ,可以手動修改 D:\projects\HelloAndroid\nbproject\build-impl.xml 檔將 line 466~468 換成以下內容

然後再按 Run ,便可以出現剛剛寫的 Hellow World, Android 畫面

4. 更改 skin
若想試試不同的 Android skin ,可以在 D:\projects\HelloAndroid\build.xml 中增加一個 property 去設定要用的 screen.skin 為何,在此我用的 skin 為
QVGA-P

則模擬器會出現 QVGA-L 型號的畫面

PS : 寫此 blog 時,此 plug in 的修正尚未 publish
Monday, November 24, 2008
在 Ubuntu 8.10 安裝 apache 2.2 + ssl
# apt-get install apache2 openssl ssl-cert
# openssl req $@ -new -x509 -days 365 -nodes -out /etc/apache2/apache.pem -keyout /etc/apache2/apache.pem
-----------
Country Name (2 letter code) [AU]:GB
State or Province Name (full name) [Some-State]:
Locality Name (eg, city) []:London
Organization Name (eg, company) [Internet Widgits Pty Ltd]:Debian
Organizational Unit Name (eg, section) []:
Common Name (eg, YOUR name) []:
Email Address []:
-----------
# chmod 600 /etc/apache2/apache.pem
# cd /etc/apache2/mods-enabled/
# ln -s ../mods-available/ssl.* .
# cd /etc/apache2/site-enabled/
# ln -s ../site-available/default-ssl .
modify ports.conf and add
LISTEN 443
NameVirtualHost *:443
# /etc/init.d/apache2 restart
Sunday, November 23, 2008
修理 nm-applet 在 ubuntu 8.10 無法顯示
安裝完 ubuntu 8.10 desktop 後,右上角的 network icon 不見了,經搜尋後,需經下列步驟的修正才能解決問題
1. 修改 /etc/dbus-1/system.d/NetworkManager.conf 和 /etc/dbus-1/system.d/nm-applet.conf 將 deny,改allow
2. 重新啟動 dbus
sudo /etc/init.d/dbus restart
3. 停止 NetworkManager
sudo /etc/init.d/NetworkManager stop
4. 刪除 /etc/network/interfaces 或是更名(rename)
sudo rm /etc/network/interfaces
5. 重新啟動 NetworkManager
sudo /etc/init.d/NetworkManager start
6. 重新登入
Thursday, November 20, 2008
黑鴉鴉的庫存 (工程師的思維)
身為一個工程師,並不容易了解庫存有多麼恐怖,因為我們看不到庫存數字與庫存價格,但我們往往是庫存的始作俑者,而一旦有了庫存,可以用來營運週轉的現金就會被咬住,如果沒有警覺,公司可能就快速進入慘澹狀況。
電影《當幸福來敲門》中,主角花光所有的積蓄買了「骨質疏鬆掃描儀」,然而機器賣得並不理想,幾乎一臺也賣不出去,後來主角甚至淪落到老婆跑了,付不出房租,只能帶著兒子在地鐵的廁所洗澡的困境。
看著這樣真人實事改編的電影,劇情可能很感人,但是主角一開始的悲慘命運卻很嚇人,不知道觀眾是否能深刻體會賣不出去的庫存所帶來的壓力,現實業界卻每天都上演著這樣嚇人的事情。常常聽人家說,神仙也賣不掉的是庫存,當公司開始堆積庫存,代表的是現金被積壓了,而且,也常常是惡夢的開始。
身為一個工程師,並不容易了解庫存有多麼恐怖,因為我們看不到庫存數字與庫存價格,但我們往往是庫存的始作俑者。有很多公司,研發單位做了產品,還沒有好好驗證,就開始出貨銷售,結果賣不出去變成庫存。也有的狀況是,研發出的東西沒有競爭力,或者一邊量產一邊修改,導致很多料件堆放在倉庫裡面也沒有人想起來,這筆錢就算是損失了。我曾經請教過一個學長,該怎樣教育研發人員降低庫存、減少呆料?學長說,首先要建立正確的庫存編碼方式,讓工程人員在設計的剛開始就查詢共用的零件,同時設計的產品中,能讓零件統一、共用,盡量讓每個研發人員使用的零件都相同,而不要各有各的習慣,這些講起來都是細節,我個人覺得總歸一句話──「就是要讓複雜的零件種類簡化」。
很多事情,在研發人員一個起心動念之下就會完全不一樣。有個朋友在一家以成本超低著名的公司上班,有一次剛好遇見他正在跟工程師討論新產品的電路設計,他很得意地跟我說,原本的設計需要用到70項零件種類,在他詳細比對,並且將該設計裡面可以使用統一規格的零件,都用同一規格取代之後,零件種類降低為50種。
我想不出這有什麼好得意的,他只好耐心解釋:「每一種零件,都是要量大價格才會低,如果我能把料件統一使用公司裡面量大的規格,或者因為統一料件之後讓該料件的採購數量放大,就可以大幅壓低成本!另外,統一之後也可以減少量產失誤、庫存雜亂、進貨複雜度等問題。」以前帶過我的前輩常常說:「好的研發人員,讓複雜的事情變簡單」,我漸漸明白其中的道理了。產品一開始設計的時候,如果沒有考慮以上細節,後面就會拉出一長串越來越複雜的人力物力,這些都是額外的時間與成本。
課堂上教授曾經問過,如果有一天,你想要買下一個工廠,那麼第一件事情你應該要看什麼?答案就是看庫存,因為那是企業經營好壞,文化優劣的第一表徵。但是,庫存並非全然不好,有些長輩反而因為累積了庫存,為了消化這些零件,逼得他們拼命去想、去找、去問,最後竟然成功開拓出商機,雖然那些庫存可能還是沒有賣出去,但是卻讓他們賺到遠超過那些庫存價值的財富。就像很多債臺高築,卻不輕言放棄的人,負債的壓力反而成為他們奮鬥的原動力,最後不僅還清債務,還賺到了新的人生。但這其實只是少數的特例。
時間拖得越久,庫存的實際價值會呈幾何級數遞減,尤其是高科技產業,新的產品不斷推出,倉庫裡的東西很快就失去價值。
我曾經有機會陪朋友去倒閉的公司倉庫搬貨,我的第一印象是,整個倉庫黑鴉鴉的都是過時的零件和零散量產尾數,我們找了半天,都找不到有價值的東西。那時候我朋友說,你知道這個倉庫裡面這些垃圾帳面價值是多少嗎?他伸出五個手指頭,五億,你信不信?不管我信不信,實際的價值可能連五萬都不到。
既然庫存這麼可怕,為什麼還會有庫存?除了研發人員沒有將各類設計好好統一整理整頓之外,經營者的內控也大有問題──量產剩餘的尾數料件沒有歸回原位,產品的編號錯亂,同一種零件有好幾種編號,更可怕的是做到一半的半成品亂堆,沒有人知道該怎樣處理。當我們眼中只有看到訂單,卻沒有看到品質,或者只想著擴充,忽略掉驗證,套一句老人家的話:就是貪心。
「誰想要這樣?還不都是被騙的!」雖然說被人家騙,買了貨客戶卻取消訂單,但是如果這個產品夠好,其實也不愁賣不掉吧?如果當初有考慮到公司的體質,不好的交易條件無法接受,也就不用硬吞吧?我們都想讓公司上市上櫃賺很多錢,但是在這之前需要思考公司的口袋有多深?各個環節是否能認真思考把事情變簡單?
一旦有了庫存,可以用來營運週轉的現金就會被咬住,如果沒有警覺,難免就落入惡性循環直到財務出現狀況。只是看報表是不會有感覺的,有空常去倉庫走走,翻翻那些塵封的零件,心理一定會有感觸的。
要體驗庫存的壓力很簡單,去五分埔買一些衣服到網路上去賣,殺價競爭與賣不出去的焦急感很快就來到,即使對你而言衣服可能只是不到1, 000元的投資。但是倉庫那些黑鴉鴉的庫存,至少都是百萬千萬的損失呢!
參考連結
http://www.ithome.com.tw/itadm/article.php?c=52063
Tips for Ubuntu Server Configuration
1. Change computer name
step 1. modify /etc/hostname
step 2. modify /etc/hosts
PS : If /etc/hosts is not modified, X windows will have trouble.
step 1. modify /etc/hostname
step 2. modify /etc/hosts
PS : If /etc/hosts is not modified, X windows will have trouble.
Wednesday, November 19, 2008
讓裝過 desktop 的 Ubuntu Server 啟動進入 console mode
1. 新增一個檔案 /etc/inittab 內容如下
id:3:initdefault:
2. 更改啟動服務
$ mv /etc/rc2.d/S30gdm /etc/rc2.d/K30gdm
id:3:initdefault:
2. 更改啟動服務
$ mv /etc/rc2.d/S30gdm /etc/rc2.d/K30gdm
Tuesday, November 18, 2008
在 Ubuntu 8.10 安裝 Oracle 11g
最近因買了一台 Core Duo 2 的 notebook, 於是就分割了一塊硬碟區域裝 Ubuntu 8.10 版本,至於為何會裝 8.10 版, 因為它的 kernel 支援我的無限網卡, 完全不用再安裝其他軟體
在台灣, 最常用的 database 就是 mssql, oracle, mysql。 在 linux 下安裝 mssql 是不可能的事,除非用 VM 去模擬 Windows 環境。 看了一下 Oracle 的安裝手冊,全部都是英文的,於是想在安裝的時候順便把過程用中文寫下來,便於日後參考。安裝步驟如下
1. 下載 oracle 11g 版本 (安裝版本為 linux_11gR1_database_1013.zip),這裡需提醒你必須要註冊成為 oracle 的使用者才能下載,註冊是免費的
2. 用 root 進入
$ sudo su -
2. 安裝額外的 package 給 oracle 用
# apt-get install gcc make binutils gawk x11-utils rpm alien ksh lsb-rpm
3. 因為 Ubuntu 的預設 shell 是 sh,需改成 bash
# ln -sf /bin/bash /bin/sh
# ls -l /bin/sh
3. 建立群組與使用者
# addgroup oinstall
# addgroup dba
# addgroup nobody
# usermod -g nobody nobody
# useradd -g oinstall -G dba -p password -d /home/oracle -s /bin/bash oracle
# mkdir /home/oracle
# chown -R oracle:dba /home/oracle
# ln -s /usr/bin/awk /bin/awk
# ln -s /usr/bin/rpm /bin/rpm
# ln -s /usr/bin/basename /bin/basename
# mkdir /etc/rc.d
# for i in 0 1 2 3 4 5 6 S ; do ln -s /etc/rc$i.d /etc/rc.d/rc$i.d ; done
4. 建立 Oracle 專用目錄
# mkdir -p /u01/app/oracle
# chown -R oracle:dba /u01
. 解壓縮 linux_11gR1_database_1013.zip 到 /u01 下
6. 加入以下參數到 /etc/sysctl.conf
fs.file-max = 65535
kernel.shmall = 2097152
kernel.shmmax = 2147483648
kernel.shmmni = 4096
kernel.sem = 250 32000 100 128
net.ipv4.ip_local_port_range = 1024 65535
net.core.rmem_default = 4194304
net.core.rmem_max = 4194304
net.core.wmem_default = 262144
net.core.wmem_max = 262144
7. 將下列參數加到 /etc/security/limits.conf
oracle soft nproc 2047
oracle hard nproc 16383
oracle soft nofile 1023
oracle hard nofile 65535
8. 將下列參數加到 /etc/pam.d/login
session required /lib/security/pam_limits.so
session required pam_limits.so
9. 重新啟動 Ubuntu Server 開機
10. 先用 oracle 登入後,執行以下命令以安裝 11g。因不支援 zh_TW:UTF-8 的語系,必需先改成 zh_TW:Big5 在執行安裝程式
$ cd /u01/database
$ export LANG=zh_TW:Big5
$ ./runInstaller -ignoreSysPrereqs
11. 這時候英文版的安裝畫面會出現,繼續執行安裝
Next >> Operating System group name = dba >> Standard Edtion >>
Name=oraubuntu, Location /u01/app/oracle/product/11.1.0/oraubuntu
12. 畫面跳到檢查系統需求,這時候將所有的 check box 勾選成 user verified.
13. 按 Next 繼續,然後選擇 "Install Software Only"
14. 按 Next 繼續,將所有 group 選 "dba"
15. 按 Next 繼續,再按 Install 開始正式安裝
16. 經過兩杯 coffee 時間,終於出現下一個畫面,安裝程式需要你用 root 執行兩個 script 分別為
/u01/app/orsInventory/orainstRoot.sh
/u01/app/oracle/product/11.1.0/oraubuntu/root.sh
17. 用 root 執行完這兩個 script 後按 OK,整個安裝就算完成了
18. 此時只有安裝完 oracle ,但尚未建立資料庫,在建立資料庫之前,必須先安裝幾個 package 再建立資料庫
# apt-get install libaio1 lesstif2 libmotif3
19. 用 root 建立 script 以便在開機時啟動 oracle 資料庫
# cat /etc/init.d/oracledb
===============================================================
#!/bin/bash
#
# /etc/init.d/oracledb
#
# Run-level Startup script for the Oracle Listener and Instances
# It relies on the information on /etc/oratab
export ORACLE_BASE=/u01/app/oracle
export ORACLE_HOME=/u01/app/oracle/product/11.1.0/oraubuntu
export ORACLE_OWNR=oracle
export PATH=$PATH:$ORACLE_HOME/bin
if [ ! -f $ORACLE_HOME/bin/dbstart -o ! -d $ORACLE_HOME ]
then
echo "Oracle startup: cannot start"
exit 1
fi
case "$1" in
start)
# Oracle listener and instance startup
echo -n "Starting Oracle: "
su $ORACLE_OWNR -c "$ORACLE_HOME/bin/lsnrctl start"
su $ORACLE_OWNR -c "$ORACLE_HOME/bin/dbstart $ORACLE_HOME"
touch /var/lock/oracle
echo "OK"
;;
stop)
# Oracle listener and instance shutdown
echo -n "Shutdown Oracle: "
su $ORACLE_OWNR -c "$ORACLE_HOME/bin/lsnrctl stop"
su $ORACLE_OWNR -c "$ORACLE_HOME/bin/dbshut $ORACLE_HOME"
rm -f /var/lock/oracle
echo "OK"
;;
reload|restart)
$0 stop
$0 start
;;
*)
echo "Usage: `basename $0` start|stop|restart|reload"
exit 1
esac
exit 0
=======================================================================
# chmod a+x /etc/init.d/oracledb
# update-rc.d oracledb defaults 99
20. 用 oracle 開始建立資料庫
$ export ORACLE_HOME=/u01/app/oracle/product/11.1.0/oraibex
$ export PATH=$PATH:/u01/app/oracle/product/11.1.0/oraibex/bin
$ dbca
21. 接下來按 Next >> "Create Database", Next >> Next
22. Global Database Name : vmid , SID : vmid
23. 不要選擇 "Configure Enterprise Manager" 再按 Next
24. password 統一用 "oracle" ,再按 Next
25. 選 File System ,再按 Next
26. 選第一個,"Use Databaes File Location from Template" 再按 Next
27. 將 archive 功能 disable 再按 Next
28. 選擇 "Sample Schema" 再按 Next
29. 在 "Character Sets" 選 "Unicode" 再按 Next
30. 選 "Keep default security settings" ,再按 Next
31. 將 "Enable automatic maintenance tasks" disable 後,再按 Next
32. 再按 "Next" >> "Finish" >> "ok" 後 vmid 的資料庫開始建立
33. 建立完成後按 "exit" 離開,此時資料庫建立完成
34. 測試資料庫連接
$ export ORACLE_ID=vmid
$ sqlplus system/oracle
若可以連進去,便是成功
35. 開機時啟動 oracle 並可連接,需編輯 /etc/oratab
intrepid:/u01/app/oracle/product/11.1.0/oraibex:N
並將 N 改為 Y
36. 重新啟動 server ,如此才能從外部連接 oracle
Wednesday, October 22, 2008
Google機房的省電妙招
| 根據Google資料顯示,其資料中心PUE值平均僅為1.21,他們是透過建立冷熱通道、提高電源供應器的使用效率、使用蒸發式的冷卻水塔等,來降低資料中心的耗電量。 | |
| 說到Google,或許你曾使用過Google的Gmail、搜尋引擎等服務,但你一定不知道,當使用Google搜尋時,使用者個人電腦所耗費的電力比起Google系統回應使用者需求所使用的能源還多。 根據Google的資料,Google六座資料中心平均PUE值為1.21,目前臺灣企業資料中心的PUE值平均為2.5,歐美國家的PUE值平均則為 2,PUE值越低,代表著機房空調冷卻所需的電力就會更少,Google幾乎做到最高標準的資料中心節能目標。Google日前發布一個專屬網站,告訴大 家Google如何透過4種方法打造出高能源使用效率的資料中心。 第一步:降低伺服器的用電量 對於Google來說,最大宗的IT設備莫過於伺服器。Google從2000年就開始強化伺服器的節能,目前Google所用的伺服器都是自行設計,將設計好的伺服器委由代工廠製造。Google的目的就是要打造一臺相當節能的伺服器,而重點就是要提升能源轉換的效率。 在挑選伺服器的電源供應器上,Google採用高轉換效率的電源供應器。此外,Google還注意到電力供應從主機板到各零組件的電力浪 費,Google透過有效率的電壓調節模組(efficient voltage regulator modules)來避免電力從主機板至各零組件在轉換的過程中所造成的浪費。不只如此,由於Google的應用屬性,伺服器並不需要繪圖處理器,因此拿掉 不需要的零組件,不但減少電力的浪費,由於零組件數量降低,風扇的使用數目也可減少,提升整體伺服器的用電效率。 第二步:冷卻水塔盡量使用蒸發冷卻 傳統資料中心空調冷卻的費用約占整體電費的30%至70%,Google除了建立冷熱通道來提升空調使用效率,並提高冷通道的溫度設定來減少空調冷卻的支出,比方來說,如果冷通道溫度設定為21度可調高至26度,透過提高冷通道的溫度,減少空調使用。 此外,Google還透過「蒸發冷卻」的方式來降低空調冷卻的費用。 Google目前位在俄勒岡州的資料中心,其冷卻水塔就是採用蒸發冷卻的方式。 先將資料中心所產生的熱透過冷卻水來降溫,所製造的熱水就是透過冷卻水塔,與外界的冷空氣進行熱交換,來達到冷卻的目的,這麼一來就不需要額外負擔電費將熱水降溫,透過「免費的冷卻模式」來降低資料中心空調的電費。 第三步:充分利用水資源 Google不只省電,也想節省用水量,Google計畫在今年底,有兩座資料中心的冷卻水塔將全部採用再生水,並預計在2010年有8成的用水 量是來自再生水。目前在比利時的資料中心就在建置水過濾系統,所使用的水資源主要來自城市的汙水或雨水,雖然淨化後的水質還不足以當作飲用水,但透過過濾 系統淨化雜質,還是可以供給冷卻水塔使用,降低Google的用水量。 第四步:重複利用伺服器 當伺服器走入汰換年限,Google並非丟棄淘汰的伺服器,而是透過回收機制,讓老舊的伺服器還能發揮最大的作用。Google的理想是希望每一臺伺服器的零組件都能重複使用,把回收的零組件繼續用在新伺服器上。 目前Google有6成8的老舊零組件使用在新的伺服器上,至於Google自身無法繼續使用的零組件,Google則是透過出售或捐贈的方式,來延續老舊零組件的壽命。文⊙林文彬 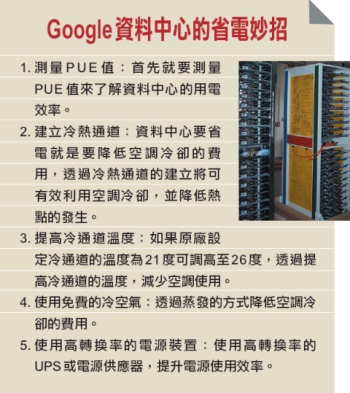 |
Friday, October 3, 2008
十年磨一劍,開發功力需要實戰累積
| 程式人的養成並非一朝一夕。若以為「熟讀唐詩三百首,不會作詩也會吟」,絕對難成大器。 |
| |
| 一篇名為《Teach Yourself Programming in Ten Years(花十年的時間學習程式設計)》” 文章,作者Peter Norvig點出了許多程式人急於速成程式設計的現象。相信許多人看到這篇文章的標題,都會露出會心的一笑,因為相較於坊間許多標榜在幾天甚至幾小時之 內,可以學成某一程式語言或特定軟體技術的書籍而言,這篇文章標題中的「十年」,無疑突顯出極大的對比。 程式開發可快速上手,是開發工具給的錯覺 已經記不得究竟是那本書籍開此風氣之先,但根據這篇文章的作者,在文章中表示,他在Amazon上搜尋具有此種形式的書名,在搜尋結果的前兩百筆中,高達96%的書是和電腦技術相關。 這實在是一個相當獨特而且有趣的現象。此類書籍大行其道,代表市場接受度高。為什麼唯獨電腦技術,特別是程式語言的學習者,這麼迫切地想要在極短的時間內學習完一樣事物呢?又是什麼樣的原因,使得人們也同樣期待在這麼短的時間內,得以將程式語言學習完成? 許多程式語言具備了易懂難精的本質。程式人或許可以在相對短的時間內了解、學會該語言的主要語法,並且讀懂典型的程式碼,但這不代表已經確切地體會、掌握了該語言的核心及精髓。 有些程式語言本身的設計,即試圖降低入門時的學習曲線及門檻,好讓新手程式人們也能輕易上手。而現代整合開發工具越來越先進,所打造的應用程式框 架及現有元件更是日益完備,使得新手程式人只消撰寫極少量的程式碼,所得的應用程式便可產生極為炫目的效果。在許多開發工具的助陣之下,即使是剛入門的程 式人,只需要拖拉幾個元件並略加設定,便能輕易地完成一個小型的資料庫應用程式,而且資料的新增、修改、刪除、查詢功能一應俱全。 這樣的情況,讓許多程式人以及管理者產生錯覺,誤以為程式語言的學習、程式人的養成,以及軟體的開發,可以如此速成。那麼,這些在若干天之內便教會讀者某種程式語言或技術的書籍,它們的心態及動機,便也就不言可喻了,能夠大行其道也就不那麼難以理解。 教育訓練中心的培訓方式,也使人們以為速成不難 除此之外,「軟體工程師」或「程式設計師」這樣子的職務,在現今的職場中,即使稱不上薪資優沃,卻也是一份需求大過於供給的工作。這吸引了許多原先在校園中並不是修讀資訊相關科系的人們,競向轉職投入這一個領域之中。 於是,許多教育訓練單位及機構,便推出各種滿足此種就職需求的課程,有的甚至是以取得各式證照為目標。而這類的課程,也促使了許多人意外地成為了 程式人,而且對他們來說,能在越短的時間內完成投入職場的準備,越快找到合適的工作,是不可動搖的第一目標。在這樣的前提下,能夠「速成」,何樂而不為? 上述的兩個例子,所呈現的便是社會上對於程式設計的某種觀感,有許多人甚至認為,程式設計是小道,而且速成不難。 用「十年磨一劍」來形容程式人的養成,才是貼切的 程式設計真是一門可以如此速成的技藝嗎?我反倒認為程式設計是一門需要投入時間,才能有所成的領域。而一名優秀程式人的養成,更是需要十分漫長的時間,絕 非許多人所想像的,能夠透過速成的方式達成。唐朝詩人賈島的〈劍客〉裡說「十年磨一劍」,用十年的光陰來磨出一名程式人,似乎也差不多。 不論你是在學校中修讀程式設計及電腦科學課程,或者是憑藉著書籍或課程自修入門,在本質上程式設計是一種全然需要在實戰中累積經驗和技巧的功夫, 閱讀(甚至是少量且走馬看花般的閱讀)以及課程,不過只是踏進這個領域的敲門磚,書本中及課程上所告訴你的,都必須透過一次又一次的實作,才能不斷地從中 有所體會。 許多程式人厭倦煩悶的程式碼撰寫工作,他們期待著早日「晉升」,成為系統設計師、系統分析師、甚至管理職務,以便擺脫工人一般的角色。 然而,這麼一來,對撰寫程式碼容易感到厭倦,就難以成為一名優秀的程式人。二來,系統設計、系統分析之類的角色,都是建立在具有優秀的程式設計基礎之上,而優秀的程式設計能力,除了透過持續、大量的程式撰寫工作之外,大概也沒有其他的方式可以達成。 大量的程式碼撰寫實作,就像是蹲馬步的功夫,有時看起來很單調、枯燥,甚至沒有什麼學問在裡頭。每個人都討厭反覆無聊的動作,但馬步蹲久了,下盤自然穩固了,也會更明白使力出力的法門。而這些都不是單靠老師點撥提示,或自修讀書就能夠輕易體會的。 例如,在書本裡頭、在課堂上,多半是教導你如何達成你想要的功能。對於各種可能會遭遇到的異常情況,該如何處理,以及程式撰寫時可能會意外犯下的錯誤,與這些錯誤可能會有的癥兆,只能透過實戰經驗一一磨練。 從錯誤中學到教訓是程式人最大的資產之一 一名有經驗的程式人,他身上最大的資產之一,在於犯過很多的錯誤,使得他在撰寫程式的同時,知道如何預先避開可能會犯的過失,同時在一模一樣的錯誤再度發生時,能夠很快地透過顯於外的癥兆,明白究竟是發生了什麼樣的失誤,進而得以快速解決。 過去的程式碼,就像一面鏡子一樣映照出自己過去所犯下的錯誤。 程式人透過審視自己舊有的程式碼,更容易察覺曾經產生的缺失。 在實戰中,程式人會親身體驗到自己拙劣不成熟的程式碼所帶來的苦果,並且在反省後,力圖改善。這樣的感受格外深刻,因此也就永誌難忘。 所有書中告訴你的良好寫作形式,都會在親身犯過錯誤之後,有了更深一層的體會。所以越是大量地撰寫程式碼,也就越能印證書中所言,越能自行發掘出書中沒有告訴你的事情。 在長期大量的實作下,程式人才能更深刻地從自己最初的笨拙設計中,體會良好設計的重要性,也才能更明白如何透過好的設計,優雅地解決問題。也只有 在長期大量的實作下,程式人才能培養出洞察重複需求的能力,撰寫出可重複運用的程式碼,藉以提升開發的效率。甚至,只有在長期大量的實作下,才能夠將程式 架構及程式碼的各種可能變化,了然而心,面對可能會有的各種改變,預測出動向,並預先反應。 程式設計素養與能力的訓練,一定需要長期且大量的實戰 十年磨一劍,並非指程式人必須訓練十年之久方能派上用場,而是想強調:程式人的養成並非一朝一夕之功。對於自我的要求及訓練,必須放到更長的時間軸上來看,而不能從速成的眼光限制了自己不斷成長的可能性。 另外一方面,我更想強調:程式設計的訓練,絕對是需要以長期且大量的實戰為基礎的。倘若只是紙上談兵,或者以為「熟讀唐詩三百首,不會作詩也會吟」,只需要大量的閱讀書籍,程式設計功力自然有所提升,那麼絕對難以有所大成。 賈島的〈劍客〉,說的是「十年磨一劍,霜刃未曾試」,磨劍磨了十年,卻未曾真正的於實戰中試過。程式人的十年磨一劍,卻是要天天試劍,才能讓劍的鋒芒越用越利。 |
Turn Your Ubuntu Hardy to Mac OSX Leopard
如何將 Ubuntu Hardy 轉成 Mac OSX Leopard Theme
You can’t really turn a Linux system to a Mac, but you definitely can make your Ubuntu Hardy looks like a Mac OSX Leopard.
You can’t really turn a Linux system to a Mac, but you definitely can make your Ubuntu Hardy looks like a Mac OSX Leopard.
If you want to change this
 into
into
 , follow the steps below.
Before we start…
First, create a folder in your Home and name it Mac_files. Download the following files to the Mac_files folder.
Using Archive manager, extract the three Mac4Lin zip files Modified Mac4Lin theme and Mac4Lin wallpaper to the Mac_files folder.
Apply Mac OSX Leopard Theme
Go to System->Preferences->Appearance.

Select Install and select the Mac4Lin GTK theme (/home/username/Mac_files/Mac4Lin_v0.4/GTK Metacity Theme/Mac4Lin_GTK_v0.4.tar.gz).

Next, click Install again and select the Mac4Lin icon theme. (/home/username/Mac_files/Mac4Lin_Icons_Part2_v0.4.tar.gz /home/username/Mac_files/Mac4Lin_Icons_modified.tar.gz). When prompted, select “Apply new themes“.
Click Install again and select the Mac4Lin mouse cursor theme. (/home/username/Mac_files/Mac4Lin_v0.4/GTK Cursor Theme/Mac4Lin_Cursors_v0.4.tar.gz). Select “Apply new themes” when prompted.

Click ‘customize’ and choose Mac4Lin_GTK_v0.4. Go to the “Window border” tab, choose Mac4Lin_GTK_v0.4. Click Close.

On the top, go to the Background tab. Click Add and select the Leopard wallpaper. (/home/username/Mac_files/Wallpapers/Leopard.jpg). Click Close to terminate the Appearance window

Install the Dock (Avant Window Navigator)
Open a terminal (Applications->Accessories->Terminal) and type
gksu gedit /etc/apt/sources.list
and add the following lines to the end of the file:
deb http://ppa.launchpad.net/awn-testing/ubuntu hardy main
deb-src http://ppa.launchpad.net/awn-testing/ubuntu hardy main
Save and close the file. In your terminal, type
sudo apt-get update
sudo apt-get install avant-window-navigator-trunk awn-manager-trunk awn-extras-applets-trunk
Go to System->Preferences->AWN manager. On the left, click on the Theme. On the right, click Add and navigate to the Mac_files folder. Select the Elegant_glass.tgz file. Check the bullet beside the Elegant glass theme and click Apply.

Next on the left, click on the Applet icon. On the right, scroll down to the stack Applet. Highlight it, then click Activate. This will add the Mac Leopard stack to your dock.

Before you launch the AWN, remove the bottom panel from the desktop first. Right click on the bottom panel and select “delete this panel”. Open AWN via Applications->Accessories->Avant Window Navigator. Once it is activated, you can simply drag and drop the applications into the dock.
Install OSX Fonts
Open a terminal and type the following:
sudo apt-get install msttcorefonts
This will Install the Microsoft core fonts.
Next, copy the OSX fonts to the fonts folder
cd /usr/share/fonts
sudo tar xvzf /home/username/Mac_files/Mac4Lin_v0.4/Fonts/OSX_Fonts.tar.gz
Configure the fonts:
cd/
sudo tar xvjpf /home/username/Mac_files/Mac4Lin_v0.4/Fonts/fontconfig.tbz -C /etc/fonts
Open the Appearance window (System->Preferences->Appearance) and select Fonts tab. Select the following fonts according to the image below. Click Close.

Change the traffic light window control to the left
In the terminal, type
gconf-editor
This will bring up the gconf-editor window. Scroll down to App->Metacity->general. On the right, double click on the button_layout and change the content to ‘close,minimize,maximize:menu’ (without the quote). Click Ok and close the gconf-editor.


Change the menubar
Remove all the icon and applications on the left side of the top panel. Right-click on the icon and select ‘Remove from panel‘. You will left with something like this:
![]()
On the right of the top panel, remove the logout icon. Still on the right hand side of the top panel, right click and select ‘Add to panel‘. Scroll down the list and add ‘Search for files‘. This will add the spotlight icon to the panel.

On the extreme left, right-click and select ‘Add to panel‘. Scroll down the list and add ‘Main Menu‘. This will add the apple icon on the left. You can now log out and shut down from the Apple dropdown menu (same as Mac OSX).

Next, we are going to install globalmenu so as to display the menubar for each application. In your terminal,
cd Mac_files
wget http://gnome2-globalmenu.googlecode.com/files/gnome-globalmenu-0.4-svn964.tar.gz
tar zxvf gnome-globalmenu-0.4-svn964.tar.gz
cd globalmenu
sudo dpkg -i *.deb
If you have any errors when installing the package, try
sudo dpkg -i –force-overwrite *.deb
If you are having some installation problems with the gnome-globalmenu-applet, try
sudo apt-get install -f
Once finished, right click on the top panel and select ‘Add to panel‘. Scroll down the list and add ‘Global Menu Applet‘.

You might not see anything initially. Log out and log in again, you should now see the menubar for each application showing on the panel.
If your globalmenu is of a different shade of grey from the rest of the panel (as shown in the image below), right click on any empty space on the panel and select ‘Properties‘. Go to Background tab and select ‘Background image’. Under the selection, go to /home/username/.themes/Mac4Lin_GTK_v0.4/gtk-2.0/Panel and select panel-bg.png. Click OK. (Updated: If you can’t find the .themes folder, right-click and select ‘show hidden files‘.)
![]()
Drag the globalmenu to the left just beside the Apple icon. Right click on the globalmenu and select ‘Preferences’. Tick the box beside ‘Display the title of the current application‘ and put maximum width 100. Select the font to be Lucida Grande Bold. Click Apply and OK. You should now have a desktop that resemble Mac Leopard.

![]()
Configuring the Login screen
Click on the Apple icon, go to System->Administration->Login Window. On the Local tab, click Add. Navigate to the path /filesystem/home/username/Mac_files/Mac4Lin_v0.4/GDM Theme and select the file Mac4Lin_GDM_v0.4.tar.gz. Check the box beside the newly installed theme to activate it.

Underneath, there is a color selection field, select it and key in the number E5E5E5 into the color code field.

Click Ok. Log out. You should see the login screen as the diagram below.

Configure usplash screen
usplash is the screen that you see when your computer is booting up. We are going to change it to show the white apple screen. In your terminal,
sudo apt-get install startupmanager
Go to System->Administration->Start-Up Manager Go to Appearance tab. Click on the ‘Manage bootloader theme‘. Click Add and navigate to the file /filesystem/home/username/Mac_files/Mac4Lin_v0.4/GRUB Splash/appleblack.xpm.gz. Check the box “Use background image for bootloader menu” and select ‘appleblack”.


Next, click “Manage usplash theme”. Click Add and add the file /filesystem/home/username/Mac_files/Mac4Lin_v0.4/USplash Theme/osx-splash.so. Click OK. Select OSX-splash from the dropdown box.
Now reboot. You should see the following images:


Creating Dashboard effect
We will use a combination of screenlets and Compiz widget plugin to achieve the dashboard effect.
Install Screenlets
sudo apt-get install screenlets compizconfig-settings-manager
Go to System->Preferences->Advanced Desktop Effect Setting. On the Left, click on Desktop. On the right, put a check beside ‘Widget layer’

Go to Accessories->Screenlets. Activate the widgets that you want to display. Right click on the widget and select ‘Properties’. Go to Options tab and select ‘Treat as widget’. Do this for all the widgets that you have activated.

You can now see your dashboard in action by pressing F9.

Done. You have completed the transformation of your Ubuntu desktop to Mac OSX Leopard.
Some screenshots:


Subscribe to:
Posts (Atom)