相信用 eclipse 開發 web 時,每次 compile 完 java 後 tomcat 就需要重新啟動,應該覺得讓人非常的想把電腦丟掉
最近試了一下 JRebel ,發現他的神奇之處,Java compile 完後馬上就可以試改過後的結果,不用等 1 鐘後 tomcat 重啟然後還要重新 login 到需要的 page 在測試跑完的結果
以每個工程師去寫 web 而言,平均至少要花約 30~60 次來重啟 tomcat ,每一次重啟 tomcat 後再加上登入到需要的頁面再做測試,每次約要 2-3 分鐘
30*2 ~ 60*3 = 60 ~ 180 分鐘。若每天可以省下這些時間,相信 programmer 的產出應該會比目前的方式快上 20% ~ 30% 以上,可謂京人啊
用 Java 寫 Web 的工程師都應該用 JRebel 做為中介去開發,每天省下兩小時,不只可以提高生產率,也可以讓自己有多餘的時間去休息。
雙贏的事,為何不做呢!!!!
Showing posts with label Java. Show all posts
Showing posts with label Java. Show all posts
Wednesday, April 20, 2011

Tuesday, October 5, 2010
Java Build Server
今天在 theserverside 發現一篇有去的 article
http://www.zenbi.nl/en/blog_how_to_build_a_java_buildserver.php
這份 article 在講解如何去建立一個 build server ,讓程式開發可以自動化做 build 與 Test ,減少人工的浪費。
目前 build tool 中比較 popular 的有 luntbuild, hudson, apache continuum ,此 article 建議用 luntbuild ,個人用過 luntbuild ,比較起來 luntbuild 太基本,必須用 professional 才能滿足比較大的需求。hudson 最近研究過,發現此 build tool 可以支援 plugin 功能,大大的增加其運用彈性,在此建議此 build tool 。continuum 也是比較基本的 build tool
build tool 已經漸漸的變成軟體開發的一環,須要建立起來才能有效控管軟體的 productivity and Quality
http://www.zenbi.nl/en/blog_how_to_build_a_java_buildserver.php
這份 article 在講解如何去建立一個 build server ,讓程式開發可以自動化做 build 與 Test ,減少人工的浪費。
目前 build tool 中比較 popular 的有 luntbuild, hudson, apache continuum ,此 article 建議用 luntbuild ,個人用過 luntbuild ,比較起來 luntbuild 太基本,必須用 professional 才能滿足比較大的需求。hudson 最近研究過,發現此 build tool 可以支援 plugin 功能,大大的增加其運用彈性,在此建議此 build tool 。continuum 也是比較基本的 build tool
build tool 已經漸漸的變成軟體開發的一環,須要建立起來才能有效控管軟體的 productivity and Quality
Saturday, June 19, 2010
Java performance Issue
今天在 TheServeside 看一到一篇文章,剛好是我的專長,也讓我多知道一些有關 Java Performance 的偵測方式
其中最常發生的應該是 Database Call。我常常看到 Developer 寫 code 時,因為沒經驗的關係,把兩個 table 的資料放在 Loop 裡面寫,造成多餘的 Database Call
舉例而言, 要找出 product 的 vendor ,有經驗的 Developer 會用 join 的方式一次 Query 就將 Data 一次取出,但沒經驗的就會先取出所有 Product 後再 loop product 再取出 vendor。這個是所有沒經驗的 Developer 會做的事。所以只要出個類似的題目給 Developer 就可以看出程度如何了。
以下是從 TheServerSide 貼過來了,供大家參考
其中最常發生的應該是 Database Call。我常常看到 Developer 寫 code 時,因為沒經驗的關係,把兩個 table 的資料放在 Loop 裡面寫,造成多餘的 Database Call
舉例而言, 要找出 product 的 vendor ,有經驗的 Developer 會用 join 的方式一次 Query 就將 Data 一次取出,但沒經驗的就會先取出所有 Product 後再 loop product 再取出 vendor。這個是所有沒經驗的 Developer 會做的事。所以只要出個類似的題目給 Developer 就可以看出程度如何了。
以下是從 TheServerSide 貼過來了,供大家參考
Top 10 Performance Problems taken from Zappos, Monster, Thomson and Co
For a recent edition of the Swiss Computerworld Magazine we listed our Top 10 Performance Problems as we have seen them over the years when working with our clients. I hope this list is enlightening – and I’ve included follow-up links to the blogs to help better understand how to solve these problems:
#1: Too Many Database Calls
The problem we see the most are too many database query per request/transaction. There are 3 specific phenomena to witness
- More data is requested is than actually required in the context of the current transaction, e.g.: requesting all account information instead of those that we need to display on the current screen.
- The same data is requested multiple times. This usually happens when different components involved in the same transaction act independently from one another and each requests the same set of data. It is unknown what type of data has already been loaded in the current context so we end up with the same queries multiple times.
- Multiple queries are executed to retrieve a certain set of data. This is often a result of not taken full advantage of complex SQL statements or stored procedures to retrieve the data in one batch.
Further Reading: Blog on Linq2Sql Performance Issues on Database, Video on Performance Anti-Patterns
#2: Synchronized to Death
There is no question that synchronization is necessary to protect shared data in an application. Too often developers make the mistake to over-synchronize, e.g.: excessively-large code sequences are synchronized. Under low load (on the local developers workstation) performance won’t be a problem. In a high-load or production environment over-synchronization results in severe performance and scalability problems.
Further Reading: How to identify synchronization problems under load
#3: Too chatty on the remoting channels
Many libraries out there make remote communication seem like a piece of cake. There is hardly any difference for the developer to call a local vs. remote method. The lack of understanding of what is really going on under the remoting-hood makes people forget about things like latency, serialization, network traffic and memory usage that come with every remoting call. The easy way of using these technologies results in too many calls across these remoting boundaries and in the end causes performance and scalability problems.
Further Reading: Performance Considerations in Distributed Applications
#4: Wrong usage of O/R-Mappers
Object-Relational Mappers take a big burden off developers’ shoulders – loading and persisting objects in the database. As with any framework there usually are many configuration options to optimize the usage of the O/R Mapper for current application use cases. Faulty settings and incorrect usage of the framework itself too often results in unexpected performance and scalability problems within these frameworks. Make sure you make yourself familiar with all options and learn about the internals of these libraries that you rely on.
Further Reads: Understanding Hibernate Session Cache, Understanding the Query Cache, Understanding the Second Level Cache
#5: Memory Leaks
Managed runtime environments such as Java and .NET have the advantage of helping with memory management by offering Garbage Collectors. A GC, however, does not prevent memory leaks. Objects that are “forgotten” will stick around in memory and ultimately lead to a memory leak that may cause an OutOfMemoryException. It is important to release object references as soon as they are no longer needed.
Further Read: Understanding and finding Memory Leaks
#6: Problematic 3rd Party Code/Components
Nobody is writing all of the functionality of a new application on their own. We use existing 3rd party libraries to speed up our development process. Not only do we speed up our output – but we also increase performance risks introduced by these components. Even though most frameworks are well documented and have been thoroughly tested, there is no guarantee that these frameworks run as expected in every use case they are included. 3rd party code is often used incorrectly or in ways that have not been tested. It is therefore important to make an in-depth check of every framework before introducing it into your code.
Further Read: Top SharePoint Performance Mistakes
#7: Wasteful handling of scarce resources
Resources such as memory, CPU, I/O or the database are scarce. Wasteful handling of these resources results in lack of access to these resources by others and ultimately leads to performance and scalability issues. A good example: database connections that are kept open for too long. Connections must only be used for the time period they are really needed, e.g.: for a query – and then returned to the connection pool. We often see that connections are requested early on in the request handler and are not released until the very end which leads to a classic bottleneck situation.
Further Read: Resource Leak detection in .NET Applications
#8: Bloated web frontends
Thanks to high-speed web access many users have a better end-user experience in the World Wide Web. The downside of this trend is that many applications get packed with too much stuff – they become bloated – which ultimately leads to bad browsing behavior. Particularly users that do not yet have high-speed internet access suffer the most. Too many images that are too large; failure to use or incorrect usage of the browser cache; or overly-aggressive usage of JavaScript/AJAX – all result in performance problems in the browser. Following the existing Best Practices on Web Site Performance Optimization can solve most of these problems:
Further Read: How Better Caching would help speed up Frankfurt Airport Web Site
#9: Wrong Cache Strategy leads to excessive Garbage Collection
Caching objects in memory to avoid constant roundtrips to the database is one way to boost performance. Caching too many objects – or objects that are hardly ever used quickly changes the advantage of caching into a disadvantage due to higher memory usage and increased GC activity. Before implementing a caching strategy you have to figure out which objects to cache and which objects not to cache in order to avoid these types of performance and scalability problems:
Further Reads: Java Memory Problems, Identify GC Bottlenecks in Distributed Applications
#10: Intermittent Problems
Intermittent problems are hard to find. These are usually problems that occur with specific input parameters or only happen under certain load conditions. Full test coverage – functional as well as load and performance coverage – will uncover most of these problems early on before they become real problems for real users.
Further Reads: Tracing Intermittent Errors by Lucy Monahan from Novell, How to find invisible performance problems
(Bonus Problem) #11: Expensive Serialization
With remoting communication – such as Web Services, RMI or WCF – objects need to serialized by the caller in order to be transferred over the network. The callee on the other side needs to de-serialize the object before it can be used. Transformation therefore happens on both sides of the call resulting in some overhead while doing so. It is important to understand what type of serialization is required by both ends and what the optimal choice of serialization and transport type is. Different types of serialization have a different impact on performance, scalability, memory usage and network traffic.
Further Read: Performance Considerations in Distributed Applications
Thursday, February 18, 2010
HTTP Session Monitor
開發 web application 時,若要管控所有的 session ,自己寫可能要花一段時間,不如試試看
messadmin
這個工具可以監控目前有多少人 login ,session 的狀況。目前我試過後,此版本可以
1. 送 message 給所有人,立即提醒 User 系統將會做甚麼事
2. 將特定 User 的 session 斷掉,讓此 user 重新 login
3. 直接整合到 J2EE 的環境,整合程度好
若需要這個 package 的可以試試看,因為用的是 BSD license ,所以可以用在 commercial 上
messadmin
這個工具可以監控目前有多少人 login ,session 的狀況。目前我試過後,此版本可以
1. 送 message 給所有人,立即提醒 User 系統將會做甚麼事
2. 將特定 User 的 session 斷掉,讓此 user 重新 login
3. 直接整合到 J2EE 的環境,整合程度好
若需要這個 package 的可以試試看,因為用的是 BSD license ,所以可以用在 commercial 上
Saturday, February 6, 2010
Saturday, March 28, 2009
在 Web 上套用統計圖表 Jfreechart + cewolf
在開發 Web Page 時若要將統計圖表放到 Web 上,可以使用 JFreeChart 將數據轉換成圖形後,再以檔案的方式存起來,當 WebPage 顯示時再利用 URL 的方式將 image 從檔案中讀取出來並顯示在 Web Page 上
這個方式雖然可以解決統計圖顯示在 Web Page 上問題,但彈性太小,無法透過參數的方式指定圖形型態,大小,資料等,而 cewolf 這個 open source 便提供了此彈性的解決方案
Cewolf 在實作上是一個 JFreeChart 的 Wrapper 並提供 Tag Library 讓 Developer 可以方便的在 JSP 上套用統計圖表。要在 JSP 下顯示圖表可以參考以下步驟
1. Setup Libarary of JFreeChart and Cewolf
從 JFreeChart 與 Cewolf 下載 library 後,必須在 web.xml 中設定 servlet 與 servlet mapping 讓圖形可以透過此 mappng 讓 Browser 下載圖表

2. Add Chart into JSP
在 JSP 中若要加 JFreeChart 的圖表,需要加上 tag 如下 ([] 取代 <>)
[%@ taglib uri="/WEB-INF/cewolf.tld" prefix="cewolf" %]
[cewolf:chart id="line" title="EPS" type="verticalbar" xaxislabel="category" axislabel="value"]
[cewolf:data]
[cewolf:producer id="datasetProducer" /]
[/cewolf:data]
[cewolf:chartpostprocessor id="dataColor"/]
[/cewolf:chart]
[cewolf:img chartid="line" renderer="/cewolf" width="600" height="300" /]
3. Assign data to id associated to chart
這邊是用 struts 2 的方式,所以在 action 中加上 API 就可以當 id 用
public DatasetProducer getDatasetProducer() {
DatasetProducer producer = new DatasetProducer() {
/**
* Produces some random data.
*/
public Object produceDataset(Map params) throws DatasetProduceException {
log.info("producing data.");
// create the dataset...
DefaultCategoryDataset dataset = new DefaultCategoryDataset();
dataset.addValue(100, "serial1", "category1");
dataset.addValue(120, "serial2", "category1");
dataset.addValue(120, "serial3", "category1");
dataset.addValue(130, "serial1", "category2");
dataset.addValue(140, "serial2", "category2");
dataset.addValue(140, "serial3", "category2");
return dataset;
}
/**
* This producer's data is invalidated after 5 seconds. By this method the
* producer can influence Cewolf's caching behaviour the way it wants to.
*/
public boolean hasExpired(Map params, Date since) {
log.debug(getClass().getName() + "hasExpired()");
//return (System.currentTimeMillis() - since.getTime()) > 5000;
return true;
}
/**
* Returns a unique ID for this DatasetProducer
*/
public String getProducerId() {
return "PageViewCountData DatasetProducer";
}
/**
* @see java.lang.Object#finalize()
*/
protected void finalize() throws Throwable {
super.finalize();
log.debug(this + " finalized.");
}
};
return producer;
}
public ChartPostProcessor getDataColor() {
ChartPostProcessor dataColor = new ChartPostProcessor() {
public void processChart(Object chart, Map params) {
CategoryPlot categoryplot = (CategoryPlot) ((JFreeChart) chart) .getPlot();
categoryplot.setDomainGridlinesVisible(true);
categoryplot.setRangeCrosshairVisible(true);
categoryplot.setRangeCrosshairPaint(Color.blue);
NumberAxis numberaxis = (NumberAxis)categoryplot.getRangeAxis();
numberaxis.setStandardTickUnits(NumberAxis.createIntegerTickUnits());
BarRenderer barrenderer = (BarRenderer)categoryplot.getRenderer();
barrenderer.setDrawBarOutline(false);
GradientPaint gradientpaint = new GradientPaint(0.0F, 0.0F, Color.blue, 0.0F, 0.0F, new Color(0, 0, 64));
GradientPaint gradientpaint1 = new GradientPaint(0.0F, 0.0F, Color.green, 0.0F, 0.0F, new Color(0, 64, 0));
GradientPaint gradientpaint2 = new GradientPaint(0.0F, 0.0F, Color.red, 0.0F, 0.0F, new Color(64, 0, 0));
barrenderer.setSeriesPaint(0, gradientpaint);
barrenderer.setSeriesPaint(1, gradientpaint1);
barrenderer.setSeriesPaint(2, gradientpaint2);
barrenderer.setLegendItemToolTipGenerator(new StandardCategorySeriesLabelGenerator("Tooltip: {0}"));
CategoryAxis categoryaxis = categoryplot.getDomainAxis();
categoryaxis.setCategoryLabelPositions(CategoryLabelPositions.createUpRotationLabelPositions(0.52359877559829882D));
}
};
return dataColor;
}
如此就可以在畫面上顯示

PS:
1. 在 cewolf:img chartid="line" renderer="/cewolf" width="600" height="300"中的 renderer 需要加上 "/" 因為 servlet 的 mapping 設定是以 "/" 為主
2. 這個 cewolf package 在 resin 下若顯示兩個圖表以上會有 bug
這邊提供一個範例 webchart ,提供給需要實作的人可以快速上手
這個方式雖然可以解決統計圖顯示在 Web Page 上問題,但彈性太小,無法透過參數的方式指定圖形型態,大小,資料等,而 cewolf 這個 open source 便提供了此彈性的解決方案
Cewolf 在實作上是一個 JFreeChart 的 Wrapper 並提供 Tag Library 讓 Developer 可以方便的在 JSP 上套用統計圖表。要在 JSP 下顯示圖表可以參考以下步驟
1. Setup Libarary of JFreeChart and Cewolf
從 JFreeChart 與 Cewolf 下載 library 後,必須在 web.xml 中設定 servlet 與 servlet mapping 讓圖形可以透過此 mappng 讓 Browser 下載圖表

2. Add Chart into JSP
在 JSP 中若要加 JFreeChart 的圖表,需要加上 tag 如下 ([] 取代 <>)
[%@ taglib uri="/WEB-INF/cewolf.tld" prefix="cewolf" %]
[cewolf:chart id="line" title="EPS" type="verticalbar" xaxislabel="category" axislabel="value"]
[cewolf:data]
[cewolf:producer id="datasetProducer" /]
[/cewolf:data]
[cewolf:chartpostprocessor id="dataColor"/]
[/cewolf:chart]
[cewolf:img chartid="line" renderer="/cewolf" width="600" height="300" /]
3. Assign data to id associated to chart
這邊是用 struts 2 的方式,所以在 action 中加上 API 就可以當 id 用
public DatasetProducer getDatasetProducer() {
DatasetProducer producer = new DatasetProducer() {
/**
* Produces some random data.
*/
public Object produceDataset(Map params) throws DatasetProduceException {
log.info("producing data.");
// create the dataset...
DefaultCategoryDataset dataset = new DefaultCategoryDataset();
dataset.addValue(100, "serial1", "category1");
dataset.addValue(120, "serial2", "category1");
dataset.addValue(120, "serial3", "category1");
dataset.addValue(130, "serial1", "category2");
dataset.addValue(140, "serial2", "category2");
dataset.addValue(140, "serial3", "category2");
return dataset;
}
/**
* This producer's data is invalidated after 5 seconds. By this method the
* producer can influence Cewolf's caching behaviour the way it wants to.
*/
public boolean hasExpired(Map params, Date since) {
log.debug(getClass().getName() + "hasExpired()");
//return (System.currentTimeMillis() - since.getTime()) > 5000;
return true;
}
/**
* Returns a unique ID for this DatasetProducer
*/
public String getProducerId() {
return "PageViewCountData DatasetProducer";
}
/**
* @see java.lang.Object#finalize()
*/
protected void finalize() throws Throwable {
super.finalize();
log.debug(this + " finalized.");
}
};
return producer;
}
public ChartPostProcessor getDataColor() {
ChartPostProcessor dataColor = new ChartPostProcessor() {
public void processChart(Object chart, Map params) {
CategoryPlot categoryplot = (CategoryPlot) ((JFreeChart) chart) .getPlot();
categoryplot.setDomainGridlinesVisible(true);
categoryplot.setRangeCrosshairVisible(true);
categoryplot.setRangeCrosshairPaint(Color.blue);
NumberAxis numberaxis = (NumberAxis)categoryplot.getRangeAxis();
numberaxis.setStandardTickUnits(NumberAxis.createIntegerTickUnits());
BarRenderer barrenderer = (BarRenderer)categoryplot.getRenderer();
barrenderer.setDrawBarOutline(false);
GradientPaint gradientpaint = new GradientPaint(0.0F, 0.0F, Color.blue, 0.0F, 0.0F, new Color(0, 0, 64));
GradientPaint gradientpaint1 = new GradientPaint(0.0F, 0.0F, Color.green, 0.0F, 0.0F, new Color(0, 64, 0));
GradientPaint gradientpaint2 = new GradientPaint(0.0F, 0.0F, Color.red, 0.0F, 0.0F, new Color(64, 0, 0));
barrenderer.setSeriesPaint(0, gradientpaint);
barrenderer.setSeriesPaint(1, gradientpaint1);
barrenderer.setSeriesPaint(2, gradientpaint2);
barrenderer.setLegendItemToolTipGenerator(new StandardCategorySeriesLabelGenerator("Tooltip: {0}"));
CategoryAxis categoryaxis = categoryplot.getDomainAxis();
categoryaxis.setCategoryLabelPositions(CategoryLabelPositions.createUpRotationLabelPositions(0.52359877559829882D));
}
};
return dataColor;
}
如此就可以在畫面上顯示

PS:
1. 在 cewolf:img chartid="line" renderer="/cewolf" width="600" height="300"中的 renderer 需要加上 "/" 因為 servlet 的 mapping 設定是以 "/" 為主
2. 這個 cewolf package 在 resin 下若顯示兩個圖表以上會有 bug
這邊提供一個範例 webchart ,提供給需要實作的人可以快速上手
Saturday, January 31, 2009
Essential Java Resources(必備 Java 資源)
最近看到一篇文章,裡面提到重要的 Java 必備資源,所以就把這些資源 blog 下來,日後在做 research 時可以參考
Web sites and developer Web portals
Weblogs
Packages and/or libraries
以上都是在使用 Java 寫系統時最好先須具備的 Resource ,這樣才能隨時參考到資料並做最有效的運用
Web sites and developer Web portals
Weblogs
Packages and/or libraries
- java.lang.reflect
- javax.script
- javax.management and java.lang.management
- java.util.concurrent.*
- java.util
- java.beans
- java.util.logging
- java.security.*
- javax.xml.parsers.*, javax.xml.bind, and javax.xml.transform.*
- javax.sound.*
- Effective Java (2nd Ed) by Joshua Bloch
- Java Concurrency in Practice by Brian Goetz
- Better, Faster, Lighter Java by Justin Gehtland and Bruce Tate
- Effective Enterprise Java by Ted Neward (me)
- Release It! by Michael Nygard
- Either Inside the Java 2 Virtual Machine by Bill Venners or Component Development for the Java Platform by Stuart Halloway
- Patterns of Enterprise Application Architecture by Martin Fowler and Enterprise Integration Patterns by Gregor Hohpe and Bobby Woolf
- Java Power Tools by John Smart
- The Pragmatic Programmer by Andy Hunt and Dave Thomas
- The Productive Programmer by Neal Ford
- The Pragmatic Starter Kit
- Ant in Action (2nd Ed) by Erik Hatcher and Steve Loughran
- The IDE
Of course, the tools discussion begins with the IDE. In an effort to steer clear of commercial endorsements, both Eclipse and NetBeans are open source and free and thus offer an attractive "first steps" option. - Unit testing
The perennial favorite here is the original that started the unit testing revolution, JUnit, but a few others have crept into popular usage, including TestNG, and not surprisingly JUnitPerf, among others. - Continuous Integration
A Continuous Integration server constantly checks the code out of source control, builds it, runs the unit tests against it, and reports any build failures to the developers, usually via e-mail. Several open-source versions are available, but one that has gathered a lot of attention is Hudson, a Continuous Integration server with a lot of plug-ins and high extensibility. The original is CruiseControl and for that reason alone commands respect. - Static analysis
FindBugs is an open-source static analysis tool that runs over Java code, performs deep n-way analysis to figure out all the possible code paths, and reports all sorts of errors and warnings it finds, based on a set of extensible rules. Developed by William Pugh (the same William Pugh who discovered a bug in the Java memory model), FindBugs' biggest claim to fame is its ability to analyze Java code for concurrency bugs, something that every programmer can appreciate. - Network packet tracing
WireShark (which formerly used to be called Ethereal) gives programmers a view of what's traveling across the network, giving them an opportunity to verify that what's moving across the wire is what's supposed to be moving across the wire, and that what's not supposed to be there (such as sensitive information or passwords in clear text), isn't. - Virtualization
A virtualization tool (or perhaps it is more accurate to call it a platform) like VMWare, Xen, VirtualBox, or VirtualPC offers programmers the ability to create an environment identical to the one the production machine will be running without losing the productivity of the environment of the host PC. It also provides a convenient way to have a home for trying "experimental" software without risking the machine that has to stay productive. Most of these have some kind of free option if they're not outright open-source projects.
以上都是在使用 Java 寫系統時最好先須具備的 Resource ,這樣才能隨時參考到資料並做最有效的運用
Thursday, January 8, 2009
如何用 appfuse 2.0.2 透過 gmail 發信
若需要發信但又沒有 SMTP servr 時,可以利用 gmail 的帳號發信
因為 gmail 用的 SMTP 走的是 SSL 機制,所以設定上比較麻煩一點
以下是用 gmail 發信的 mail.properties 範例
mail.default.from=Name <xyz@gmail.com>
mail.debug=true
mail.transport.protocol=smtp
mail.username=xyz@gmail.com
mail.password=secret
mail.port=587
mail.mime.address.strict=false
mail.mime.charset=UTF-8
雖然有點 tricky, but it works
因為 gmail 用的 SMTP 走的是 SSL 機制,所以設定上比較麻煩一點
以下是用 gmail 發信的 mail.properties 範例
mail.default.from=Name <xyz@gmail.com>
mail.debug=true
mail.transport.protocol=smtp
mail.smtp.starttls.enable=true
mail.host=smtp.gmail.commail.username=xyz@gmail.com
mail.password=secret
mail.port=587
mail.mime.address.strict=false
mail.mime.charset=UTF-8
雖然有點 tricky, but it works
Wednesday, December 17, 2008
Load balance and clustering with Apache HTTP Server 2.2.x and Tomcat 6.0.x
HA 在網路的世界不可或缺,尤其客戶是屬於 C 端 (customer,個人) 時,更要在 AP 端配置 HA 的架構,讓系統不斷線,客戶可以持續的交易不造成中斷。
HA 涉及的議題包含了軟體端的 Load Balance, Clustering 建置,硬體端的網路連線,磁碟空間配置。就硬體端而言,除了至少要有兩條網路線互相備援外,磁碟空間也必須做 replication 與備援才能有效的支援因外在因素而產生的影響。硬體端的 HA 可以有很多架構,但需要 $$ 去建置,這裡就不多講。
在軟體端方面,因為熟悉 J2EE 的架構,所以就選了非常 light weight 的 Apache HTTP Server 2.2.x 與 Tomcat 6.0.x 作為 load balance and clustering 的 instance.
Load Balance 設定
此部份用 Apache HTTP Server 就可做的到,這裡舉一個範例
Apache HTTP Server (HTTPs)
|
/ \
/ \
/ \
Tomcat 6.0.x(T1) Tomcat 6.0.x(T2)
這是最簡單的架構,透過 Apache HTTP Server ,便可以存取 T1 與 T2,然後可以在 T1 與 T2 的相同 JSP 放入不同的內容,以測試 Load Balance 的正確性
1. 下載 Apache HTTP Server 與 Tomcat 6.0.x (Windows version)
1.1 下載 Apache HTTP Server 2.2.x 並裝至 d:\Program Files。此版本含有 openssl ,用來產生 key 與 certificate for HTTPS 用
1.2 下載 Tomcat 6.0.x 並解壓縮到 d:\java 中。解壓縮時需解到兩個目錄,一個是
d:\java\apache-tomcat-6.0.16-t1,另一個是 d:\java\apache-tomcat-6.0.16-t2
2. 安裝 SSL
這個部份對大部分的人應該都滿陌生的,因為 SSL 有點小 tricky,除非你正式做過需 HTTPS 的案子,不然可能會搞糊塗。 這邊的 SSL 是針對 Apache HTTP Server 上的 SSL,不是 Tomcat 上的 SSL。Tomcat 的作法與 Apche HTTP Server 不同,用的工具也不同,但其 Certificate 是可以共用的,會在後面 Tomcat with SSL 時說明
2.1 去除 D:\Program Files\Apache Software Foundation\Apache2.2\conf\httpd.conf 中有關 SSL 的 #
#LoadModule ssl_module modules/mod_ssl.so
#Include conf/extra/httpd-ssl.conf
2.2 建立 CA Root Certificate 及 Server Certificate
什麼是 CA Root Certificate ,基本上就是老大發的通行證,若網站是經由此老大認證過,IE 或 Firefox 就會認得此憑證是老大發的,就不用懷疑其效力。這些老大通常都會審核申請憑證的公司的合法性,一般 User 也比較能放心去這些網站使用或消費。
但為何要建立 CA Root Certificate 呢,因為若要公司每台 Server 都需要 Certificate ,則每個 Certificate 都需要跟老大申請認證,這些都需要費用。若這些 Server 只是內部用,則可以自己當老大做一個 CA Root Certificate 然後認證自己發的 Server Certificate,這樣可以減少許多成本,也比較方便。用的時候只需要將老大的 CA Root Certificate 安裝到公司內部的 IE 或 Fixfox 就行了,凡經由 CA Root Certificate 認證過的 Server Certificate 都不會被詢問其 SSL的安全性問題,因為老大說了算 (不知道是否已經有人昏倒了)
建立 CA Root Certificate
d:\>cd D:\Program Files\Apache Software Foundation\Apache2.2\bin
d:>openssl genrsa -des3 -out ..\conf\caroot.key 2048
Loading 'screen' into random state - done Generating RSA private key, 2048 bit long modulus ...........+++ .+++ e is 65537 (0x10001) Enter pass phrase for ..\conf\caroot.key: Verifying - Enter pass phrase for ..\conf\caroot.key:
用 RSA 演算法+Triple Des Encryption (des3) 建立 CA root 的 key,強度為 2048bit。密碼請輸入 暫時輸入 changeit
d:>openssl req -config ..\conf\openssl.cnf -new -key ..\conf\caroot.key -out ..\conf\caroot.csr
Enter pass phrase for ..\conf\caroot.key: Loading 'screen' into random state - done You are about to be asked to enter information that will be incorporated into your certificate request. What you are about to enter is what is called a Distinguished Name or a DN. There are quite a few fields but you can leave some blank For some fields there will be a default value, If you enter '.', the field will be left blank.
----- Country Name (2 letter code) [AU]:TW
State or Province Name (full name) [Some-State]:Taiwan
Locality Name (eg, city) []:Taipei
Organization Name (eg, company) [Internet Widgits Pty Ltd]:My Company Inc.
Organizational Unit Name (eg, section) []:My Company Dept
Service Provider Common Name (eg, YOUR name) []:My Company Trust
Email Address []:
Please enter the following 'extra' attributes to be sent with your certificate request A challenge password []:
An optional company name []:
這裡是產生 CSR (Certificate Service Request),用以讓別的 CA 簽發憑證。因為是自己要用的 Root,所以等一下會自己簽自己。基本上所以有 CA Root 都是自己簽自己。
d:>openssl x509 -req -days 7305 -sha1 -extensions v3_ca -signkey ..\conf\caroot.key -in ..\conf\caroot.csr -out ..\conf\caroot.crt
Loading 'screen' into random state - done Signature ok subject=/C=TW/ST=Taiwan/L=Taipei/O=My Company/OU=My Company Dept/CN=My Company Trust/emailAddress=
Getting Private key
Enter pass phrase for ..\conf\caroot.key:
這裡就是自己簽自己的簽發憑證。若 double click ..\conf\caroot.crt 並安裝此憑證,可以打開 IE > 網際網路選項 > 內容 > 憑證 看到此憑證被放到根憑證的目錄中
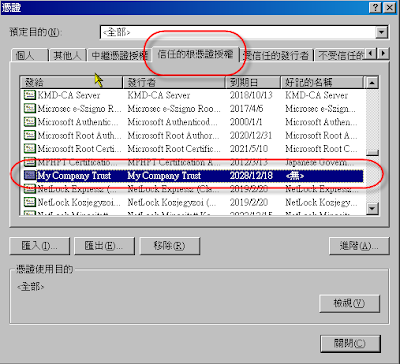
PS : caroot.key 一定要保存好並記住密碼,不然掉了,所以憑證全部要重新簽發,很費時間。
建立 Server Certificate
當建立完 CA Root Certificate 後,再來就是要建立 Server Certificate 再用 CA Root Certificate 對 Server Certitificate 做簽發 (Sign)
d:>openssl genrsa -out ..\conf\server.key 2048
建立 Server 用的 key
d:>openssl req -config ..\conf\openssl.cnf -new -key ..\conf\server.key -out ..\conf\server.csr
Loading 'screen' into random state - done You are about to be asked to enter information that will be incorporated into your certificate request. What you are about to enter is what is called a Distinguished Name or a DN. There are quite a few fields but you can leave some blank For some fields there will be a default value, If you enter '.', the field will be left blank. -----
Country Name (2 letter code) [AU]:TW
State or Province Name (full name) [Some-State]:Taiwan
Locality Name (eg, city) []:Taipei
Organization Name (eg, company) [Internet Widgits Pty Ltd]:My Company Ltd
Organizational Unit Name (eg, section) []:RD Dept
Common Name (eg, YOUR name) []:www.mycompnay.com
Email Address []:
Please enter the following 'extra' attributes to be sent with your certificate request A challenge password []:
An optional company name []:
以上會建立申請簽章的檔案 server.csr,這裡需記得 Common Name 必須與 server 的 url domain name 一樣如 www.mycompany.com,這樣才能通過 IE 或 Firefox 的認證,否則會出現 warning。
d:>openssl x509 -req -days 3650 -sha1 -extensions v3_req -CA ..\conf\caroot.crt -CAkey ..\conf\caroot.key -CAcreateserial -in ..\conf\server.csr -out ..\conf\server.crt
Loading 'screen' into random state - done
Signature ok
subject=/C=TW/ST=Taiwan/L=Taipei/O=My Company Ltd/OU=RD Dept/CN=www.mycompnay.co m
Getting CA Private Key
Enter pass phrase for ..\conf\caroot.key:
這裡會用 caroot 簽發 server.csr 並產生 server.crt。double click server.crt 可得畫面如下
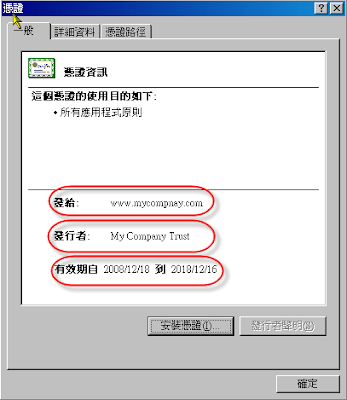
這裡可以發現,沒有 warning, 發行者是 CA Root ,有效是 10 年
2.3 重新啟動 Apache HTTP Server
因為產生 Server 的 certificate 檔名已經同步 conf/extra/httpd-ssl.conf 裡面所定義的命名方式,所以直接啟動 Apache HTTP Server 便可以使用 HTTPS (SSL)
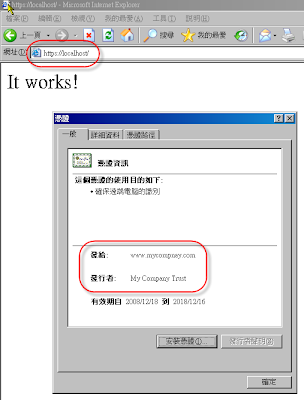
3. 設定 load balance
3.1 下載 mod_jk (Tomcat 6.0.x for win32 版)。
下載完 mod_jk 後 請將檔名改為 mod_jk.so 並放到 D:\Program Files\Apache Software Foundation\Apache2.2\modules 中
3.2 在 D:\Program Files\Apache Software Foundation\Apache2.2\conf\extra 中新增一個檔案 httpd-load-balance.conf
內容如下
================================
#(httpd.conf)
#載入 mod_jk 模組
LoadModule jk_module modules/mod_jk.so
#
# Configure mod_jk
#
JkWorkersFile conf/workers.properties
JkMountFile conf/uriworkermap.properties
JkLogFile logs/mod_jk.log
JkLogLevel info
JkMount jkstatus
Order deny,allow
Deny from all
Allow from 127.0.0.1
===============================
3.3 在 D:\Program Files\Apache Software Foundation\Apache2.2\conf\httpd.conf 的最後新增一行
內容為
Include conf/extra/httpd-load-balance.conf
如此重新啟動 Apache HTTP Server 時才會把 load balance 的 module 放到 kernel 中執行
3.4 在 D:\Program Files\Apache Software Foundation\Apache2.2\conf 中新增一個檔案 workers.properties
內容為
=====================================
# The advanced router LB worker
worker.list=router,jkstatus
# Define a worker using ajp13
worker.worker1.port=8009
worker.worker1.host=localhost
worker.worker1.type=ajp13
worker.worker1.lbfactor=1
# Define prefered failover node for worker1
#worker.worker1.redirect=worker2
# Define another worker using ajp13
worker.worker2.port=9009
worker.worker2.host=localhost
worker.worker2.type=ajp13
worker.worker2.lbfactor=1
# Disable worker2 for all requests except failover
#worker.worker2.activation=disabled
# Define the LB worker
worker.router.type=lb
worker.router.balance_workers=worker1,worker2
# Define a 'jkstatus' worker using status
worker.jkstatus.type=status
====================================
這裡指定 worker1 為 T1, 用的 port 為 8009,worker2 為 T2,用的 port 為 9009
3.5 在 D:\Program Files\Apache Software Foundation\Apache2.2\conf 中新增一個檔案 uriworkermap.properties
內容為
===============================
/*=router
===============================
這裡會將 URI 為 /* 的 mapping 全部轉向 T1 或 T2
3.6 更改 T2 的設定檔
因為 T2 用的 port 還是 8009,需改為 9009 以配合 workers.properties 中的設定
修改 D:\java\apache-tomcat-6.0.16-t2\conf\server.xml 中的
line 22 port="8005" 改為 port="9005"
line 67 port="8080" 改為 port="9090"
line 89 port="8009" 改為 port="9009"
port 改成如此是因為要避免與 T1 衝突。
3.7 重新啟動 Apache HTTP Server 與 T1, T2
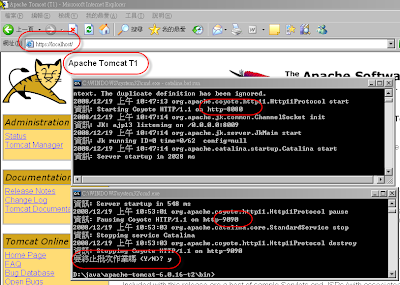
重新啟動 Apache HTTP Server 後再啟動 T1, T2,接下來打開 IE 將 URL 指向 http://localhost 可以得到
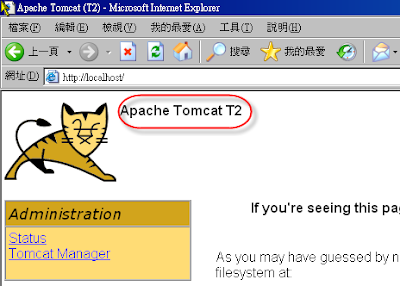
這裡可以看到跑的是 Apache Tomcat T2 (webapps\ROOT\index.html 有修改過),證明 Load Balance 已經開始作用中
3.8 啟動 SSL 的 Load Balance
這時候當 URL 指向 https://localhost 時,Tomcat 的畫面並不會跑出來,需要在
D:\Program Files\Apache Software Foundation\Apache2.2\conf\extra\httpd-ssl.conf
的 VirtualHost 裡面加上這一行
JkMountFile conf/uriworkermap.properties
然後重新啟動 Apache HTTP Server ,SSL 便可以做到 Load Balance 了
以下畫面是把 T2 Shutdown 後,Refresh IE 則會 Forward 到 T1 上
4. 設定 Tomcat 的 Clustering
若有人要OOXX,現在是一個好時機,因為在 Windows XP 上無法做 Clustering。花了幾乎快一個下午的時間試,也無法試出來用 2 個 Tomcat instance 跑在同一台機器,後來用 VMWare 跑 Ubuntu 8.10 然後在上面跑 2 個 Tomcat ,一切搞定。所以,Linux 實在非常適合做 Server。
話不多說,把 Ubuntu 8.10 跑起來後,利用 SSH 將兩個 tomcat 複製到 /opt 下
/$ cd /
/$ sudo mkdir /opt
/$ sudo chmod o+w opt
這樣才能在非 root 的使用者下將 tomcat 複製到 /opt
/opt$ ls -l
apache-tomcat-6.0.16-t1
apache-tomcat-6.0.16-t2
/opt$ chmod +x apache-tomcat-6.0.16-t1/bin/*.sh
/opt$ chmod +x apache-tomcat-6.0.16-t2/bin/*.sh
4.1 設定 Tomcat Cluster in server.xml
更改 /opt/apache-tomcat-6.0.16-t1/conf/server.xml
在 line 100 的 Engine 中加入 jvmRoute="worker1"
在 line 106 將 Cluster 的上下 comment !-- -- 拿掉
更改 /opt/apache-tomcat-6.0.16-t2/conf/server.xml
在 line 100 的 Engine 中加入 jvmRoute="worker2"
在 line 106 將 Cluster 的上下 comment !-- -- 拿掉
4.2 設定 web application
因之前有發表過 appfuse 2.0.2 for JPA ,所以就直接把 war 檔放到 t1 與 t2 的 webapps 下,也修改了 WEB-INF/classes/jdbc.properties 中的 localhost 為原本的 XP 上
4.3 啟動 Tomcat t1, t2
打開一個 xterm (應用程式 > 附屬應用程式 > 終端機 )
$ cd /opt/apache-tomat-6.0.16-t1/bin
/bin$ export JAVA_HOME=/usr/lib/jvm/java-6-sun
/bin$ ./catalina.sh run
打開另一個 xterm (應用程式 > 附屬應用程式 > 終端機 )
$ cd /opt/apache-tomat-6.0.16-t2/bin
/bin$ export JAVA_HOME=/usr/lib/jvm/java-6-sun
/bin$ ./catalina.sh run
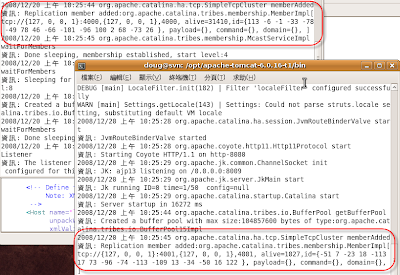
這時候應該可以看到 t1, t2 會互相 talk 如下畫面
4.4 修改 Apache HTTP Server
因之前的 load balance 設定用的 tomcat 是 localhost ,但因 XP 無法支援,所以要將 D:\Program Files\Apache Software Foundation\Apache2.2\conf\workers.properties 中的
worker.worker1.host=localhost
worker.worker2.host=localhost
改為
worker.worker1.host=svn
worker.worker2.host=svn
PS : 此 svn 是 Ubuntu VM 上的 hostname
然後重新啟動 Apache HTTP Server
4.5 測試 Cluster
打開一個 IE 網址為 https://localhost/myprojectjpa-1.0-SNAPSHOT/然後用 admin/admin login,再進入 系統管理 > 訪問紀錄 可以看到用的是 worker1 的 tomat t1
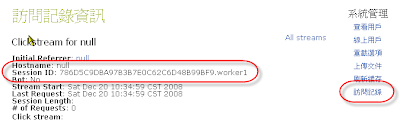
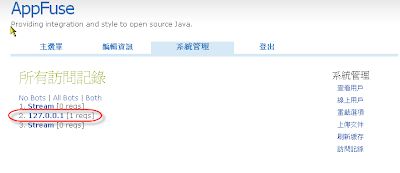
再打開另一個 IE 網址為 https://localhost/myprojectjpa-1.0-SNAPSHOT/ 然後用 admin/admin login,再進入 系統管理 > 訪問紀錄 可以看到有兩個 Stream ,點進去看可以看到分別是 worker1 與 worker2

經由此測試可以發現 Cluster 試驗成功,因為 worker1 上或 worker2 上的 tomcat 都有兩個 session 在
接下來將 t1 shutdown ,然後在按 worker1 上的 IE 的訪問紀錄,可發現 session 已轉到 worker2 了。因為此 session 是由 worker1 複製過來的,所以 Name 被改為 127.0.0.1 了
後記 :
1. 經由此測試發現在 Windows XP 上無法模擬 Cluster (也許要改設定),有興趣的人可以試試在 Windows 2003 server 上試,但建議用 VMware 跑 Ubuntu,因為省錢又方便
2. Tomcat 6 的設定比 Tomcat 5 簡單多了,因為預設值都被 Tomcat container 處理掉了
3. Load Balance 除了用 mod_jk 外,好像也可以用 ProxyPass 的方式,改天再來試試看
HA 涉及的議題包含了軟體端的 Load Balance, Clustering 建置,硬體端的網路連線,磁碟空間配置。就硬體端而言,除了至少要有兩條網路線互相備援外,磁碟空間也必須做 replication 與備援才能有效的支援因外在因素而產生的影響。硬體端的 HA 可以有很多架構,但需要 $$ 去建置,這裡就不多講。
在軟體端方面,因為熟悉 J2EE 的架構,所以就選了非常 light weight 的 Apache HTTP Server 2.2.x 與 Tomcat 6.0.x 作為 load balance and clustering 的 instance.
Load Balance 設定
此部份用 Apache HTTP Server 就可做的到,這裡舉一個範例
Apache HTTP Server (HTTPs)
|
/ \
/ \
/ \
Tomcat 6.0.x(T1) Tomcat 6.0.x(T2)
這是最簡單的架構,透過 Apache HTTP Server ,便可以存取 T1 與 T2,然後可以在 T1 與 T2 的相同 JSP 放入不同的內容,以測試 Load Balance 的正確性
1. 下載 Apache HTTP Server 與 Tomcat 6.0.x (Windows version)
1.1 下載 Apache HTTP Server 2.2.x 並裝至 d:\Program Files。此版本含有 openssl ,用來產生 key 與 certificate for HTTPS 用
1.2 下載 Tomcat 6.0.x 並解壓縮到 d:\java 中。解壓縮時需解到兩個目錄,一個是
d:\java\apache-tomcat-6.0.16-t1,另一個是 d:\java\apache-tomcat-6.0.16-t2
2. 安裝 SSL
這個部份對大部分的人應該都滿陌生的,因為 SSL 有點小 tricky,除非你正式做過需 HTTPS 的案子,不然可能會搞糊塗。 這邊的 SSL 是針對 Apache HTTP Server 上的 SSL,不是 Tomcat 上的 SSL。Tomcat 的作法與 Apche HTTP Server 不同,用的工具也不同,但其 Certificate 是可以共用的,會在後面 Tomcat with SSL 時說明
2.1 去除 D:\Program Files\Apache Software Foundation\Apache2.2\conf\httpd.conf 中有關 SSL 的 #
#LoadModule ssl_module modules/mod_ssl.so
#Include conf/extra/httpd-ssl.conf
2.2 建立 CA Root Certificate 及 Server Certificate
什麼是 CA Root Certificate ,基本上就是老大發的通行證,若網站是經由此老大認證過,IE 或 Firefox 就會認得此憑證是老大發的,就不用懷疑其效力。這些老大通常都會審核申請憑證的公司的合法性,一般 User 也比較能放心去這些網站使用或消費。
但為何要建立 CA Root Certificate 呢,因為若要公司每台 Server 都需要 Certificate ,則每個 Certificate 都需要跟老大申請認證,這些都需要費用。若這些 Server 只是內部用,則可以自己當老大做一個 CA Root Certificate 然後認證自己發的 Server Certificate,這樣可以減少許多成本,也比較方便。用的時候只需要將老大的 CA Root Certificate 安裝到公司內部的 IE 或 Fixfox 就行了,凡經由 CA Root Certificate 認證過的 Server Certificate 都不會被詢問其 SSL的安全性問題,因為老大說了算 (不知道是否已經有人昏倒了)
建立 CA Root Certificate
d:\>cd D:\Program Files\Apache Software Foundation\Apache2.2\bin
d:>openssl genrsa -des3 -out ..\conf\caroot.key 2048
Loading 'screen' into random state - done Generating RSA private key, 2048 bit long modulus ...........+++ .+++ e is 65537 (0x10001) Enter pass phrase for ..\conf\caroot.key: Verifying - Enter pass phrase for ..\conf\caroot.key:
用 RSA 演算法+Triple Des Encryption (des3) 建立 CA root 的 key,強度為 2048bit。密碼請輸入 暫時輸入 changeit
d:>openssl req -config ..\conf\openssl.cnf -new -key ..\conf\caroot.key -out ..\conf\caroot.csr
Enter pass phrase for ..\conf\caroot.key: Loading 'screen' into random state - done You are about to be asked to enter information that will be incorporated into your certificate request. What you are about to enter is what is called a Distinguished Name or a DN. There are quite a few fields but you can leave some blank For some fields there will be a default value, If you enter '.', the field will be left blank.
----- Country Name (2 letter code) [AU]:TW
State or Province Name (full name) [Some-State]:Taiwan
Locality Name (eg, city) []:Taipei
Organization Name (eg, company) [Internet Widgits Pty Ltd]:My Company Inc.
Organizational Unit Name (eg, section) []:My Company Dept
Service Provider Common Name (eg, YOUR name) []:My Company Trust
Email Address []:
Please enter the following 'extra' attributes to be sent with your certificate request A challenge password []:
An optional company name []:
這裡是產生 CSR (Certificate Service Request),用以讓別的 CA 簽發憑證。因為是自己要用的 Root,所以等一下會自己簽自己。基本上所以有 CA Root 都是自己簽自己。
d:>openssl x509 -req -days 7305 -sha1 -extensions v3_ca -signkey ..\conf\caroot.key -in ..\conf\caroot.csr -out ..\conf\caroot.crt
Loading 'screen' into random state - done Signature ok subject=/C=TW/ST=Taiwan/L=Taipei/O=My Company/OU=My Company Dept/CN=My Company Trust/emailAddress=
Getting Private key
Enter pass phrase for ..\conf\caroot.key:
這裡就是自己簽自己的簽發憑證。若 double click ..\conf\caroot.crt 並安裝此憑證,可以打開 IE > 網際網路選項 > 內容 > 憑證 看到此憑證被放到根憑證的目錄中

PS : caroot.key 一定要保存好並記住密碼,不然掉了,所以憑證全部要重新簽發,很費時間。
建立 Server Certificate
當建立完 CA Root Certificate 後,再來就是要建立 Server Certificate 再用 CA Root Certificate 對 Server Certitificate 做簽發 (Sign)
d:>openssl genrsa -out ..\conf\server.key 2048
建立 Server 用的 key
d:>openssl req -config ..\conf\openssl.cnf -new -key ..\conf\server.key -out ..\conf\server.csr
Loading 'screen' into random state - done You are about to be asked to enter information that will be incorporated into your certificate request. What you are about to enter is what is called a Distinguished Name or a DN. There are quite a few fields but you can leave some blank For some fields there will be a default value, If you enter '.', the field will be left blank. -----
Country Name (2 letter code) [AU]:TW
State or Province Name (full name) [Some-State]:Taiwan
Locality Name (eg, city) []:Taipei
Organization Name (eg, company) [Internet Widgits Pty Ltd]:My Company Ltd
Organizational Unit Name (eg, section) []:RD Dept
Common Name (eg, YOUR name) []:www.mycompnay.com
Email Address []:
Please enter the following 'extra' attributes to be sent with your certificate request A challenge password []:
An optional company name []:
以上會建立申請簽章的檔案 server.csr,這裡需記得 Common Name 必須與 server 的 url domain name 一樣如 www.mycompany.com,這樣才能通過 IE 或 Firefox 的認證,否則會出現 warning。
d:>openssl x509 -req -days 3650 -sha1 -extensions v3_req -CA ..\conf\caroot.crt -CAkey ..\conf\caroot.key -CAcreateserial -in ..\conf\server.csr -out ..\conf\server.crt
Loading 'screen' into random state - done
Signature ok
subject=/C=TW/ST=Taiwan/L=Taipei/O=My Company Ltd/OU=RD Dept/CN=www.mycompnay.co m
Getting CA Private Key
Enter pass phrase for ..\conf\caroot.key:
這裡會用 caroot 簽發 server.csr 並產生 server.crt。double click server.crt 可得畫面如下

這裡可以發現,沒有 warning, 發行者是 CA Root ,有效是 10 年
2.3 重新啟動 Apache HTTP Server
因為產生 Server 的 certificate 檔名已經同步 conf/extra/httpd-ssl.conf 裡面所定義的命名方式,所以直接啟動 Apache HTTP Server 便可以使用 HTTPS (SSL)

3. 設定 load balance
3.1 下載 mod_jk (Tomcat 6.0.x for win32 版)。
下載完 mod_jk 後 請將檔名改為 mod_jk.so 並放到 D:\Program Files\Apache Software Foundation\Apache2.2\modules 中
3.2 在 D:\Program Files\Apache Software Foundation\Apache2.2\conf\extra 中新增一個檔案 httpd-load-balance.conf
內容如下
================================
#(httpd.conf)
#載入 mod_jk 模組
LoadModule jk_module modules/mod_jk.so
#
# Configure mod_jk
#
JkWorkersFile conf/workers.properties
JkMountFile conf/uriworkermap.properties
JkLogFile logs/mod_jk.log
JkLogLevel info
JkMount jkstatus
Order deny,allow
Deny from all
Allow from 127.0.0.1
===============================
3.3 在 D:\Program Files\Apache Software Foundation\Apache2.2\conf\httpd.conf 的最後新增一行
內容為
Include conf/extra/httpd-load-balance.conf
如此重新啟動 Apache HTTP Server 時才會把 load balance 的 module 放到 kernel 中執行
3.4 在 D:\Program Files\Apache Software Foundation\Apache2.2\conf 中新增一個檔案 workers.properties
內容為
=====================================
# The advanced router LB worker
worker.list=router,jkstatus
# Define a worker using ajp13
worker.worker1.port=8009
worker.worker1.host=localhost
worker.worker1.type=ajp13
worker.worker1.lbfactor=1
# Define prefered failover node for worker1
#worker.worker1.redirect=worker2
# Define another worker using ajp13
worker.worker2.port=9009
worker.worker2.host=localhost
worker.worker2.type=ajp13
worker.worker2.lbfactor=1
# Disable worker2 for all requests except failover
#worker.worker2.activation=disabled
# Define the LB worker
worker.router.type=lb
worker.router.balance_workers=worker1,worker2
# Define a 'jkstatus' worker using status
worker.jkstatus.type=status
====================================
這裡指定 worker1 為 T1, 用的 port 為 8009,worker2 為 T2,用的 port 為 9009
3.5 在 D:\Program Files\Apache Software Foundation\Apache2.2\conf 中新增一個檔案 uriworkermap.properties
內容為
===============================
/*=router
===============================
這裡會將 URI 為 /* 的 mapping 全部轉向 T1 或 T2
3.6 更改 T2 的設定檔
因為 T2 用的 port 還是 8009,需改為 9009 以配合 workers.properties 中的設定
修改 D:\java\apache-tomcat-6.0.16-t2\conf\server.xml 中的
line 22 port="8005" 改為 port="9005"
line 67 port="8080" 改為 port="9090"
line 89 port="8009" 改為 port="9009"
port 改成如此是因為要避免與 T1 衝突。
3.7 重新啟動 Apache HTTP Server 與 T1, T2
重新啟動 Apache HTTP Server 後再啟動 T1, T2,接下來打開 IE 將 URL 指向 http://localhost 可以得到

這裡可以看到跑的是 Apache Tomcat T2 (webapps\ROOT\index.html 有修改過),證明 Load Balance 已經開始作用中
3.8 啟動 SSL 的 Load Balance
這時候當 URL 指向 https://localhost 時,Tomcat 的畫面並不會跑出來,需要在
D:\Program Files\Apache Software Foundation\Apache2.2\conf\extra\httpd-ssl.conf
的 VirtualHost 裡面加上這一行
JkMountFile conf/uriworkermap.properties
然後重新啟動 Apache HTTP Server ,SSL 便可以做到 Load Balance 了
以下畫面是把 T2 Shutdown 後,Refresh IE 則會 Forward 到 T1 上

4. 設定 Tomcat 的 Clustering
若有人要OOXX,現在是一個好時機,因為在 Windows XP 上無法做 Clustering。花了幾乎快一個下午的時間試,也無法試出來用 2 個 Tomcat instance 跑在同一台機器,後來用 VMWare 跑 Ubuntu 8.10 然後在上面跑 2 個 Tomcat ,一切搞定。所以,Linux 實在非常適合做 Server。
話不多說,把 Ubuntu 8.10 跑起來後,利用 SSH 將兩個 tomcat 複製到 /opt 下
/$ cd /
/$ sudo mkdir /opt
/$ sudo chmod o+w opt
這樣才能在非 root 的使用者下將 tomcat 複製到 /opt
/opt$ ls -l
apache-tomcat-6.0.16-t1
apache-tomcat-6.0.16-t2
/opt$ chmod +x apache-tomcat-6.0.16-t1/bin/*.sh
/opt$ chmod +x apache-tomcat-6.0.16-t2/bin/*.sh
4.1 設定 Tomcat Cluster in server.xml
更改 /opt/apache-tomcat-6.0.16-t1/conf/server.xml
在 line 100 的 Engine 中加入 jvmRoute="worker1"
在 line 106 將 Cluster 的上下 comment !-- -- 拿掉
更改 /opt/apache-tomcat-6.0.16-t2/conf/server.xml
在 line 100 的 Engine 中加入 jvmRoute="worker2"
在 line 106 將 Cluster 的上下 comment !-- -- 拿掉
4.2 設定 web application
因之前有發表過 appfuse 2.0.2 for JPA ,所以就直接把 war 檔放到 t1 與 t2 的 webapps 下,也修改了 WEB-INF/classes/jdbc.properties 中的 localhost 為原本的 XP 上
4.3 啟動 Tomcat t1, t2
打開一個 xterm (應用程式 > 附屬應用程式 > 終端機 )
$ cd /opt/apache-tomat-6.0.16-t1/bin
/bin$ export JAVA_HOME=/usr/lib/jvm/java-6-sun
/bin$ ./catalina.sh run
打開另一個 xterm (應用程式 > 附屬應用程式 > 終端機 )
$ cd /opt/apache-tomat-6.0.16-t2/bin
/bin$ export JAVA_HOME=/usr/lib/jvm/java-6-sun
/bin$ ./catalina.sh run
這時候應該可以看到 t1, t2 會互相 talk 如下畫面

4.4 修改 Apache HTTP Server
因之前的 load balance 設定用的 tomcat 是 localhost ,但因 XP 無法支援,所以要將 D:\Program Files\Apache Software Foundation\Apache2.2\conf\workers.properties 中的
worker.worker1.host=localhost
worker.worker2.host=localhost
改為
worker.worker1.host=svn
worker.worker2.host=svn
PS : 此 svn 是 Ubuntu VM 上的 hostname
然後重新啟動 Apache HTTP Server
4.5 測試 Cluster
打開一個 IE 網址為 https://localhost/myprojectjpa-1.0-SNAPSHOT/然後用 admin/admin login,再進入 系統管理 > 訪問紀錄 可以看到用的是 worker1 的 tomat t1

再打開另一個 IE 網址為 https://localhost/myprojectjpa-1.0-SNAPSHOT/ 然後用 admin/admin login,再進入 系統管理 > 訪問紀錄 可以看到有兩個 Stream ,點進去看可以看到分別是 worker1 與 worker2

經由此測試可以發現 Cluster 試驗成功,因為 worker1 上或 worker2 上的 tomcat 都有兩個 session 在
接下來將 t1 shutdown ,然後在按 worker1 上的 IE 的訪問紀錄,可發現 session 已轉到 worker2 了。因為此 session 是由 worker1 複製過來的,所以 Name 被改為 127.0.0.1 了

後記 :
1. 經由此測試發現在 Windows XP 上無法模擬 Cluster (也許要改設定),有興趣的人可以試試在 Windows 2003 server 上試,但建議用 VMware 跑 Ubuntu,因為省錢又方便
2. Tomcat 6 的設定比 Tomcat 5 簡單多了,因為預設值都被 Tomcat container 處理掉了
3. Load Balance 除了用 mod_jk 外,好像也可以用 ProxyPass 的方式,改天再來試試看
Tuesday, December 9, 2008
Run appfuse 2.0.2 with JPA
最近發現一件事,似乎越來越多的軟體公司,若是用 J2EE + MVC 架構,以 JPA 取代 Hibernate 的情況越來越多。說實在的,看了一下 JPA 的 spec,跟以往 EJB 一樣,他是一個空殼子,真正的 implementation 可以是任何 framework。
目前看到的 JPA implementation 有 Hibernate 、TopLink 及 OpenJPA,在 appfuse 2.0.2 中用的是 Hibernate 最新版 3.3.0 GA 版,但在試 appfuse 2.0.2 with JPA 中發現一些問題,讓我摸索好久才試出來,提供那些卡住的人一些解法。試之前請先參考
Appfuse 2.0.2 安裝步驟(steps for appfuse 2.0.2 installation) 中的
1. 安裝 maven-2.0.9 及設定環境變數
1. 建立 appfuse 2.0.2 的 archetype 到 d:\projects 中
d:\projects> mvn archetype:create -DarchetypeGroupId=org.appfuse.archetypes -DarchetypeArtifactId=appfuse-basic-struts -DremoteRepositories=http://static.appfuse.org/releases -DarchetypeVersion=2.0.2 -DgroupId=com.mycompany.app -DartifactId=myprojectjpa
PS : 有別於之前的範例,這裡用 struts 2.0 作為 MVC 的 framework,artifactId 也改為 myprojectjpa,避免與之前的範例衝到
2. 安裝 mysql (若尚未安裝)
到 mysql 的網站下載 mysql for Windows 並安裝 (此時裝的是 v5.0.x )。root 的密碼暫定為 root
3. 修改 root 的密碼及更改 dao framework 為 jpa
3.1 因 預設在 myproject 中的 pom.xml 的 mysql 密碼為 "空白",所以必須將此部份的空白填入真正的 root 密碼,在做 install 時才能將 table 及 測試資料放到 mysql 的資料庫中。編輯 pom.xml 並在 line 975 修改
<jdbc.password> </jdbc.password> 為
<jdbc.password>root</jdbc.password> (假設 mysql root 的密碼為 root)
3.2 修改 line 938 將 hibernate 改成 jpa
3.3 修改 line 142 將 annotationconfiguration 改成 jpaconfiguration
3.4 這時候別急著跑 mvn jetty:run-war ,因為你一跑,會出現
javax.persistence.PersistenceException: No name provided and several persistence
units found
我因為這個 error 卡了 2,3 個小時,後來 google 後才知道要
3.4.1 remove D:\projects\myprojectjpa\src\main\resources\hibernate.cfg.xml
3.4.2 remove D:\projects\myprojectjpa\src\test\resources\hibernate.cfg.xml
3.4.3 remove D:\projects\myprojectjpa\src\main\resources\META-INF\persistence.xml
4. 取得 appfuse 的 source code 以便日後 debug 用
d:\projects> cd myproject
d:\projects\myproject> mvn appfuse:full-source
5. 利用 command line 啟動 appfuse
d:\projects\myproject> mvn clean jetty:run-war
執行 clean 的目的是要把 war 中的 hibernate.cfg.xml 清除掉,不然會造成 error
org.hibernate.DuplicateMappingException: Duplicate collection role mapping com.m
ycompany.app.model.User.roles
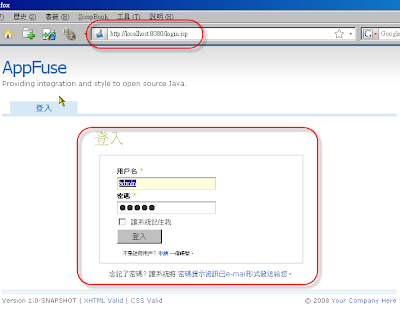
一旦執行此 mvn jetty:run-war,appfuse 就會直接啟動在 port 8080。此時可以用 firefox 檢測 appfuse 是否啟動成功。將 url 指向 http://localhost:8080 可以得到此畫面
目前看到的 JPA implementation 有 Hibernate 、TopLink 及 OpenJPA,在 appfuse 2.0.2 中用的是 Hibernate 最新版 3.3.0 GA 版,但在試 appfuse 2.0.2 with JPA 中發現一些問題,讓我摸索好久才試出來,提供那些卡住的人一些解法。試之前請先參考
Appfuse 2.0.2 安裝步驟(steps for appfuse 2.0.2 installation) 中的
1. 安裝 maven-2.0.9 及設定環境變數
1. 建立 appfuse 2.0.2 的 archetype 到 d:\projects 中
d:\projects> mvn archetype:create -DarchetypeGroupId=org.appfuse.archetypes -DarchetypeArtifactId=appfuse-basic-struts -DremoteRepositories=http://static.appfuse.org/releases -DarchetypeVersion=2.0.2 -DgroupId=com.mycompany.app -DartifactId=myprojectjpa
PS : 有別於之前的範例,這裡用 struts 2.0 作為 MVC 的 framework,artifactId 也改為 myprojectjpa,避免與之前的範例衝到
到 mysql 的網站下載 mysql for Windows 並安裝 (此時裝的是 v5.0.x )。root 的密碼暫定為 root
3. 修改 root 的密碼及更改 dao framework 為 jpa
3.1 因 預設在 myproject 中的 pom.xml 的 mysql 密碼為 "空白",所以必須將此部份的空白填入真正的 root 密碼,在做 install 時才能將 table 及 測試資料放到 mysql 的資料庫中。編輯 pom.xml 並在 line 975 修改
<jdbc.password>
<jdbc.password>root</jdbc.password> (假設 mysql root 的密碼為 root)
3.2 修改 line 938 將 hibernate 改成 jpa
3.3 修改 line 142 將 annotationconfiguration 改成 jpaconfiguration
3.4 這時候別急著跑 mvn jetty:run-war ,因為你一跑,會出現
javax.persistence.PersistenceException: No name provided and several persistence
units found
我因為這個 error 卡了 2,3 個小時,後來 google 後才知道要
3.4.1 remove D:\projects\myprojectjpa\src\main\resources\hibernate.cfg.xml
3.4.2 remove D:\projects\myprojectjpa\src\test\resources\hibernate.cfg.xml
3.4.3 remove D:\projects\myprojectjpa\src\main\resources\META-INF\persistence.xml
4. 取得 appfuse 的 source code 以便日後 debug 用
d:\projects> cd myproject
d:\projects\myproject> mvn appfuse:full-source
執行 clean 的目的是要把 war 中的 hibernate.cfg.xml 清除掉,不然會造成 error
org.hibernate.DuplicateMappingException: Duplicate collection role mapping com.m
ycompany.app.model.User.roles
一旦執行此 mvn jetty:run-war,appfuse 就會直接啟動在 port 8080。此時可以用 firefox 檢測 appfuse 是否啟動成功。將 url 指向 http://localhost:8080 可以得到此畫面

Saturday, December 6, 2008
Run appfuse 2.0.2 in NetBeans 6.5
在 NetBeans 6.1 跑 appfuse 2.0.2 幾乎是不可能,試了半天總是碰壁,但到了 NetBeans 6.5,就像變魔術一般,跑的特別順,尤其是改 jsp 時,不用像 eclipse 需要改 snapshot 裡面的 jsp。在 NetBeans 6.5 可以直接修改 jsp 後在 firefox 中按 F5 就會立即反應改過的結果,對於開發者而言,實在助益不少。以下就 NetBeans 6.5 跑 appfuse 2.0.2 的步驟做一說明
使用 NetBeans 6.5 前,必須先把 appfuse 2.0.2 先安裝好。安裝的步驟可參考
Appfuse 2.0.2 安裝步驟(steps for appfuse 2.0.2 installation)
1. 安裝 NetBeans 6.5
下載 NetBeans 6.5 後安裝到 d:\Java\NetBeans 6.5 下。安裝時須確認裝的元件含 Java Web and EE,及 Run time server Tomcat 6.0.x ,如此跑 appfuse 2.0.2 時才能指定 Tomcat server 為其 Rune time server。
PS : 若你是用 JDK 6.0 Update 10 以上的版本,可以更改 d:\Java\NetBeans 6.5\etc\netbeans.conf 中的 netbeans_default_options (line 6) 在最後加上
--laf com.sun.java.swing.plaf.nimbus.NimbusLookAndFeel
可以將 NetBeans 的外觀換成新的介面如下
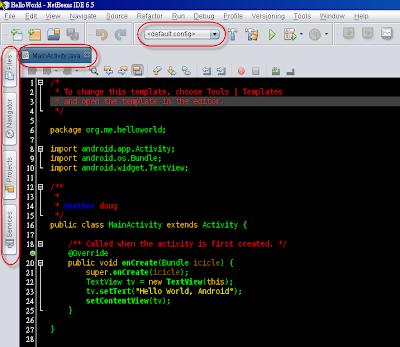
此介面比舊的 Windows 好看多了
2. 安裝 maven plugin
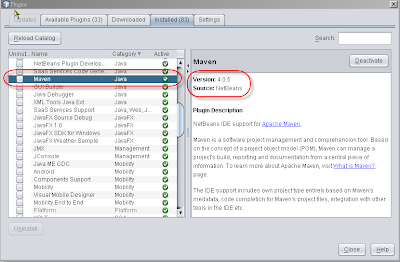
安裝完 NetBeans 6.5 後,可透過 Tools > Plugins > Available Plugins 安裝 maven plugin。安裝完可得以下畫面
3. 匯入 myproject 到 NetBeans 6.5 中
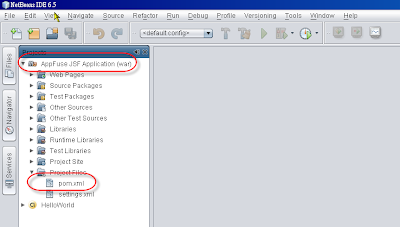
基本上這也不是匯入,因為已經裝了 maven plugin 的關係,可以透過 File > Open Project 的方式就可以直接打開 myproject 了
4. 設定 Rumtime Server
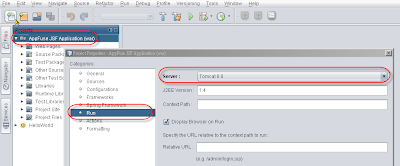
把 myproject 匯入到 NetBeans 後,預設並不會指定 Runtime Server ,這時候需透過 右鍵按Appfuse JSF Application > Properties > Run 去指定 Server。這邊請先設定為 Tomcat 6.0
5. 啟動 Appfuse web application
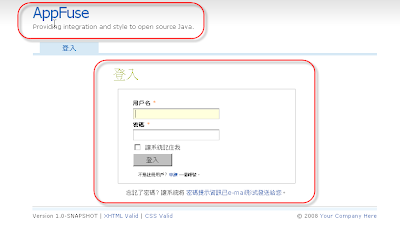
當 1-4 設定完成後,可以按 F6 ,Appfuse 就會立即 compile 並 deploy 到 Tomcat 6.0 上且直接帶出 Firefox (或 IE) 顯示 Appfuse 的完整功能
Tips
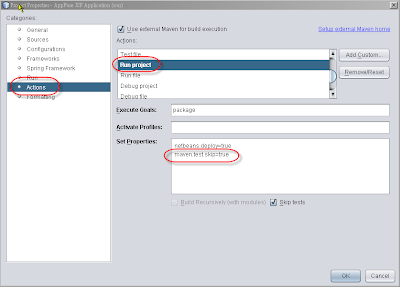
1. 每次按 F6 時,maven 都會先跑 testcase 後再 deploy 到 tomcat 上,若要跳過 testcase ,可以透過 右鍵按Appfuse JSF Application > Properties > Action > Run project > Set Properties 加入 maven.test.skip=true 即可以跳過 testcase
2. 當修改 java code 後按 F6 重新 deploy appfuse 到 tomcat ,會發現 2 次後便會發生
java.lang.OutOfMemoryError: PermGen space
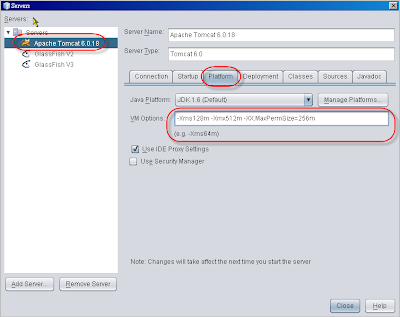
的錯誤訊息,此時便無法重新 deploy appfuse ,必須透過 Task Manager 將手動 Tomcat 除掉後再重新 deploy 一次,造成很大的不便。這個問題可以透過 Tools > Servers > Apache Tomcat 6.0.18 > Platform(tab) > VM options 加入 -XX:MaxPermSize=256m 便可以至少 redeploy appfuse 至少 10 次以上,減少除掉 Tomcat 所需花費的時間。
運用這兩個 Tips ,應該可以減少一下開發時的麻煩,把時間花在功能的開發上。
使用 NetBeans 6.5 前,必須先把 appfuse 2.0.2 先安裝好。安裝的步驟可參考
Appfuse 2.0.2 安裝步驟(steps for appfuse 2.0.2 installation)
1. 安裝 NetBeans 6.5
下載 NetBeans 6.5 後安裝到 d:\Java\NetBeans 6.5 下。安裝時須確認裝的元件含 Java Web and EE,及 Run time server Tomcat 6.0.x ,如此跑 appfuse 2.0.2 時才能指定 Tomcat server 為其 Rune time server。
PS : 若你是用 JDK 6.0 Update 10 以上的版本,可以更改 d:\Java\NetBeans 6.5\etc\netbeans.conf 中的 netbeans_default_options (line 6) 在最後加上
--laf com.sun.java.swing.plaf.nimbus.NimbusLookAndFeel
可以將 NetBeans 的外觀換成新的介面如下

此介面比舊的 Windows 好看多了
2. 安裝 maven plugin
安裝完 NetBeans 6.5 後,可透過 Tools > Plugins > Available Plugins 安裝 maven plugin。安裝完可得以下畫面

3. 匯入 myproject 到 NetBeans 6.5 中
基本上這也不是匯入,因為已經裝了 maven plugin 的關係,可以透過 File > Open Project 的方式就可以直接打開 myproject 了

4. 設定 Rumtime Server
把 myproject 匯入到 NetBeans 後,預設並不會指定 Runtime Server ,這時候需透過 右鍵按Appfuse JSF Application > Properties > Run 去指定 Server。這邊請先設定為 Tomcat 6.0

5. 啟動 Appfuse web application
當 1-4 設定完成後,可以按 F6 ,Appfuse 就會立即 compile 並 deploy 到 Tomcat 6.0 上且直接帶出 Firefox (或 IE) 顯示 Appfuse 的完整功能

Tips
1. 每次按 F6 時,maven 都會先跑 testcase 後再 deploy 到 tomcat 上,若要跳過 testcase ,可以透過 右鍵按Appfuse JSF Application > Properties > Action > Run project > Set Properties 加入 maven.test.skip=true 即可以跳過 testcase

2. 當修改 java code 後按 F6 重新 deploy appfuse 到 tomcat ,會發現 2 次後便會發生
java.lang.OutOfMemoryError: PermGen space
的錯誤訊息,此時便無法重新 deploy appfuse ,必須透過 Task Manager 將手動 Tomcat 除掉後再重新 deploy 一次,造成很大的不便。這個問題可以透過 Tools > Servers > Apache Tomcat 6.0.18 > Platform(tab) > VM options 加入 -XX:MaxPermSize=256m 便可以至少 redeploy appfuse 至少 10 次以上,減少除掉 Tomcat 所需花費的時間。

運用這兩個 Tips ,應該可以減少一下開發時的麻煩,把時間花在功能的開發上。
Appfuse 2.0.2 安裝步驟(steps for appfuse 2.0.2 installation)
Appfuse 2.0.2 理論上不是一個 framework,而是一個已經 ready to go 的 project prototype。它集合了最穩定與先進的 framework 再加上最基本的 ACL,Menu ,讓 developer 不用從頭開始建構一個 project 的基礎架構。它的 build tool 用的是 Maven,所以無論在做 demo、test、ContinuousIntegration 都不用在額外撰寫新的,直接使用或就現有的架構再做擴充便可以上手。
以下為安裝 appfuse 2.0.2 的簡單步驟,不用十分鐘(除了喝 coffee 的時間),你就有一個可以 login 、manage user 、 upload file 基本功能的 web application 出現在你的電腦上。
1. 安裝 maven-2.0.9 及設定環境變數
下載 maven-2.0.9 到 d:\Java (目錄為 d:\Java\apache-maven-2.0.9)
set M2=D:\Java\apache-maven-2.0.9\bin
set M2_HOME=D:\Java\apache-maven-2.0.9
set MAVEN_OPTS=-Xms256m -Xmx512m
set PATH=%M2%;%PATH%
編輯 d:\Java\apache-maven-2.0.9\conf\settting.xml
line 49 將 localrepository 的內容改成 D:\Java\apache-maven-2.0.9\repository
PS:因 maven 預設值會將 repository 放到 c:\Document2 and Settings\.m2 中,這樣用不同的人 login ,其 repository 就需要跟著異動。放到 d:\Java\apache2-maven-2.0.9\repository 的好處在於將來 team 可以用同樣的設定作業,避免因環境的不同而需要花額外的時間做環境設定
2. 建立 appfuse 2.0.2 的 archetype 到 d:\projects 中
d:\projects> mvn archetype:create -DarchetypeGroupId=org.appfuse.archetypes -DarchetypeArtifactId=appfuse-basic-jsf -DremoteRepositories=http://static.appfuse.org/releases -DarchetypeVersion=2.0.2 -DgroupId=com.mycompany.app -DartifactId=myproject
PS : 此時可以去喝一杯咖啡了,因為要很久。若要節省時間,可以下載 dependency 並解壓縮到 d:\Java\apache-maven-2.0.9\repository
3. 取得 appfuse 的 source code 以便日後 debug 用
d:\projects> cd myproject
d:\projects\myproject> mvn appfuse:full-source
4. 安裝 mysql
到 mysql 的網站下載 mysql for Windows 並安裝 (此時裝的是 v5.0.x )。root 的密碼暫定為 root
5. 修改 root 的密碼
因 預設在 myproject 中的 pom.xml 的 mysql 密碼為 "空白",所以必須將此部份的空白填入真正的 root 密碼,在做 install 時才能將 table 及 測試資料放到 mysql 的資料庫中。編輯 pom.xml 並在 line 982 修改 <jdbc.password> </jdbc.password> 為 <jdbc.password>root</jdbc.password> (假設 mysql root 的密碼為 root)
6. 利用 command line 啟動 appfuse
一旦執行此 mvn jetty:run-war,appfuse 就會直接啟動在 port 8080。此時可以用 firefox 檢測 appfuse 是否啟動成功。將 url 指向 http://localhost:8080 可以得到此畫面
簡單的 6 個步驟,你就有一個功能陽春的 prototype 可以使用,但是若要真的用在 project 上,建議需要有至少 1 年以上的 web 開發功力再使用這一套,因為裡面用的是 MVC + ACEGI + AJAX ,光摸熟這一套就需要花約 2 星期的工夫,但一旦摸熟,則無往不利,因為要加新的功能,除了 domain 的 knowledge 以外,用套的就可以了。
以下為安裝 appfuse 2.0.2 的簡單步驟,不用十分鐘(除了喝 coffee 的時間),你就有一個可以 login 、manage user 、 upload file 基本功能的 web application 出現在你的電腦上。
1. 安裝 maven-2.0.9 及設定環境變數
下載 maven-2.0.9 到 d:\Java (目錄為 d:\Java\apache-maven-2.0.9)
set M2=D:\Java\apache-maven-2.0.9\bin
set M2_HOME=D:\Java\apache-maven-2.0.9
set MAVEN_OPTS=-Xms256m -Xmx512m
set PATH=%M2%;%PATH%
編輯 d:\Java\apache-maven-2.0.9\conf\settting.xml
line 49 將 localrepository 的內容改成 D:\Java\apache-maven-2.0.9\repository
PS:因 maven 預設值會將 repository 放到 c:\Document2 and Settings\
2. 建立 appfuse 2.0.2 的 archetype 到 d:\projects 中
d:\projects> mvn archetype:create -DarchetypeGroupId=org.appfuse.archetypes -DarchetypeArtifactId=appfuse-basic-jsf -DremoteRepositories=http://static.appfuse.org/releases -DarchetypeVersion=2.0.2 -DgroupId=com.mycompany.app -DartifactId=myproject
PS : 此時可以去喝一杯咖啡了,因為要很久。若要節省時間,可以下載 dependency 並解壓縮到 d:\Java\apache-maven-2.0.9\repository
3. 取得 appfuse 的 source code 以便日後 debug 用
d:\projects\myproject> mvn appfuse:full-source
4. 安裝 mysql
到 mysql 的網站下載 mysql for Windows 並安裝 (此時裝的是 v5.0.x )。root 的密碼暫定為 root
5. 修改 root 的密碼
因 預設在 myproject 中的 pom.xml 的 mysql 密碼為 "空白",所以必須將此部份的空白填入真正的 root 密碼,在做 install 時才能將 table 及 測試資料放到 mysql 的資料庫中。編輯 pom.xml 並在 line 982 修改 <jdbc.password>
6. 利用 command line 啟動 appfuse
一旦執行此 mvn jetty:run-war,appfuse 就會直接啟動在 port 8080。此時可以用 firefox 檢測 appfuse 是否啟動成功。將 url 指向 http://localhost:8080 可以得到此畫面
簡單的 6 個步驟,你就有一個功能陽春的 prototype 可以使用,但是若要真的用在 project 上,建議需要有至少 1 年以上的 web 開發功力再使用這一套,因為裡面用的是 MVC + ACEGI + AJAX ,光摸熟這一套就需要花約 2 星期的工夫,但一旦摸熟,則無往不利,因為要加新的功能,除了 domain 的 knowledge 以外,用套的就可以了。
Tuesday, December 2, 2008
如何在 eclipse 3.4 下跑 appfuse 2.0.2
因為工作性質的關係(一堆同時進行的專案),在系統的開發上需要有效率的執行,不能每次都從頭來,但已做過的專案又會因其特性的不同而造成 reuse 的機會降低,所以當時找了一個不是 framework 的 framework 當作開發的 initial startup ,裡面含有當下最新的技術,不用在自行組裝要用的 package,以降低開發時所需的時間與精力
Appfuse 目前最新版的是 2.0.2 ,用的整合工具是 maven 2.0.x ,但只能用 command line 做 build 及 run ,無法直接用在 IDE 的環境上。說實在的,借由 IDE 的輔助,可以省掉一些 coding 的時間,尤其是在 gen getxx 與 setxx 的 java code 時,助益不少
經我測試過,Appfuse 2.0.2 在 Netbeans 6.5 下完全沒有問題,可見 Netbeans 越來越成熟了,但在 eclipse 3.4 下則必須還要做些微修正才能符合 eclipse 的環境,做到 hot deployment 及減少修改 code 後還要重新 deployment 所浪費的時間
以下為修改步驟以便讓 appfuse 2.0.2 適用於 eclipse 3.4
PS : 請先安裝 JDK1.6, eclipse 3.4 JEE, maven 2.0.9, m2eclipse, mysql
1. 安裝 eclipse 3.4
下載 eclipse 3.4 並解壓縮到 d:\Java (目錄為 d:\Java\eclipse)
利用 eclipse 的 Help > Software Update > Available Software > Add site 安裝 m2eclipse plugin。
此 plugin 的 url 為 http://m2eclipse.sonatype.org/update/
2. 安裝 maven-2.0.9 及設定環境變數
下載 maven-2.0.9 到 d:\Java (目錄為 d:\Java\apache-maven-2.0.9)
set M2=D:\Java\apache-maven-2.0.9\bin
set M2_HOME=D:\Java\apache-maven-2.0.9
set MAVEN_OPTS=-Xms256m -Xmx512m
set PATH=%M2%;%PATH%
編輯 d:\Java\apache-maven-2.0.9\conf\settting.xml
line 49 將 localrepository 的內容改成 D:\Java\apache-maven-2.0.9\repository
PS:因 maven 預設值會將 repository 放到 c:\Document2 and Settings\.m2 中,這樣用不同的人 login ,其 repository 就需要跟著異動。放到 d:\Java\apache2-maven-2.0.9\repository 的好處在於將來 team 可以用同樣的設定作業,避免因環境的不同而需要花額外的時間做環境設定
3. 建立 appfuse 2.0.2 的 archetype
d:\projects> mvn archetype:create -DarchetypeGroupId=org.appfuse.archetypes -DarchetypeArtifactId=appfuse-basic-jsf -DremoteRepositories=http://static.appfuse.org/releases -DarchetypeVersion=2.0.2 -DgroupId=com.mycompany.app -DartifactId=myproject
PS : 此時可以去喝一杯咖啡了,因為要很久。若要節省時間,可以下載 dependency 並解壓縮到 d:\Java\apache-maven-2.0.9\repository
4. 取得 appfuse 的 source code 以便日後 debug 用
d:\projects> cd myproject
d:\projects\myproject> mvn appfuse:full-source
5. 修改 root 的密碼
因 預設在 myproject 中的 pom.xml 的 mysql 密碼為 "空白",所以必須將此部份的空白填入真正的 root 密碼,在做 install 時才能將 table 及 測試資料放到 mysql 的資料庫中。編輯 pom.xml 並在 line 982 修改 <jdbc.password> </jdbc.password> 為 <jdbc.password>root</jdbc.password> (假設 mysql root 的密碼為 root)
6. 利用 command line 啟動 appfuse
一旦執行此 mvn jetty:run,appfuse 就會直接啟動在 port 8080。此時可以用 firefox 檢測 appfuse 是否啟動成功。將 url 指向 http://localhost:8080 可以得到此畫面
7. 匯入 myproject 到 eclipse 中
確認 appfuse 執行無誤後, 請執行
d:\projects\myproject> mvn eclipse:eclipse
這時候會在 d:\projects\myproject 目錄下產生 .settings 目錄及 .project, .classpath 檔
然後打開 eclipse ,利用 File > Import > General > Maven Projects 再將 Root Directory 指到 d:\projects\myproject 再按 Finish
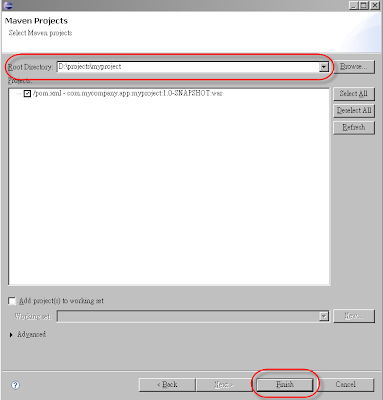
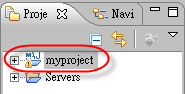
這裡可看到 myproject 已經被匯入到 eclipse 中了
8. 修改 eclipse WTP 專用的設定檔
若要讓 appfuse 可以在 eclipse WTP 上執行,必須做稍微的修正,才能直接在 eclipse 上啟動 tomcat 並 deploy appfuse
修改 .setting\org.eclipse.wst.common.component
刪除 <wb-resource deploy-path="/" source-path="src/main/webapp"/>
刪除 <wb-resource deploy-path="/" source-path="src/main/resource"/>
增加
修改 .classpath
刪 除 <classpathentry kind="src" path="src/main/resources" excluding="ApplicationResources_de.properties|ApplicationResources_fr.properties|ApplicationResources_ko.properties|ApplicationResources_nl.properties|ApplicationResources_no.properties|ApplicationResources_pt*.properties|ApplicationResources_tr.properties|ApplicationResources_zh*.properties|applicationContext- resources.xml|**/*.java"/>
增 加 <classpathentry kind="con" path="org.eclipse.jst.server.core.container/org.eclipse.jst.server.tomcat.runtimeTarget/Apache Tomcat v6.0"/>
增加 <classpathentry kind="con" path="org.eclipse.jst.j2ee.internal.web.container"/>
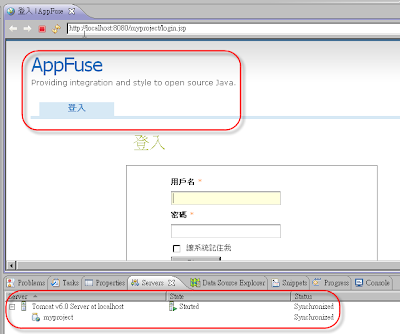
9. 注意事項
9.1 若要改 jsp ,必須改 target/myproject-1.0-SNAPSHOT 下面的 jsp 檔,測試完後再 copy 回 src\main\webapp 下,因為修改後的 WTP 只吃 target/myproject-1.0-SNAPSHOT 下的 jsp。
9.2 若改 jsp 後 refresh browser 無法立即呈現修改後的狀態,需要 close myproject 在 open myrpoejct。這是因為手動改 wtp 設定檔,需 reopen myproject 才行
Appfuse 目前最新版的是 2.0.2 ,用的整合工具是 maven 2.0.x ,但只能用 command line 做 build 及 run ,無法直接用在 IDE 的環境上。說實在的,借由 IDE 的輔助,可以省掉一些 coding 的時間,尤其是在 gen getxx 與 setxx 的 java code 時,助益不少
經我測試過,Appfuse 2.0.2 在 Netbeans 6.5 下完全沒有問題,可見 Netbeans 越來越成熟了,但在 eclipse 3.4 下則必須還要做些微修正才能符合 eclipse 的環境,做到 hot deployment 及減少修改 code 後還要重新 deployment 所浪費的時間
以下為修改步驟以便讓 appfuse 2.0.2 適用於 eclipse 3.4
PS : 請先安裝 JDK1.6, eclipse 3.4 JEE, maven 2.0.9, m2eclipse, mysql
1. 安裝 eclipse 3.4
下載 eclipse 3.4 並解壓縮到 d:\Java (目錄為 d:\Java\eclipse)
利用 eclipse 的 Help > Software Update > Available Software > Add site 安裝 m2eclipse plugin。
此 plugin 的 url 為 http://m2eclipse.sonatype.org/update/
2. 安裝 maven-2.0.9 及設定環境變數
下載 maven-2.0.9 到 d:\Java (目錄為 d:\Java\apache-maven-2.0.9)
set M2=D:\Java\apache-maven-2.0.9\bin
set M2_HOME=D:\Java\apache-maven-2.0.9
set MAVEN_OPTS=-Xms256m -Xmx512m
set PATH=%M2%;%PATH%
編輯 d:\Java\apache-maven-2.0.9\conf\settting.xml
line 49 將 localrepository 的內容改成 D:\Java\apache-maven-2.0.9\repository
PS:因 maven 預設值會將 repository 放到 c:\Document2 and Settings\
3. 建立 appfuse 2.0.2 的 archetype
d:\projects> mvn archetype:create -DarchetypeGroupId=org.appfuse.archetypes -DarchetypeArtifactId=appfuse-basic-jsf -DremoteRepositories=http://static.appfuse.org/releases -DarchetypeVersion=2.0.2 -DgroupId=com.mycompany.app -DartifactId=myproject
PS : 此時可以去喝一杯咖啡了,因為要很久。若要節省時間,可以下載 dependency 並解壓縮到 d:\Java\apache-maven-2.0.9\repository
4. 取得 appfuse 的 source code 以便日後 debug 用
d:\projects\myproject> mvn appfuse:full-source
5. 修改 root 的密碼
因 預設在 myproject 中的 pom.xml 的 mysql 密碼為 "空白",所以必須將此部份的空白填入真正的 root 密碼,在做 install 時才能將 table 及 測試資料放到 mysql 的資料庫中。編輯 pom.xml 並在 line 982 修改 <jdbc.password>
6. 利用 command line 啟動 appfuse
一旦執行此 mvn jetty:run,appfuse 就會直接啟動在 port 8080。此時可以用 firefox 檢測 appfuse 是否啟動成功。將 url 指向 http://localhost:8080 可以得到此畫面
7. 匯入 myproject 到 eclipse 中
確認 appfuse 執行無誤後, 請執行
d:\projects\myproject> mvn eclipse:eclipse
這時候會在 d:\projects\myproject 目錄下產生 .settings 目錄及 .project, .classpath 檔
然後打開 eclipse ,利用 File > Import > General > Maven Projects 再將 Root Directory 指到 d:\projects\myproject 再按 Finish


這裡可看到 myproject 已經被匯入到 eclipse 中了
8. 修改 eclipse WTP 專用的設定檔
若要讓 appfuse 可以在 eclipse WTP 上執行,必須做稍微的修正,才能直接在 eclipse 上啟動 tomcat 並 deploy appfuse
修改 .setting\org.eclipse.wst.common.component
刪除 <wb-resource deploy-path="/" source-path="src/main/webapp"/>
刪除 <wb-resource deploy-path="/" source-path="src/main/resource"/>
增加
刪 除 <classpathentry kind="src" path="src/main/resources" excluding="ApplicationResources_de.properties|ApplicationResources_fr.properties|ApplicationResources_ko.properties|ApplicationResources_nl.properties|ApplicationResources_no.properties|ApplicationResources_pt*.properties|ApplicationResources_tr.properties|ApplicationResources_zh*.properties|applicationContext- resources.xml|**/*.java"/>

9. 注意事項
9.1 若要改 jsp ,必須改 target/myproject-1.0-SNAPSHOT 下面的 jsp 檔,測試完後再 copy 回 src\main\webapp 下,因為修改後的 WTP 只吃 target/myproject-1.0-SNAPSHOT 下的 jsp。
9.2 若改 jsp 後 refresh browser 無法立即呈現修改後的狀態,需要 close myproject 在 open myrpoejct。這是因為手動改 wtp 設定檔,需 reopen myproject 才行
Thursday, November 27, 2008
Android Plugin in Netbeans 6.5
Android for Netbeans 的 plugin 終於出現了,雖然 Android 官方網站只推出支援 eclipse 的 plugin ,但畢竟 Netbeans 也越來越多人使用,Google 應該也推出 Netbeans 的 plugin 才對,可能是 resource 不夠吧。
目前的 release 版本只能算是 beta 版,因為在 Linux 此 plugin 運作沒有問題,但在 Windows 上還要做些微的修改才能順利的使用此 plugin。以下為使用此 plugin 的步驟
1. 安裝 IDE 與 Android SDK 軟體
下載 NetBeans 6.5 並安裝到 d:\Java\NetBeans 6.5
下載 Android Windows SDK 並安裝到 d:\Java\android-sdk-windows-1.0_r1
2. 安裝 Android plugin
啟動 NetBeans 6.5,點選 Tools > Plugins > Settings > Add
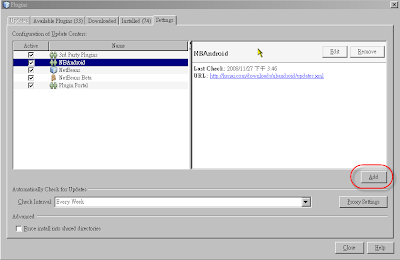
然後在 dialog 加入 nbandroid 的 URL http://kenai.com/downloads/nbandroid/updates.xml
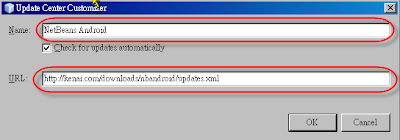
這時候可以在 Available-plugin 中找到 Android 的 plugin 並按 Install 安裝
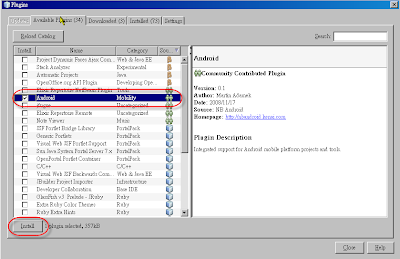
3. Hello Word, Android
既然 plugin 裝好了,就順便寫一個初學者最常用的程式 Hello World。在 NetBeans 中按
File > New Project > Android > Android Application
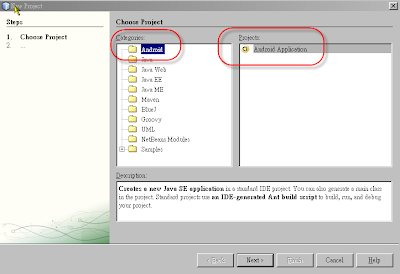
按 Next 會出現 New Android Application 的畫面,在此畫面,請填入如下畫面
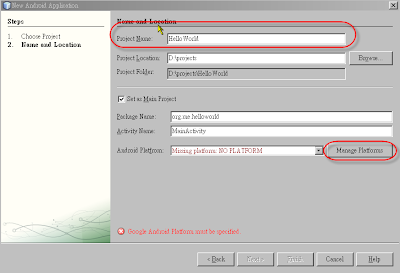
在畫面下面可以看見紅字部份,此部份是因為尚未設定 Android Platform 的關係,此時可以按 Manage Platforms > Add Platform... 來新增 Android Platform
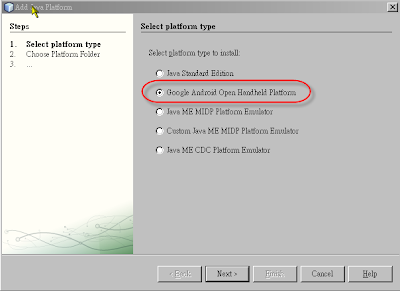
點選 Google Android Open Handheld Platform 按 Next,
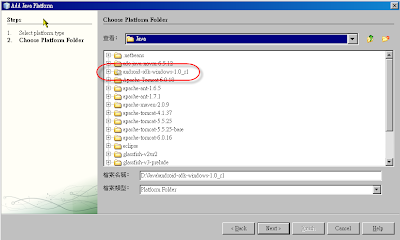
在 Platform folder 選擇 d:\Java\android-sdk-windows-1.0_r1 後按 Next
按 Next 後,出現 Platform 的命名,在 Name 上用預設值按 Finish,Android Platform 便可新增完成
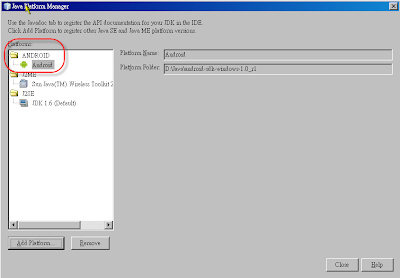
按 Close 後,返回 New Android Application 後,Android Platform 會自動選擇
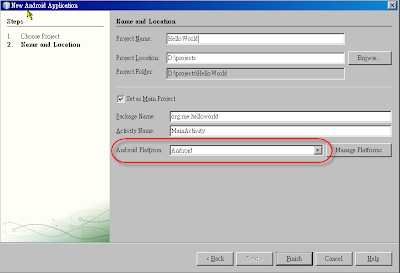
按 Finish 後,就可以開始寫 Android 的 Hello World 程式了
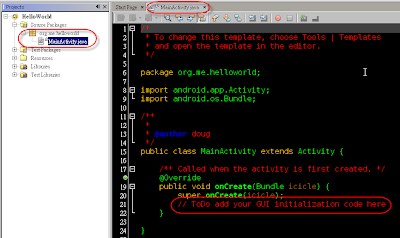
將 Todo 那一行換成以下三行
TextView tv = new TextView(this);
tv.setText("Hello World, Android");
setContentView(tv);
PS : 請記得 import android.widget.TextView;
此時按 Run 會發現模擬器雖然跑出來了,但並不會將 Hello World deploy 到模擬器中
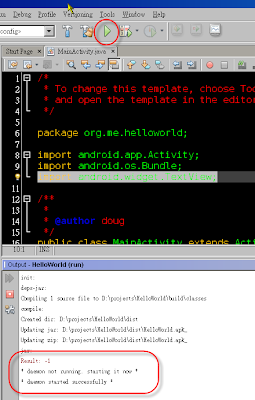
這是因為此 plug in 有一個 bug,要修正此 bug ,可以手動修改 D:\projects\HelloAndroid\nbproject\build-impl.xml 檔將 line 466~468 換成以下內容

然後再按 Run ,便可以出現剛剛寫的 Hellow World, Android 畫面
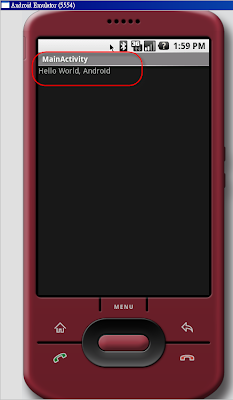
4. 更改 skin
若想試試不同的 Android skin ,可以在 D:\projects\HelloAndroid\build.xml 中增加一個 property 去設定要用的 screen.skin 為何,在此我用的 skin 為
則模擬器會出現 QVGA-L 型號的畫面

PS : 寫此 blog 時,此 plug in 的修正尚未 publish
目前的 release 版本只能算是 beta 版,因為在 Linux 此 plugin 運作沒有問題,但在 Windows 上還要做些微的修改才能順利的使用此 plugin。以下為使用此 plugin 的步驟
1. 安裝 IDE 與 Android SDK 軟體
下載 NetBeans 6.5 並安裝到 d:\Java\NetBeans 6.5
下載 Android Windows SDK 並安裝到 d:\Java\android-sdk-windows-1.0_r1
2. 安裝 Android plugin
啟動 NetBeans 6.5,點選 Tools > Plugins > Settings > Add

然後在 dialog 加入 nbandroid 的 URL http://kenai.com/downloads/nbandroid/updates.xml

這時候可以在 Available-plugin 中找到 Android 的 plugin 並按 Install 安裝

3. Hello Word, Android
既然 plugin 裝好了,就順便寫一個初學者最常用的程式 Hello World。在 NetBeans 中按
File > New Project > Android > Android Application

按 Next 會出現 New Android Application 的畫面,在此畫面,請填入如下畫面

在畫面下面可以看見紅字部份,此部份是因為尚未設定 Android Platform 的關係,此時可以按 Manage Platforms > Add Platform... 來新增 Android Platform

點選 Google Android Open Handheld Platform 按 Next,
在 Platform folder 選擇 d:\Java\android-sdk-windows-1.0_r1 後按 Next

按 Next 後,出現 Platform 的命名,在 Name 上用預設值按 Finish,Android Platform 便可新增完成

按 Close 後,返回 New Android Application 後,Android Platform 會自動選擇

按 Finish 後,就可以開始寫 Android 的 Hello World 程式了

將 Todo 那一行換成以下三行
TextView tv = new TextView(this);
tv.setText("Hello World, Android");
setContentView(tv);
PS : 請記得 import android.widget.TextView;
此時按 Run 會發現模擬器雖然跑出來了,但並不會將 Hello World deploy 到模擬器中

這是因為此 plug in 有一個 bug,要修正此 bug ,可以手動修改 D:\projects\HelloAndroid\nbproject\build-impl.xml 檔將 line 466~468 換成以下內容

然後再按 Run ,便可以出現剛剛寫的 Hellow World, Android 畫面

4. 更改 skin
若想試試不同的 Android skin ,可以在 D:\projects\HelloAndroid\build.xml 中增加一個 property 去設定要用的 screen.skin 為何,在此我用的 skin 為
QVGA-P

則模擬器會出現 QVGA-L 型號的畫面

PS : 寫此 blog 時,此 plug in 的修正尚未 publish
Subscribe to:
Posts (Atom)